Features/Use Cases
Features are basically a description of the product complete functionality. In general terms a feature is something you would like to share with your customers and prospective customers. While a use case is a way by which a customer achieves their goal using our products feature. Use cases are a way to document a specific type of requirements.
This document will take you through configuring all available LoginRadius features on the Hosted page including Admin Console configurations and customization. You can simply follow this document in order to configure any of the features on the Hosted page like Social Login, Phone Authentication, Risk-Based Authentication, etc.
- Phone Authentication
- Account Linking
- Multi-Factor Authentication
- Passwordless Authentication
- One Touch Login
- Update Phone ID
- Privacy Policy
- Custom Object
- Social Login
Phone Authentication
It may be useful to tie the accounts to a phone number, such as when your main product is a mobile app and you want your users to go through a registration process. In this case, allowing them to register by providing a phone number and password for registration as opposed to an email and password might be a better experience. You can find the settings on the Admin Console, follow the Phone Login Configuration document here.
Phone Authentication is disabled by default in the LoginRadius Admin Console. To enable this feature please contact LoginRadius Support Team.
Most of the settings for Phone Authentication are already configured by default. If any updates are needed, they can be manually configured under respective sections. As a better approach, you should enable Phone ID field in Branding > Forms.
Username Login
You may want to use a UserName as the unique identifier for your customers, for various reasons, for example, you may want customers to have a publicly visible identifier that doesn't associate to their personal information or you may want to allow a customer to have multiple accounts with the same email.
To check if Username Registration is enabled for your account you need to login to your Admin Console account and navigate to Authentication > Authentication Configuration > Username. Check if the Username option is enabled.
If the feature is not enabled then navigate to Branding > Forms and look for UserName (field) and enable it and save the configuration. UserName field will start showing on the Hosted Page.
Hosted Pages Customization Steps
This is a default flow and no customization is required, refer to the Javascript Hooks document for details on how to make stylistic or functional changes such as renaming labels as per your requirements.
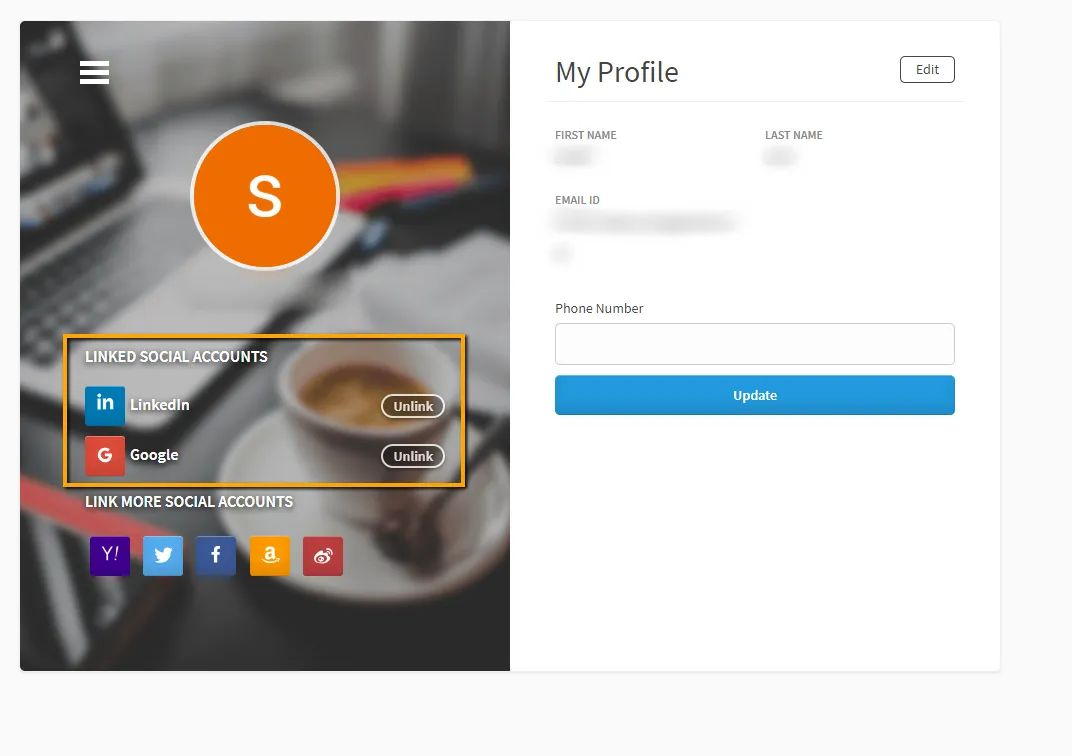
Account Linking
LoginRadius provides an Account Linking feature that will link customer's profiles from different providers. You can learn more about account linking with the help of this document.
This feature is already enabled by default on your Hosted pages so no further action needs to be taken to utilize this feature. You can link any configured social account by the following steps:
- Login to your Hosted pages
https://<your-site-name>.loginradius.com/auth.aspx - You will see your configured social providers on your account profile (left side).
- Click and log in by any social provider which you want to link with this account.
- You will see your linked accounts under Linked Social Accounts.
This will link your social accounts with the logged in account and upon login with any linked account you will get to log in with that account.
Multi-Factor Authentication
Providing your customers with two factors of authentication is one of the most powerful security tools you can provide your customers with, for usage details please see our Multi-Factor Authentication Overview.
To check if this feature is enabled or not for your app go to Platform Security > Multi-Layered Security > Multi-Factor Authentication. his feature is disabled by default in the LoginRadius Admin Console. An explicit request has to be made by contacting LoginRadius Support Team to enable it.
Configure MFA in Admin Console
Follow the Multi Factor Authentication Configuration document to configure Multi-Factor Authentication settings from the Admin Console.
Hosted Pages Customization Steps
The Hosted Page will need some additional customization to support MFA, see the following required steps:
Navigate to Branding -> Hosted Pages -> Profile Page Files Files and follow the following instructions
- Display the MFA interface for logged in customers:
You will need to add HTML code for displaying Multi-Factor Authentication Interface in profile.aspx page after closing profile-viewer div. The following is the sample code:
- Sample HTML Code:
<div class='lr-content-section cf' id='authentication-container'>
</div>
<div id="edit-reset" class="form-item form-type-item">
   <div class="resetCode" id="resetCode" onclick="resetBackupCodes()">Reset Code</div>
</div>
<div id="resettable" class="" style="display: none;">
   <p>The two factor authentication backup code is already generated, please reset your two factor authentication backup code. </p>
</div>
<div id="lr_ciam_reset_table" style="display: none;">
   <h5>If you lose your phone or can't receive codes via SMS, voice call or Google Authenticator, you can use backup codes to sign in. So please save these backup codes somewhere.</h5>
   <div class="form-item form-type-item">
       <div class="copyMessage" style="display:none;">Copied!</div>
       <div title="Copy" class="mybackupcopy" onclick="changeIconColor()"></div>
   </div>
   <div id="backupcode-table-body"></div>
</div>
- Add New Custom JS
Add the following JS Code to display the Multi-Factor Authentication interface for your customers under:
Before Script -> Before-Script.js file just after the code where LRObject is defined and save the file. The following is the Sample JS code:
- Sample JS Code:
  $(document).ready(function(){
   initializeTwoFactorAuthenticator();
   getBackupCodes();
});

function getBackupCodes() {
   var accessToken = readCookie("lr-session-token");
   LRObject.api.getBackupCode(accessToken,
           function (response) {
               jQuery('#backupcode-table-body').empty();
               for (var i = 0; i < response.BackUpCodes.length; i++) {
                   var html = '';
                   jQuery('#resettable').hide();
                   jQuery('#lr_ciam_reset_table').show();

                   html += '<divs class="form-item code-list" id="backup-codes-' + i + '-field">';
                   html += '<span class="backupCode">' + response.BackUpCodes[i] + '</span>';
                   html += '</div>';

                   jQuery('#backupcode-table-body').append(html);
               }
               jQuery('.mybackupcopy').click(function () {
                   setClipboard(jQuery(this).parent('.form-item').find('span').text());
               });
           }, function (errors) {
       jQuery('#resettable').show();
   });
}

function resetBackupCodes() {
   var accessToken = readCookie("lr-session-token");
   LRObject.api.resetBackupCode(accessToken,
           function (response) {
               jQuery('#backupcode-table-body').empty();
               for (var i = 0; i < response.BackUpCodes.length; i++) {
                   var html = '';
                   jQuery('#resettable').hide();
                   jQuery('#lr_ciam_reset_table').show();

                   html += '<div class="form-item code-list" id="backup-codes-' + i + '-field">';
                   html += '<span class="backupCode">' + response.BackUpCodes[i] + '</span>';
                   html += '</div>';

                   jQuery('#backupcode-table-body').append(html);
               }
               jQuery('.mybackupcopy').click(function () {
                   setClipboard(jQuery(this).parent('.form-item').find('span').text());
               });
           }, function (errors) {
               jQuery("#lr-raas-message").show().removeClass("loginradius-raas-success-message").addClass("loginradius-raas-error-message").text(errors[0].Message).delay(10000).fadeOut(300);
   });
}

function initializeTwoFactorAuthenticator() {
   //initialize two factor authenticator button
   var authentication_options = {};
   authentication_options.container = "authentication-container";
   authentication_options.onSuccess = function (response) {
       if(response.AccountSid){
           jQuery("#lr-raas-message").show().removeClass("loginradius-raas-error-message").addClass("loginradius-raas-success-message").text("An OTP has been sent.").delay(10000).fadeOut(300);
       } else if (response.IsDeleted) {
           jQuery("#lr-raas-message").show().removeClass("loginradius-raas-error-message").addClass("loginradius-raas-success-message").text("Disabled successfully.").delay(10000).fadeOut(300);
            window.setTimeout(function () {
               window.location.reload();
           }, 3000);
       } else if (response.Uid) {
           jQuery("#lr-raas-message").show().removeClass("loginradius-raas-error-message").addClass("loginradius-raas-success-message").text("Verified successfully.").delay(10000).fadeOut(300);
           window.setTimeout(function () {
               window.location.reload();
           }, 3000);
       }
   };
   authentication_options.onError = function (errors) {
       jQuery("#lr-raas-message").show().removeClass("loginradius-raas-success-message").addClass("loginradius-raas-error-message").text(errors[0].Description).delay(10000).fadeOut(300);
   }
   LRObject.init("createTwoFactorAuthentication", authentication_options);
}

function readCookie(name) {
           var nameEQ = name + "=";
           var ca = document.cookie.split(';');
           for (var i = 0; i < ca.length; i++) {
               var c = ca[i];
               while (c.charAt(0) == ' ') c = c.substring(1, c.length);
               if (c.indexOf(nameEQ) == 0) return c.substring(nameEQ.length, c.length);
           }
           return null;
       }


function setClipboard() {
   var value = '';
   jQuery('.code-list').find('span').each(function () {
       value += jQuery(this).html() + "\n";
   });
   var tempInput = document.createElement("textarea");
   tempInput.style = "position: absolute; left: -1000px; top: -1000px";
   tempInput.value = value;
   document.body.appendChild(tempInput);
   tempInput.select();
   document.execCommand("copy");
   document.body.removeChild(tempInput);
   jQuery('.copyMessage').show();
   setTimeout(removeCodeCss, 5000);
}

function removeCodeCss() {
   jQuery('.code-list').find('span').removeAttr('style');
   jQuery('.copyMessage').hide();
}

function changeIconColor() {
   jQuery('.code-list').find('span').css({'background-color': '#008ecf', 'color': '#fff'});
}
- Add New Custom CSS
You can add the following CSS code to Custom CSS to display the Multi-Factor Authentication Interface. The following is the sample code:
Sample CSS Code:
#edit-reset .resetCode:hover {
    background: #fff;
    color: #008ecf;
    border:1px solid #008ecf;
    cursor: pointer;
}
#edit-reset .resetCode {
    background: #008ecf;
    float: right;
    color: #fff;
    padding: 6px 8px;
    margin-right: -9px;
}

#lr_ciam_reset_table {
    clear: both;
    margin-top: 45px;
}
div#backupcode-table-body {
    display: inline-block;
}
#backupcode-table-body .form-item {
    float: left;
    margin-top: -8px !important;
    width: 46%;
    background: #eee;
    border: 2px solid #fff;
    padding: 5px;
}
#resettable p {
    border: 1px solid red;
    padding: 5px;
    margin-top: 0px;
    border-radius: 5px;
    background: hsla(0, 100%, 50%, 0.18);
}
#resettable {
    margin-right: 100px;
}
.mybackupcopy {
    width: 32px;
    float: right;
    background-image: url(../images/copy.png);
    height: 40px;
    background-size: 24px 24px;
    background-repeat: no-repeat;
    margin: 5px;
    cursor: pointer;
}
.copyMessage{
    background-color: #eeeeee;
    display: inline-block;
    padding: 6px 12px 5px 10px;
    color:#59b32c;
    margin-left:86%;
    margin-bottom: -21px;
}
Passwordless Authentication
Passwordless Authentication is a great way to remove all of the difficulties that come with password management, for more details please see our Passwordless Login Overview.
Hosted Page Customization
This is a default flow and no customization is required after enabling the PasswordLess Login feature from LoginRadius operation team. You will see an Email a link to sign in and Send OTP to sign in buttons on the login screen of the Hosted page. The following screen shows how Password less login will look like on your Hosted.

One Touch Login
One Touch Login is another method of authentication that does not require a password to login, what makes it unique is that it has a ping API that can be leveraged to see if a customer has logged in, this is useful if you're delegating the authentication to another safer device which is common practice with IoT Devices. You can learn more about One Touch Login in our documentation.
To check if this feature is enabled or not for your app, navigate to Authentication > Authentication Configuration > Passwordless > One Touch Login. If this section is disabled for your site, contact LoginRadius Support Team
Hosted Page Customization Steps
Navigate to Branding -> Hosted Pages and select Authentication Pages from left hand side menu and follow the following steps:
-
Display the One Touch Login Interface
You will need to add HTML code for displaying One Touch Login Interface in auth.aspx page after closing login-container div. The following is the sample HTML code:
-
Sample HTML Code:
<div id="onetouchLogin-container"></div>
- Add New Custom JS
Add the following JS Code to display the One Touch Login interface under Auth.aspx -> Before Script file at the bottom of the code and save the file. The following is the Sample JS Code:
- Sample JS Code:
$(document).ready(function(){
onetouchlogin();
});
function onetouchlogin(){
var one_touch_options = {};
one_touch_options.container = "onetouchLogin-container";
one_touch_options.onSuccess = function(response) {
// On Success, you can define code here according to your use case.
console.log(response);
    if(typeof response.access_token != 'undefined' && response.access_token != ''){
        redirectToReturnUrl(response.access_token);
    }
    else if(typeof response.Data != 'undefined' && typeof response.Data.AccountSid != 'undefined' && response.Data.AccountSid != ''){
        jQuery("#lr-raas-message").show().removeClass("loginradius-raas-error-message").addClass("loginradius-raas-success-message").text("An OTP has been sent").delay(10000).fadeOut(300);
    }
    else{    jQuery("#lr-raas-message").show().removeClass("loginradius-raas-error-message").addClass("loginradius-raas-success-message").text("An Email with Login link has been sent").delay(10000).fadeOut(300);
    }
};
one_touch_options.onError = function(errors) {
// On Errors, you can define the code according to your use case.
console.log(errors);
jQuery("#lr-raas-message").show().removeClass("loginradius-raas-success-message").addClass("loginradius-raas-error-message").text(errors[0].Description).delay(10000).fadeOut(300);
}
LRObject.util.ready(function() {
LRObject.init("onetouchLogin", one_touch_options);
});
}
Update Phone ID
This section will show you how to have an interface to allow customers to update their phone numbers should they be using Phone Authentication.
To check if this feature is enabled or not for your app go to "Platform configuration" -> Authentication Configuration -> Phone Login. If this section is disabled for your site contact LoginRadius Support Team.
Hosted Page Customization steps
Navigate to Branding -> Hosted Pages -> Profile Pages Page and follow the following steps
- Display Update Phone ID Interface
You will need to add HTML code for displaying the Update Phone ID interface in profile.aspx page after closing profile-viewer div. The following is the sample code:
- Sample HTML Code:
<div id="phone-update-container"></div>
-
Add New Custom JS
Add the following JS Code to display the Update Phone ID interface under Profile.aspx -> Before Script -> Before-Script.js file on the bottom of the code and save the file. The following is the Sample JS Code:
-
Sample JS Code:
function updatephoneonprofile() {
    var updatephone_options = {};
    updatephone_options.container = "phone-update-container";
    updatephone_options.onSuccess = function (response) {
    // On Success
        if(typeof response.Data !== 'undefined')
        {
            setMessage("An OTP has been sent");
        }
        else if(response.access_token)
        {
            setMessage("Phone number updated successfully");
        setTimeout(function () {
            location.reload();
        }, 500);
        }

    };
    updatephone_options.onError = function (response) {
        // On Error
        setMessage(response[0].Description, true);
         };

          LRObject.init("updatePhone", updatephone_options);
}

$(document).ready(function(){
updatephoneonprofile();
});
Privacy Policy
LoginRadius provides you with the tools to assist you with your Privacy Policy Management, this is particularly useful if your business has regulatory/legal requirements for collecting consent from your end-customers, you can find additional details in our Privacy Policy Versioning document.
Hosted Pages Customization Steps
Navigate to Branding -> Hosted Pages and select Auth.aspx Page from left hand menu and follow the following steps:
Display Privacy Policy link on Registration page
There are 2 ways to update the privacy policy link in the Hosted page
-
Using termsAndConditionHtml option
Go to Branding -> Hosted Pages -> Authentication Page Page and download the Before-script.js From Auth.aspx > Before Script > Before-Script.js and add the following code after “raasoption.hashTemplate=true;”
raasoption.termsAndConditionHtml = 'check <a href=”https://example.com/privacy” target=”_blank”>Privacy Policy</a>';
- Using customizeFormLabel hooks
- Download the Before-script.js From Auth.aspx > Before Script > Before-Script.js and add the following code
LRObject.$hooks.call('customizeFormLabel',{
         "acceptprivacypolicy" : "I agree to the LoginRadius ® <a href='https://www.example.com/termsofuse' target='_blank'>Terms of Use</a> and <a href='https://www.example.com/privacypolicy'' target='_blank'>Privacy Statement</a>."
});
- Now, upload the updated before.js file under Auth.aspx -> Before Script -> Replace -> upload File
Custom Object
Should you need to use custom data with your implementation, the LoginRadius Custom Objects can easily be leveraged with the Hosted Page. This section assumes that you already have Custom Data Object Storage configured in your LoginRadius Admin Console. You can view your existing Custom Object Storages in the LoginRadius Admin Console by navigating to Branding -> Forms -> Custom Objects.
The following screen willl appear
If you're looking to get set up with Custom Data Object storage, please reach out to the LoginRadius Support team.
The following are APIs related to Custom object:
-
Fetch a custom object from the Custom Object by ObjectRecordId and Token API
Social Login
Social Login can help your business in the following ways:
-
Reduce Login Failures: Handling login failures can be time-consuming for both you and the customer. When using Social Login, the customer does not have to provide you with a password that might need to be reset if forgotten.
-
Easily Build Profiles: The data provided by social providers allows you to easily build a profile on your customers without prompting them to fill out a form. To configure Social Login, follow Configure Social App document. The configured provider will be shown like below:

- Increase Registrations: Having to fill out a registration form can be intimidating for a customer. According to Business Insider, Facebook has claimed that it's social authentication increases registration by 30-200%
Ask for required fields after social login
Should you want to minimize friction during registration, if there are additional details you would like to obtain from the customer that isn't provided by the social provider, Social Login can be configured to ask for required fields by default. If the provider doesn't return value for required fields then the Hosted page will prompt the user to fill in the missing values of required fields.
Ask for optional fields after social login
To minimize friction during registration, if there are additional details you would like to obtain from the customer that isn't provided by the social provider, you can also prompt users with "optional" fields to fill out.
By default, Social Login isn’t configured to ask for optional fields. It can be configured in the user Admin Console. Go to Deployment > JS Widgets >Settings. Enable the option for “Ask Optional Fields On Social Signup”.
If it is enabled then Hosted page will prompt the user for missing optional fields as well.
Pre Filled Form Fields
If as part of your registration, you require your customer to fill out a form, you can still use the power of Social Login by pre-filling your form with data obtained from Social Login. It can be configured by following the steps below -
- Go to Branding -> Hosted Pages -> Authentication Page files
- Under “Before Script > Before-Script.js” add
“raasoption.autoFilledFieldForSocial= true;” Along with other rassoptions as following:
raasoption.forgotPasswordUrl = raasoption.forgotPasswordUrl || encodeURIComponent(forgotpasswordurl);
raasoption.verificationUrl = raasoption.verificationUrl || encodeURIComponent(emailverifyurl);
//raasoption.callbackUrl= window.location;
//raasoption.templateName = window.lr_raas_settings.sociallogin.templateid;
raasoption.hashTemplate = true;
raasoption.callbackUrl = window.location.href.split('?')[0];
- Now, click on the “save” button.