Ionic-2 Library
This is an open source library, which means you are free to download and customize the library functions based on your specific application needs.
Download SDK
The Ionic-2 SDK and demo project can be found here.
Configure your Account
Make the following changes in the LoginRadius Admin Console:
1 . In the Branding > Email Templates > Verification Email, edit the template to include an additional apikey parameter.
Your apikey value can be found in the Tenant settings > API Configurations > API Account Key.
The same change should also be applied to your "Forgot Password Email" template.
2 . Generate a SOTT in the Tenant settings > SOTT (Mobile App) page.
Installation
After downloading the LoginRadius Ionic-2 SDK, include the following in your index.html file:
<script src="https://auth.lrcontent.com/v2/js/LoginRadiusV2.js"></script>
To use the Ionic-2 SDK, you must install the Apache Cordova InAppBrowser into your current project. Click the InAppBrowser link and follow Cordova's installation documentation.
Note: If you're using Cordova 4.0.0 or higher, you must install the Apache Cordova Whitelist in order to make network requests. Please follow Cordova's installation documentation.
In the index.html file, initialize the LoginRadius Object:
var apiKey = "your_loginradius_api_key";
var appName = "LoginRadius_site_name";

var commonOptions = {};
commonOptions.apiKey = apiKey;
commonOptions.appName = appName;
commonOptions.hashTemplate = true;
commonOptions.accessTokenResponse = true;
commonOptions.phoneLogin = false;
commonOptions.sott = "Get_Sott";
commonOptions.verificationUrl = "https://auth.lrcontent.com/mobile/verification/index.html";
commonOptions.callbackUrl = 'YOUR_PHONEGAP_APP_NAME://';
commonOptions.isMobile = true;
commonOptions.formValidationMessage = true;
LRObject = new LoginRadiusV2(commonOptions);

function socialLogin(url) {
var lroptions = {};
lroptions.apiKey = apiKey;
lroptions.facebookNative = false;
lroptions.googleNative = false;
lroptions.googlewebid = ""; // if you set google native login
window.angularComponentRef.zone.run(function() {
         window.angularComponentRef.componentFn(url, lroptions)
 });
You need to add a LoginRadiusService to your project using a dependency injection in your Component.ts file:
constructor(public navCtrl: NavController,private myService:LoginRadiusService,private zone:NgZone) {
   (<any>window).angularComponentRef = {
    zone: this.zone,
    componentFn: (url,lroptions) => myService.ionicLogin(url,lroptions),
    component: this
    };
   }
You also need to import HttpModule and LoginRadiusService in your app.module file:
import { HttpModule } from '@angular/http';
import { LoginRadiusService } from '../pages/services/loginradius.service';
After importing LoginRadiusService, add it as a provider:
 providers: [
    StatusBar,
    LoginRadiusService,
    SplashScreen,
    {provide: ErrorHandler, useClass: IonicErrorHandler}
  ]
After importing HttpModule, add it to your imports:
imports: [
  BrowserModule,
   HttpModule,
    IonicModule.forRoot(MyApp)
  ]
Note: Do not call LoginRadiusService from the root page because the root page loads before the
index.htmlfile.
Activation
Finally, set up elements to trigger the functions that will direct your users to the relevant interface.
List of APIs and Methods in this Section:
- Registration
- Social Login
- Login
- Forgot Password
- Profile Update
- Update Phone
- Add Email
- Remove Email
- Change Username
Registration
Triggers the Registration interface in your Component and returns a "registration" action back to the callback function.
var response: any = {};
this.myService.getRegister(response);
response.callback = (params => {
    if (params.action == "register") {
        alert(JSON.stringify(params.response));

    }
});
You must add an HTML div for the Registration interface.
<div id="registration-container"></div>
Social Login
Triggers the Social Login interface in your Component and returns a "sociallogin" action back to the callback function.
  var response: any = {};
  this.myService.getSocialLogin(response);
  response.callback = (params => {
      if (params.action == "sociallogin") {
          if (params.response.access_token != null) {
              sessionStorage.setItem('LRTokenKey', params.response.access_token);
              this.navCtrl.push(AfterLoginRedirectionPage);
          } else {
              alert(JSON.stringify(params.response));
          }
      }
  });


var id: any = document.getElementById("loginradiuscustom_tmpl");
var span = document.createElement("span");
span.setAttribute('class', "lr-sl-icon1 lr-sl-icon1-<#=Name.toLowerCase()#>");
var s = document.createElement("a");
s.setAttribute('title', "<#=Name#>");
s.setAttribute('href', "javascript:void(0)");
s.innerHTML = "Login With ";
s.setAttribute('class', "lr-sl-shaded-brick-button lr-flat-<#=Name.toLowerCase()#>");
s.setAttribute('onclick', "socialLogin('<#=Endpoint#>')");
s.appendChild(span);
id.appendChild(s);
You must add an HTML div for the SocialLogin interface.
<div id="sociallogin-container" class="interfacecontainerdiv" style="text-align: center;margin-bottom: 4%;"></div>
<div id="loginradiuscustom_tmpl" style="display:none;"></div>
Login
Triggers the Login interface in your Component and returns a "login" action back to the callback function.
var response: any = {};
this.myService.getLogin(response);
response.callback = (params => {
    if (params.action == "login") {
        if (params.response.access_token != null) {
            sessionStorage.setItem('LRTokenKey', params.response.access_token);
            this.navCtrl.push(AfterLoginRedirectionPage);
           } else {
            alert(JSON.stringify(params.response));
       }
    }
});
Add the following div to use the Traditional Login:
<div id="login-container"></div>
If you want a Social and Traditional Login Interface on the same page, add the following code to your Component.
var response: any = {};
this.myService.getLogin(response);
response.callback = (params => {
    if (params.action == "sociallogin") {
        if (params.response.access_token != null) {
            sessionStorage.setItem('LRTokenKey', params.response.access_token);
            this.navCtrl.push(AfterLoginRedirectionPage);
        } else if (params.response.AccessToken != null) {
            sessionStorage.setItem('LRTokenKey', params.response.AccessToken);
            this.navCtrl.push(AfterLoginRedirectionPage);
        } else {
            alert(JSON.stringify(params.response));
        }
    } else if (params.action == "login") {
        if (params.response.access_token != null) {
            sessionStorage.setItem('LRTokenKey', params.response.access_token);
            this.navCtrl.push(AfterLoginRedirectionPage);

        } else {
            alert(JSON.stringify(params.response));
        }
    }

});

var id: any = document.getElementById("loginradiuscustom_tmpl");
var span = document.createElement("span");
span.setAttribute('class', "lr-sl-icon1 lr-sl-icon1-<#=Name.toLowerCase()#>");
var s = document.createElement("a");
s.setAttribute('title', "<#=Name#>");
s.setAttribute('href', "javascript:void(0)");
s.innerHTML = "Login With ";
s.setAttribute('class', "lr-sl-shaded-brick-button lr-flat-<#=Name.toLowerCase()#>");
s.setAttribute('onclick', "socialLogin('<#=Endpoint#>')");
s.appendChild(span);
id.appendChild(s);
<div>
  <div id="attid" style="display:none;text-align: center;margin-bottom: 20px;">Fill all field to complete the registration process</div>
  <div id="sociallogin-container" class="interfacecontainerdiv" style="text-align: center;margin-bottom: 4%;"></div>
  <div id="line">
   <h2><span>or</span></h2>
  </div>
  <div id="login-container" style="margin-bottom: 5%;"></div>
  <div id="loginradiuscustom_tmpl" style="display:none;"></div>
</div>
Forgot Password
Triggers the Forgot Password interface in your Component and returns a "forgotpassword" action back to the callback function.
 var response: any = {};
 this.myService.getForgotpassword(response);
 response.callback = (params => {
     if (params.action == "forgotpassword") {
         alert(JSON.stringify(params.response));
     }
 });
You must add an HTML div for the Forgot Password interface.
<div id="forgotpassword-container"></div>
Profile Update
Triggers the Profile Update interface in your Component and returns a "profileupdate" action back to the callback function.
var response: any = {};
this.myService.getProfileUpdate(response);
response.callback = (params => {
    if (params.action == "profileupdate") {
        alert(JSON.stringify(params.response));
    }
});
You must add an HTML div for the Profile Update interface.
<div id="profileeditor-container"></div>
Change Password
Triggers the Change Password interface in your Component and returns a "changepassword" action back to the callback function.
var response: any = {};
this.myService.getChangePassword(response);
response.callback = (params => {
    if (params.action == "changepassword") {
        alert(JSON.stringify(params.response));
    }
});
You must add an HTML div for the Change Password interface.
<div id="changepassword-container"></div>
Update Phone
Triggers the Update Phone interface in your Component and returns a "updatephone" action back to the callback function.
var response: any = {};
this.myService.getUpdatePhone(response);
response.callback = (params => {
    if (params.action == "updatephone") {
        alert(JSON.stringify(params.response));
    }
});
You must add an HTML div for the Update Phone interface.
<div id="updatephone-container"></div>
Add Email
Triggers the Add Email interface in your Component and returns an "addemail" action back to the callback function.
var response: any = {};
this.myService.getAddEmail(response);
response.callback = (params => {
    if (params.action == "addemail") {
        alert(JSON.stringify(params.response));
    }
});
You must add an HTML div for the Add Email interface.
<div id="addemail-container"></div>
Remove Email
Triggers the Remove Email interface in your Component and returns a "removeemail" action back to the callback function.
var response: any = {};
this.myService.getRemoveEmail(response);
response.callback = (params => {
    if (params.action == "removeemail") {
        alert(JSON.stringify(params.response));
    }
});
You must add an HTML div for the Remove Email interface.
<div id="removeemail-container"></div>
Change Username
Triggers the Change Username interface in your Component and returns a "changeusername" action back to the callback function.
var response: any = {};
this.myService.getChangeUsername(response);
response.callback = (params => {
    if (params.action == "changeusername") {
        alert(JSON.stringify(params.response));
    }
});
You must add an HTML div for the Change Username interface.
<div id="changeusername-container"></div>
Advanced Options
This section covers the following features:
# Phone Login
Enable Phone Login via the commonOptions object:
commonOptions.phoneLogin = true;
# Native Login
Supported Platforms
Currently, only Facebook, Google, and VK are supported for Native Login with our SDK for Android and iOS.
Facebook Native Login
Before enabling Native Login, refer to Ionic's documentation for connecting Ionic to your Facebook app.
Then, install the Apache Cordova Facebook Plugin into your current project. It is highly recommended to follow the iOS installation guide and the Android installation guide.
Enable Native Login via the lroptions object:
lroptions.facebookNative = true;
Facebook Native Login Configuration for Android
Create a Development Key Hash
Facebook uses the key hash to authenticate interactions between your app and the Facebook app. If you run apps that use Facebook Login, you need to add your Android development key hash to your Facebook developer profile.
Add the following code snippet to your onCreate method to output your key hash to your logs. Be sure to replace the placeholder with your activity package name before running.
try {
       PackageInfo info = getPackageManager().getPackageInfo(
               "PUT-YOUR-ACTIVITY-PACKAGE-NAME-HERE",
               PackageManager.GET_SIGNATURES);
       for (Signature signature : info.signatures) {
           MessageDigest md = MessageDigest.getInstance("SHA");
           md.update(signature.toByteArray());
           Log.d("KeyHash:", Base64.encodeToString(md.digest(), Base64.DEFAULT));
           }
   } catch (NameNotFoundException e) {
   } catch (NoSuchAlgorithmException e) {
   }
Now back in the Facebook Developers Admin Console:
-
Select "My Apps" and create a new app using "Add a New App".
-
Click on Settings in the left panel > Add Platform > Android
-
Then enter the following information, including your key hash:

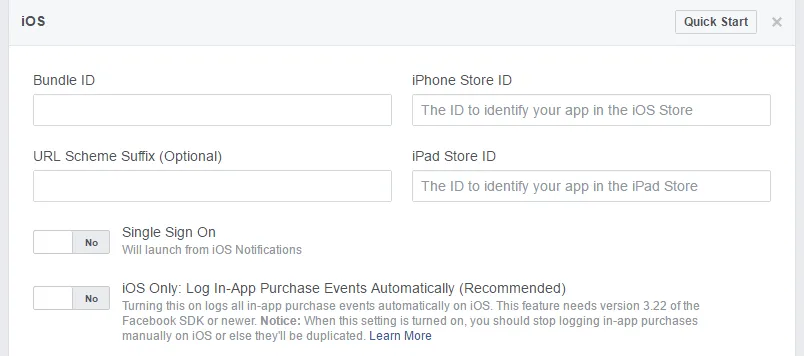
Facebook Native Login Configuration for iOS
In the Facebook Developers Admin Console:
- Click on Settings in the left panel > Add Platform > iOS
- Then enter the following information:
Google Native Login
Before Google Native Login can be enabled, install the Apache Cordova Google Plugin in your current project.
In your index.html file, enable Google Native Login via the lroptions object and set your Google webClientId.
lroptions.googleNative = true;
lroptions.googlewebid=""; // You must set your webClientId to use Google Native Login
Google Native Login Configuration for Android
Generate a configuration file here. Once Google Sign-In is enabled, Google will automatically create the necessary credentials in the Developer Console. There is no need to add the generated google-services.json file into your Cordova project.
After generating the configuration file, in the Google Credentials Manager for your project, select Credentials from the left panel and copy the Web application Client ID.
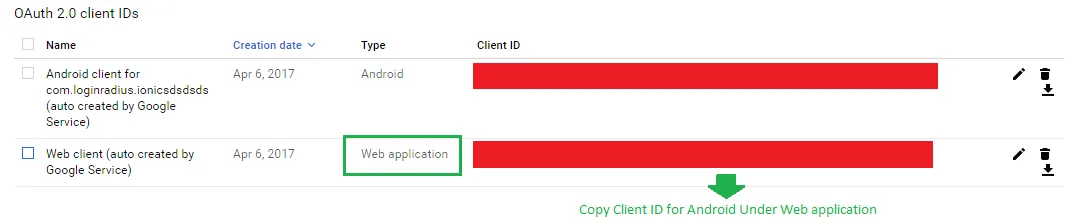
Pass the Client ID into the following cordova command:
cordova plugin add cordova-plugin-googleplus --save --variable REVERSED_CLIENT_ID=yourClientIdHere
Then, set your Client ID via the lroptions object:
lroptions.googlewebid="<YOUR_CLIENT_ID>";
Google Native Login Configuration for iOS
To get your iOS REVERSED_CLIENT_ID, generate a configuration file here. Drag the generated GoogleService-Info.plist file into your project's "Resources" folder.
Copy the CLIENT_ID from the GoogleService-Info.plist and set this via the lroptions object:
lroptions.googlewebid="<YOUR_CLIENT_ID>";
Common Error Messages:
12501 : This is commonly caused by an incorrect SHA1 being used to set up your project with Google. Make sure that the SHA1 of the build you are testing matches what you used in the Developer's Console.
10: Make sure that the Client ID you're passing in to the plugin, i.e. webClientId, is of type Web application, and not any other type.
Note: Running the latest Android SDK can also help. If you run into any configuration issues, please reach out to the LoginRadius Support team.
VK Native Login
Before VK Native Login can be enabled, install Apache Cordova Social VK in your project.
Enable VK Native Login via the lroptions object and set your VK App ID:
lroptions.vkNative = true;
lroptions.vkAppId=""; //You must set your VK App ID to use VK Native Login
Alternative Language Support
Label Customization Hook
Customize your form labels using the following hook:
 // "field-name": "New Label"
LRObject.$hooks.call('customizeFormLabel',{
  "emailid" : "Email Address",
  "password" : "Password"
});
Note: In order to customize custom fields, add the prefix
cf_to the field name.
Placeholder Customization Hook
Customize your form placeholders using the following hook:
LRObject.$hooks.call('customizeFormPlaceholder',{
  "emailid" : "Enter your email address",
  "password" : "Enter Your password"
});
Customize Button Name
Customize your form buttons using the following hook:
 // "action-name": "New button name"
LRObject.$hooks.call('setButtonsName',{
 login : "Login",
 registration:'Register'
});
Raw Registration Schema
In some cases, you may want to compare a user's profile with the schema you defined in the LoginRadius Admin Console. When a user logs in, the following code will allow you to retrieve the raw schema defined in the LoginRadius Admin Console along with the user's profile.
LRObject.$hooks.register('registrationSchemaFilter',registrationSchema);
function registrationSchema(regSchema, userProfile) {
  // console.log( regSchema );
  // console.log( userprofile );
}
Social Login Render Hook
In the event a Social Login provider doesn’t return a required value needed in your form, you can use the following code to, for example, hide the Social Login interface when a required value is missing:
LRObject.$hooks.register('socialLoginFormRender',function(){
   //triggers when the Social Login form renders
});
Custom Error Message Hook
This hook allows you to write custom error messages and descriptions based on the error code generated by LoginRadius:
LRObject.$hooks.call('mapErrorMessages',[{
        code: 967,
        message: "email id format is not valid",
        description: "email id format is not valid"
     },{
        code: 966,
        message: "Username/Password combination is wrong",
        description: "Correct Username/Password combination needs to be entered"
     }
);
Custom Validation Message Hook
This hook allows you to write custom validation messages using rules generated by LoginRadius.
%s is dynamically replaced by the field name.
LRObject.$hooks.call('mapValidationMessages',[{
    rule: "required",
    message: "The %s field is required."
}, {
    rule: "valid_email",
    message: "The %s field must contain a valid email address."
}]);
Social APIs
After the access token is fetched, we can then safely access the following LoginRadius APIs:
This section covers the following APIs:
- UserProfile API
- Album API
- Audio API
- CheckIn API
- Company API
- Contact API
- Event API
- Following API
- Group API
- Like API
- Mention API
- Message API
- Page API
- Post API
- Photo API
- Video API
- Status API
UserProfile API
Fetch a user’s profile:
<p id="ID"></p>
var token: any = sessionStorage.getItem('LRTokenKey');
var endpoint: any = "userprofile";
var param: any = null;
this.myService.getSocialAPI(token, endpoint, param, response => {
    document.getElementById('ID').innerHTML = response.ID;
});
Album API
Fetch a user’s photo albums:
<table id="albums"></table>
var token: any = sessionStorage.getItem('LRTokenKey');
var endpoint: any = "album";
var param: any = null;
this.myService.getSocialAPI(token, endpoint, param, data => {
    for (var i = 0; i < data.length; i++) {
        var row = document.createElement('tr');
        var col_1 = document.createElement('td');
        var col_2 = document.createElement('td');
        col_1.innerHTML = 'Title ' + (i + 1);
        col_2.innerHTML = data[i]['Title'];
        row.appendChild(col_1);
        row.appendChild(col_2);
        document.getElementById('albums').appendChild(row);
    }
});
Audio API
Fetch a user’s audio files:
<table id="audios"></table>
var token: any = sessionStorage.getItem('LRTokenKey');
var endpoint: any = "audio";
var param: any = null;
this.myService.getSocialAPI(token, endpoint, param, data => {
    for (var i = 0; i < data.length; i++) {
        var row = document.createElement('tr');
        var col_1 = document.createElement('td');
        var col_2 = document.createElement('td');
        col_1.innerHTML = 'Title ' + (i + 1);
        col_2.innerHTML = data[i]['Title'];
        row.appendChild(col_1);
        row.appendChild(col_2);
        document.getElementById('audios').appendChild(row);
    }
});
CheckIn API
Fetch a user’s check-in data:
<table id="Checkins"></table>
var token: any = sessionStorage.getItem('LRTokenKey');
var endpoint: any = "checkin";
var param: any = null;
this.myService.getSocialAPI(token, endpoint, param, data => {
    for (var i = 0; i < data.length; i++) {
        var row = document.createElement('tr');
        var col_1 = document.createElement('td');
        var col_2 = document.createElement('td');
        col_1.innerHTML = 'PlaceTitle ' + (i + 1);
        col_2.innerHTML = data[i]['PlaceTitle'];
        row.appendChild(col_1);
        row.appendChild(col_2);
        document.getElementById('Checkins').appendChild(row);
    }
});
Company API
Fetch a user’s company history:
<table id="Company"></table>
 var token: any = sessionStorage.getItem('LRTokenKey');
 var endpoint: any = "company";
 var param: any = null;
 this.myService.getSocialAPI(token, endpoint, param, data => {
     for (var i = 0; i < data.length; i++) {
         var row = document.createElement('tr');
         var col_1 = document.createElement('td');
         var col_2 = document.createElement('td');
         col_1.innerHTML = 'Name ' + (i + 1);
         col_2.innerHTML = data[i]['Name'];
         row.appendChild(col_1);
         row.appendChild(col_2);
         document.getElementById('Company').appendChild(row);
     }
 });
Contact API
Fetch a user’s contacts:
<table id="Contacts"></table>
var token: any = sessionStorage.getItem('LRTokenKey');
var endpoint: any = "contact";
var param: any = null;
this.myService.getSocialAPI(token, endpoint, param, data => {
    for (var i = 0; i < data.Data.length; i++) {
        var row = document.createElement('tr');
        var col_1 = document.createElement('td');
        var col_2 = document.createElement('td');
        col_1.innerHTML = 'Name ' + (i + 1);
        col_2.innerHTML = data.Data[i]['Name'];
        row.appendChild(col_1);
        row.appendChild(col_2);
        document.getElementById('Contacts').appendChild(row);
    }
});

```js

### Event API
Fetch a user’s event data:

```js
<table id="Events"></table>
var token: any = sessionStorage.getItem('LRTokenKey');
var endpoint: any = "event";
var param: any = null;
this.myService.getSocialAPI(token, endpoint, param, data => {
    for (var i = 0; i < data.length; i++) {
        var row = document.createElement('tr');
        var col_1 = document.createElement('td');
        var col_2 = document.createElement('td');
        col_1.innerHTML = 'Name ' + (i + 1);
        col_2.innerHTML = data[i]['Name'];
        row.appendChild(col_1);
        row.appendChild(col_2);
        document.getElementById('Events').appendChild(row);
    }
});
Following API
Fetch a user’s following data:
<table id="Following"></table>
 var token: any = sessionStorage.getItem('LRTokenKey');
 var endpoint: any = "following";
 var param: any = null;
 this.myService.getSocialAPI(token, endpoint, param, data => {
     for (var i = 0; i < data.length; i++) {
         var row = document.createElement('tr');
         var col_1 = document.createElement('td');
         var col_2 = document.createElement('td');
         col_1.innerHTML = 'Name ' + (i + 1);
         col_2.innerHTML = data[i]['Name'];
         row.appendChild(col_1);
         row.appendChild(col_2);
         document.getElementById('Following').appendChild(row);
     }
 });
Group API
Fetch a user’s groups data:
<table id="Group"></table>
var token: any = sessionStorage.getItem('LRTokenKey');
var endpoint: any = "group";
var param: any = null;
this.myService.getSocialAPI(token, endpoint, param, data => {
    for (var i = 0; i < data.length; i++) {
        var row = document.createElement('tr');
        var col_1 = document.createElement('td');
        var col_2 = document.createElement('td');
        col_1.innerHTML = 'Name ' + (i + 1);
        col_2.innerHTML = data[i]['Name'];
        row.appendChild(col_1);
        row.appendChild(col_2);
        document.getElementById('Group').appendChild(row);
    }
});
Like API
Fetch a user’s like data:
<table id="Like"></table>
var token: any = sessionStorage.getItem('LRTokenKey');
var endpoint: any = "like";
var param: any = null;
this.myService.getSocialAPI(token, endpoint, param, data => {
    for (var i = 0; i < data.length; i++) {
        var row = document.createElement('tr');
        var col_1 = document.createElement('td');
        var col_2 = document.createElement('td');
        col_1.innerHTML = 'Name ' + (i + 1);
        col_2.innerHTML = data[i]['Name'];
        row.appendChild(col_1);
        row.appendChild(col_2);
        document.getElementById('Like').appendChild(row);
    }
});
Mention API
Fetch a user’s mentions data:
<table id="Mention"></table>
var token: any = sessionStorage.getItem('LRTokenKey');
var endpoint: any = "mention";
var param: any = null;
this.myService.getSocialAPI(token, endpoint, param, data => {
    for (var i = 0; i < data.length; i++) {
        var row = document.createElement('tr');
        var col_1 = document.createElement('td');
        var col_2 = document.createElement('td');
        col_1.innerHTML = 'Text ' + (i + 1);
        col_2.innerHTML = data[i]['Text'];
        row.appendChild(col_1);
        row.appendChild(col_2);
        document.getElementById('Mention').appendChild(row);
    }
});
Message API
Fetch a Direct Message to a user:
<input type="text" id="receiver" />
<input type="text" id="subject" />
<input type="text" id="message" />
var token: any = sessionStorage.getItem('LRTokenKey');
var endpoint: any = "message/js";
var to: any = ( < HTMLInputElement > document.getElementById('receiver')).value;
var subject: any = ( < HTMLInputElement > document.getElementById('subject')).value;
var message: any = ( < HTMLInputElement > document.getElementById('message')).value;
var param: any = "to=" + to + "&subject=" + subject + "&message=" + message;
this.myService.getSocialAPI(token, endpoint, param, data => {
    alert(JSON.stringify(data));
});
Page API
Fetch a liked Page based on PageID:
<input type="text" id="name" />
var token: any = sessionStorage.getItem('LRTokenKey');
var endpoint: any = "page";
var pagename:any = ( < HTMLInputElement > document.getElementById('name')).value;
var param: any = "pagename=" + pagename;
this.myService.getSocialAPI(token, endpoint, param, data => {
    alert(JSON.stringify(data));
});
Post API
Fetch a user’s posts:
<table id="Post"></table>
var token: any = sessionStorage.getItem('LRTokenKey');
var endpoint: any = "post";
var param: any = null;
this.myService.getSocialAPI(token, endpoint, param, data => {
    for (var i = 0; i < data.length; i++) {
        var row = document.createElement('tr');
        var col_1 = document.createElement('td');
        var col_2 = document.createElement('td');
        col_1.innerHTML = 'Message ' + (i + 1);
        col_2.innerHTML = data[i]['Message'];
        row.appendChild(col_1);
        row.appendChild(col_2);
        document.getElementById('Post').appendChild(row);
    }
});
Photo API
Fetch a user’s photos from an album:
<table id="Photos"></table>
 var token: any = sessionStorage.getItem('LRTokenKey');
 var endpoint: any = "photo";
 var param: any = "albumid=" + "put your albumID";
 this.myService.getSocialAPI(token, endpoint, param, data => {
     for (var i = 0; i < data.length; i++) {
         var row = document.createElement('tr');
         var col_1 = document.createElement('td');
         var col_2 = document.createElement('td');
         col_1.innerHTML = 'Name ' + (i + 1);
         col_2.innerHTML = data[i]['Name'];
         row.appendChild(col_1);
         row.appendChild(col_2);
         document.getElementById('Photos').appendChild(row);
     }
 });
Video API
Fetch a user’s video files:
<table id="Video"></table>
 var token: any = sessionStorage.getItem('LRTokenKey');
 var endpoint: any = "video";
 var param: any = "nextcursor=put value";
 this.myService.getSocialAPI(token, endpoint, param, data => {
  alert(JSON.stringify(data));
  console.log(JSON.stringify(data));
     for (var i = 0; i < data.Data.length; i++) {
         var row = document.createElement('tr');
         var col_1 = document.createElement('td');
         var col_2 = document.createElement('td');
         col_1.innerHTML = 'Name ' + (i + 1);
         col_2.innerHTML = data.Data[i]['Name'];
         row.appendChild(col_1);
         row.appendChild(col_2);
         document.getElementById('Video').appendChild(row);
     }
 });
Status API
The Status API can fetch a user’s status updates if available through the Social provider, e.g. Facebook and Twitter. The API will check the provider being used against those available and will return an error if it is not supported.
Fetch a user's status updates:
<table id="datatable"></table>
var token: any = sessionStorage.getItem('LRTokenKey');
var endpoint: any = "status";
var param: any = null;
this.myService.getSocialAPI(token, endpoint, param, data => {
    for (var i = 0; i < data.length; i++) {
        var row = document.createElement('tr');
        var col_1 = document.createElement('td');
        var col_2 = document.createElement('td');
        col_1.innerHTML = 'Status ' + (i + 1);
        col_2.innerHTML = data[i]['Text'];
        row.appendChild(col_1);
        row.appendChild(col_2);
        document.getElementById('datatable').appendChild(row);
    }
});
Post new status update to a user’s profile:
title<input type="text" id="title" />
url<input type="text" id="url" />
imageurl<input type="text" id="imageurl" />
status<input type="text" id="status" />
caption<input type="text" id="caption" />
description<input type="text" id="description" />
<button ion-button value="Submit" (click)="postStatus()">Post Status
</button>
postStatus() {
    var token: any = sessionStorage.getItem('LRTokenKey');
    var endpoint: any = "status/js";
    var status: any = ( < HTMLInputElement > document.getElementById('status')).value;
    var title: any = ( < HTMLInputElement > document.getElementById('title')).value;
    var url: any = ( < HTMLInputElement > document.getElementById('url')).value;
    var imageUrl: any = ( < HTMLInputElement > document.getElementById('imageurl')).value;
    var caption: any = ( < HTMLInputElement > document.getElementById('caption')).value;
    var description: any = ( < HTMLInputElement > document.getElementById('description')).value;
    var param: any = "status=" + status + "&title=" + title + "&url=" + url + "&imageurl=" + imageUrl + "&caption=" + caption + "&description=" + description;
    if (status == "" || status == null) {
        alert("Status cant be null. Please enter some value into the status");
    } else {
        this.myService.getSocialAPI(token, endpoint, param, data => {
            alert(JSON.stringify(data));
        });

    }

}
Validate Access Token
This API validates access tokens. If valid, the token's expiry time is returned. Otherwise, an error is returned.
var token:any=sessionStorage.getItem('LRTokenKey');
var response:any = {};
this.myService.getValidateToken(response,token);
response.callback = (params=> {
   if(params.action == "validatetoken") {
     alert(JSON.stringify(params.response));
   }
});

```js

## Invalidate Access Token
This API invalidates an active access token or expires an access token's validity.

```js
var token:any=sessionStorage.getItem('LRTokenKey');
var response:any = {};
this.myService.getInvalidateToken(response,token);
response.callback = (params=> {
   if(params.action == "invalidatetoken") {
     alert(JSON.stringify(params.response));
   }
});

```js

## Custom Objects API
This API is used to read/write/update/delete Custom Object data.

> Note: Custom Object data is passed in in JSON format.

First, set your the Custom Object name via the `commonOptions` object:

```js
commonOptions.customObjectName="YOUR_CUSTOM_OBJECT_NAME";
Fetch Custom Objects
LRObject.api.getCustomObjects(token, onSuccess, onError);
Create Custom Object
LRObject.api.createCustomObject(token, customObjectJSON, onSuccess, onError);
Fetch Custom Object by ID
LRObject.api.getCustomObjectById(token, objectrecordid, onSuccess, onError);
Delete Custom Object
LRObject.api.deleteCustomObjectById(token, objectrecordid, onSuccess, onError);
Update Custom Object
LRObject.api.updateCustomObjectById(token, objectrecordid, customObjectJSON, onSuccess, onError);
Multi-Factor Authentication
Enable Multi-Factor Authentication via the commonOptions object:
commonOptions.twoFactorAuthentication=true;
Also, ensure that Multi-Factor Authentication is enabled in your Admin Console.
Smart Login Feature
If a user is trying to login on a Smart TV, typing the password on a TV remote can be challenging. By enabling this option, users can enter their email address or username and click on the smartLogin button. An email is then sent to the user's email address, containing a link to login to the Smart TV.
Follow these steps to implement this feature:
Step 1: Use the following hook to set the name of the button users click after entering an email address or username:
LRObject.$hooks.call('setButtonsName',{
   smartLogin  : "Click Me"
});
Step 2: Handle the smartLogin event using the following code in your Component:
var response:any = {};
this.myService.getSmartLogin(response);
response.callback = (params=> {
if(params.action == "smartlogin") {
   alert(JSON.stringify(params.response));
}
});
<div id="smartLogin-container"></div>
After the user enters an email address or username and clicks the autoLogin button, the client will continually ping the server to confirm whether the user clicked the link in the email.
The following options can be configured:
commonOptions.smartLoginPingCount = <any number>; //default is 100 times
commonOptions.smartLoginPingInterval = <any number>; //default is 5 second
commonOptions.smartLoginEmailTemplate = <Email template>
commonOptions.smartLoginRedirectUrl = <Redirect Url>
Passwordless Login Feature
This feature allows users to enter their phone number and receive a one-time password on their phone.
Step 1: Enable this feature via the commonOptions object:
commonOptions.passwordlessLogin  = true;
commonOptions.passwordlessLoginOTP   = true;
commonOptions.passwordlessLoginEmailTemplate   = "";
Step 2: Use following hook to set the name of the button users click after entering their phone number:
var response:any = {};
this.myService.getpasswordlessLoginValidate(response);
response.callback = (params=> {
   if(params.action == "passwordlessloginvalidate") {
     alert(JSON.stringify(params.response));
   }
});
One Touch Login
This API is used for sending a login link via email for users to register instantly:
var response:any = {};
this.myService.getonetouchLogin(response);
response.callback = (params=> {
   if(params.action == "onetouchlogin") {
     alert(JSON.stringify(params.response));
   }
});
You must add an HTML div for the onetouchlogin interface:
<div id="onetouchLogin-container"></div>
Update Security Question
This API is used for updating a user's security question:
var response:any = {};
this.myService.getUpdateSecurityQuestion(response);
response.callback = (params=> {
   if(params.action == "updatesecurityquestion") {
     alert(JSON.stringify(params.response));
   }
});
You must add an HTML div for the updateSecurityQuestion interface:
<div id="securityQ-container"></div>
Reset Password By Security Question
This API is used for resetting a password using a security question:
var response:any = {};
this.myService.getResetPasswordBySecurityQuestion(response);
response.callback = (params=> {
if(params.action == "resetPasswordBySecurityQuestion") {
alert(JSON.stringify(params.response));
}
});
You must add an HTML div for the resetPasswordBySecurityQuestion interface:
<div id="resetPasswordBySecQ-container"></div>
Resend Email Verification
To resend email verification, you can call this with the customer's email address.
this.myService.resendEmailVerification("<email>", data => {
alert(JSON.stringify(data));
 });
Verify OTP
The Verify OTP Login function leverages the Phone Verification by OTP API to verify a customer's provided phone number via the One Time Passcode.
this.myService.verifyOTP("<phone>","<otp>", data => {
alert(JSON.stringify(data));
 });
Resend OTP
The resendOTP function is used to resend the One Time Passcode to a customer's phone. It is based on the Phone Resend Verification OTP API
this.myService.resendOTP("<phone>", data => {
alert(JSON.stringify(data));
 });
Check Phone Number Availability
This function allows you to check the availability of a given phone number.
this.myService.checkPhoneNumberAvailability("<phone>", data => {
alert(JSON.stringify(data));
 });
Check Email Availability
This function allows you to check the availability of a given email.
this.myService.checkEmailAvailability("<email>", data => {
alert(JSON.stringify(data));
 });
Check Username Availability
This function allows you to check the availability of a given username.
this.myService.checkUserNameAvailability("<username>", data => {
alert(JSON.stringify(data));
 });
Demo
The Ionic demo app can be found in the repo here.
To configure the demo app, set your API Key and App Name in the index.html file:
var apiKey = "<Your LoginRadius API Key>";
var appName = "<Your LoginRadius App Name>";
You should then see the following interface to confirm the demo app has been properly configured:
