Ionic Library
This library is meant to help you with a quick implementation of the LoginRadius platform and also to serve as a reference point for the LoginRadius API. Keep in mind that it is an open source library, which means you are free to download and customize the library functions based on your specific application needs
Download SDK
Get a copy of the Ionic SDK and demo projects here.
Configure your Account
To get your app supported LoginRadius Ionic SDK, you need to slightly configure your LoginRadius user account.
-
Add another parameter to your User Registration Email template
Change from
Url#?vtype=emailverification&vtoken=#GUID#to
Url#?vtype=emailverification&vtoken=#GUID#&apikey=<Your-LoginRadius-API-Key>And the same change should be also applied to your Reset Password Email Template Configuration.
-
Generate SOTT:- You need to pass the SOTT value at the time of registration in ionic SDK V2 and you can generate this by Admin Console. Open Admin Console, Click on SOTT (Mobile App) available in API Configurations, now click on New SOTT and set the time according to the requirement and generate SOTT.
Installation
Get a copy of the LoginRadius User Registration SDK from git and include this in your project. Include the reference on the page:
<script src="js/sdkservices.js"></script>
<script src="https://auth.lrcontent.com/v2/js/LoginRadiusV2.js"></script>
- We also require an additional plugin:
- Before you can add this SDK, you must install the Apache Cordova InAppBrowser into your current project.please click InAppBrowser link and follow the Cordova documentation.
cordova plugin add cordova-plugin-inappbrowser
*If you using Cordova 4.0.0 or above version, you must install the Apache Cordova Whitelist into your current project for Network Request.please click Whitelist link and follow the Cordova documentation.
cordova plugin add cordova-plugin-whitelist
In the index.html file, initialize the LoginRadius User registration Object For Interface.
var commonOptions = {};
commonOptions.apiKey = "<your loginradius api key>";
commonOptions.appName = "<LoginRadius tenant name>";
commonOptions.hashTemplate = true;
commonOptions.accessTokenResponse = true;
commonOptions.phoneLogin = false;
commonOptions.sott ="<Get_Sott>";
commonOptions.verificationUrl = "https://auth.lrcontent.com/mobile/verification/index.html	";
commonOptions.callbackUrl = 'DemoApp://';
commonOptions.isMobile =true;
commonOptions.formValidationMessage=true;
var LRObject= new LoginRadiusV2(commonOptions);
your must be add in your controllers.js some dependency injection.
.controller("ExampleController",[ '$scope','SDKService', function ($scope,SDKService) {
}]);
When we click on the button they initialize the LoginRadius User registration Object:
var lroptions = {};
$scope.lr = SDKService.getSDKContext(lroptions);
$scope.lrapi = SDKService.getAPIContext();
lroptions.callback = function(params) {
//Handle the actions for: sociallogin, login, registration, and forgotpassword
switch (params.action) {
//Social login returns an accesstoken which can be used to pull user details for APIs calls.
case "sociallogin":
//handle Social functionality
break;
//Login returns an accesstoken which can be used to pull user details for APIs calls.
case "login":
//handle Email and Password Functionality
break;
//Registration returns and email message and status which you can use to display messaging to your user.
case "registration":
//Handle successful registration messaging
break;
//Forgot password returns and email message and status which you can use to display messaging to your user.
case "forgotpassword":
//Handle Forgot password messaging
break;
default:
alert('action not defined');
break;
}
};
sociallogin Action
Object will contain:
- token - The LoginRadius access token which you can use to retrieve user data with the LoginRadiusSDK.
- status - a Boolean to determine if the login was successful.
login Action
Object will contain:
- token - The LoginRadius access token which you can use to retrieve user data with the LoginRadiusSDK.
- status - a Boolean to determine if the login was successful.
- lrUid - The Account ID for the User which can also be pulled from the user object using the access token. This is used in server side calls.
registration Action
Object will contain:
- email - The email used during registration which you can use to display messaging to the user on next steps.
- status - a Boolean to determine if the login was successful.
forgotpassword Action
Object will contain:
- email - The email used during registration which you can use to display messaging to the user on next steps.
- status - a Boolean to determine if the login was successful.
Activation
Finally, setup elements to trigger the functions that will direct your users to the relevant hosted interface.
Registration
Triggers the Registration interface and will return with an action of "registration" to the callback function.
lr.register()
You must add an HTML div for Registration interface.
<div id="registration-container"></div>
Social Login
Triggers the Social Login interface and will return to an action of "sociallogin" to the callback function.
lr.social()
You must add an HTML div for SocialLogin interface.
<div id="sociallogin-main-container" class="interfacecontainerdiv" style="text-align: center;"></div>
<script type="text/html" id="loginradiuscustom_tmpl">
<a class="lr-provider-label" href="javascript:void(0)" onclick="return <#=ObjectName#>.util.openWindow('<#= Endpoint >');" title="<#= Name >" alt="Sign in with <#=Name#>">
<#=Name#>
</a>
</script>
</div>
Login
Triggers the Login interface and will return with an action of "login" to the callback function.
lr.login()
For traditional login to add div for Login interface
<div id="login-container"></div>
If you want social and traditional Login Interface in the single page to add two div for interface
<div id="sociallogin-container" class="interfacecontainerdiv" style="text-align: center;margin-bottom: 4%;"></div>
<script type="text/html" id="loginradiuscustom_tmpl">
<a class="lr-provider-label" href="javascript:void(0)" onclick="return <#=ObjectName#>.util.openWindow('<#= Endpoint >');" title="<#= Name >" alt="Sign in with <#=Name#>">
<#=Name#>
</a>
</script>
</div>
Forgot Password
Triggers the Forgot Password interface and will return to an action of "forgotpassword" to the callback function.
lr.forgotpassword()
You must add an HTML div for Forgot Password interface.
<div id="forgotpassword-container"></div>
AfterLogin Redirection
After successful login user can start any HTML file where to call API and get data. In the demo, we get all data in Profile.html, you must be configured in your HTML file in after successful redirection actions. in the demo, we perform many actions after redirection in your controllers file.
var lroptions = {};

$scope.lr = SDKService.getSDKContext(lroptions);
$scope.lrapi = SDKService.getAPIContext();

lroptions.callback = function(params) {

//Handle the actions for: sociallogin, login, registration, and forgotpassword
switch (params.action) {
//Social login returns an accesstoken which can be used to pull user details for APIs calls.
case "sociallogin":
if (params.response.access_token != null) {
sessionStorage.setItem('LRTokenKey', params.response.access_token);
window.location = "#afterloginredirection";
 }else {
 alert(JSON.stringify(params.response));
}
break;
//Login returns an accesstoken which can be used to pull user details for APIs calls.
case "login":
 if (params.response.access_token != null) {
 sessionStorage.setItem('LRTokenKey', params.response.access_token);
 window.location = "#afterloginredirection";
 } else {
 alert(JSON.stringify(params.response));
}
break;
//Registration returns and email message and status which you can use to display messaging to your user.
case "registration":
alert(JSON.stringify(params.response));
break;
//Forgot password returns and email message and status which you can use to display messaging to your user.
case "forgotpassword":
alert(JSON.stringify(params.response));
break;
//Account linking returns response which you can use to display messaging to your user.
case "accountlinking":
alert(JSON.stringify(params.response));
break;
//Update Profile returns response which you can use to display messaging to your user.
case "updateprofile":
alert(JSON.stringify(params.response));
break;
//Change Username returns response which you can use to display messaging to your user.
case "changeusername":
alert(JSON.stringify(params.response));
break;
//Add Email returns response which you can use to display messaging to your user.
case "addemail":
alert(JSON.stringify(params.response));
break;
//Remove Email returns response which you can use to display messaging to your user.
case "removeemail":
alert(JSON.stringify(params.response));
break;
//Update Phone returns response which you can use to display messaging to your user.
case "updatephone":
alert(JSON.stringify(params.response));
break;
//Change password returns response which you can use to display messaging to your user.
case "changepassword":
alert(JSON.stringify(params.response));
break;
case "smartlogin":
alert(JSON.stringify(params.response));
// Smart Login returns response which you can use to display messaging to your user.
break;
case "onetouchlogin":
alert(JSON.stringify(params.response));
//One Touch Login returns response which you can use to display messaging to your user.
break;
case "updateSecurityQuestion":
alert(JSON.stringify(params.response));
//Update Security Question returns response which you can use to display messaging to your user.
break;
case "resetPasswordBySecurityQuestion":
alert(JSON.stringify(params.response));
//Reset Password By Security Question returns response which you can use to display messaging to your user.
break;
default:
break;
}
};
UserProfile
After redirection in Profile.Html file, the user can easy call API and get all data.when a user comes profile.html file then starting a directives 'ng-init' and call a function for getting the user profile.
<ion-content ng-controller="ExampleController" padding="true" ng-init="loadUserprofile()">
1)Directives call controllers.js file function for getting user profile data.
$scope.loadUserprofile = function() {
$scope.lrapi.getUserprofile(function(userprofile) {
document.getElementById('userimage').src = userprofile.ImageUrl;
document.getElementById('ID').innerHTML = userprofile.ID;
document.getElementById('Provider').innerHTML = userprofile.Provider;
document.getElementById('username').innerHTML = (userprofile.FirstName || '') + ' ' + (userprofile.MiddleName || '') + ' ' + (userprofile.LastName || '');
document.getElementById('emailid').innerHTML = userprofile.Email && userprofile.Email.length > 0 ? userprofile.Email[0].Value : '';
document.getElementById('birthdate').innerHTML = userprofile.BirthDate;
document.getElementById('gender').innerHTML = userprofile.Gender;
document.getElementById('profileurl').innerHTML = userprofile.ProfileUrl;
 });
 }
2)We also implement a button for logout,when you click logout button that calls logout function those store in the controllers.js file.
<div class="col text-center">
<button class="button button-assertive"  ng-click ="Logout()">
Logout
</button>
Logout function in controllers.js file
 $scope.Logout = function() {
window.location = "index.html";
 $scope.lr.sdkLogout();
}
Account Linking
After redirection Triggers the Account Linking interface when you successfully login In
lr.accountLink()
You must add an HTML div for AccountLinking interface
<div id="interfacecontainerdiv_link" class="interfacecontainerdiv_link"></div>
<script type="text/html" id="loginradiuscustom_tmpl_link">
<# if(isLinked) { >
 <div class="lr-linked">
<a class="lr-provider-label" href="javascript:void(0)" title="<#= Name >" alt="Connected">
<#=Name#> is connected
</a>
<a  onclick='return  <#=ObjectName#>.util.unLinkAccount(\"<#= Name.toLowerCase() >\",\"<#= providerId >\")'>delete</a>
</div>
<# }  else {#>
 <div class="lr-unlinked">
<a class="lr-provider-label" href="javascript:void(0)" onclick="return  <#=ObjectName#>.util.openWindow('<#= Endpoint >');" title="<#= Name >" alt="Sign in with <#=Name#>">
<#=Name#></a>    </div>
  <# } >
</script>
Profile Update
After redirection Triggers the Profile Update interface when you successfully login In
lr.profileUpdate()
You must add an HTML div for Profile Update interface
<div id="profileeditor-container"></div>
Change Password
After redirection Triggers the Change Password interface when you successfully login In
lr.changePassword()
You must add an HTML div for Change Password interface
<div id="changepassword-container"></div>
Update Phone
After redirection Triggers the Update Phone interface when you successfully login In
lr.updatePhone()
You must add an HTML div for Update Phone interface
<div id="updatephone-container"></div>
Add Email
After redirection Triggers the Add Email interface when you successfully login In
lr.addEmail()
You must add an HTML div for Add Email interface
<div id="addemail-container"></div>
Remove Email
After redirection Triggers the Remove Email interface when you successfully login In
lr.removeEmail()
You must add an HTML div for Remove Email interface
<div id="removeemail-container"></div>
ChangeUsername
After redirection Triggers the ChangeUsername interface when you successfully login In
lr.changeUsername()
You must add an HTML div for ChangeUsername interface
<div id="changeusername-container"></div>
Smart Login Feature
If a user is trying to login on a Smart TV, typing the password on a TV remote can be challenging. By enabling this option, users can enter their email address or username and click on the smartLogin button. An email is then sent to the user's email address, containing a link to login to the Smart TV.
lr.smartLogin()
You must add an HTML div for autoLogin interface
<div id="smartLogin-container"></div>
- Ping Request
After the click on login button client will continuously ping the server to confirm that user has clicked on link in email or not. Smart Login has following common options.
commonOptions.smartLoginPingCount = <any number>; //default is 100 times
commonOptions.smartLoginPingInterval = <any number>; //default is 5 second
commonOptions.smartLoginEmailTemplate = <Email template>
commonOptions.smartLoginRedirectUrl = <Redirect Url>
On Touch Login
This API is used to send login link on email id for OneTouchLogin
lr.oneTouchLogin()
You must add an HTML div for One Touch Login interface
<div id="onetouchLogin-container"></div>
Update Security Question
This API is used to Update Security Question.
lr.updateSecurityQuestion()
You must add an HTML div for updateSecurityQuestion interface
<div id="securityQ-container"></div>
Reset Password By Security Question
This API is used to Reset Password By Security Question.
lr.resetPasswordBySecurityQuestion()
You must add an HTML div for resetPasswordBySecurityQuestion interface
<div id="resetPasswordBySecQ-container"></div>
##Advanced options
Phone Login
If you want to set Phone Number login then you pass in commonOptions.
commonOptions.phoneLogin = true;
Native Login
Supported Devices
Currently, only Facebook is supported for native login with our SDK for Android and iOS.
Facebook Native Login
Before you can enable native login, you can also read and check instruction about Ionic Facebook Login.
you must install the Apache Cordova Facebook Plugin into your current project for facebook native login. To function properly, it is highly recommended you follow the iOS installation guide and the Android installation guide.
lroptions.facebookNative = true;
- Facebook Configuration for Facebook Native Login
Create a new Facebook App on the Facebook Developer site. You will need to create an Android application and get a Facebook Application ID: https://developers.facebook.com/
Android
- Create a Development Key Hash Facebook uses the key hash to authenticate interactions between your app and the Facebook app. If you run apps that use Facebook Login, you need to add your Android development key hash to your Facebook developer profile. You need to add this code under activity onCreate method.Put your activity package name in this code. After that run the below code and you'll get KeyHash in logs.
try {
       PackageInfo info = getPackageManager().getPackageInfo(
               "put-your-Activity-package-name",
               PackageManager.GET_SIGNATURES);
       for (Signature signature : info.signatures) {
           MessageDigest md = MessageDigest.getInstance("SHA");
           md.update(signature.toByteArray());
           Log.d("KeyHash:", Base64.encodeToString(md.digest(), Base64.DEFAULT));
           }
   } catch (NameNotFoundException e) {
   } catch (NoSuchAlgorithmException e) {
   }
-
Now select My Apps and create a new app using "Add a New App".
-
After the creation of App, Click on setting into left panel, Select Add Plateform and choose Android
-
After generating KeyHash successfully, you need to setup below setting and fill the required fields e.g. Package Name & Class Name.

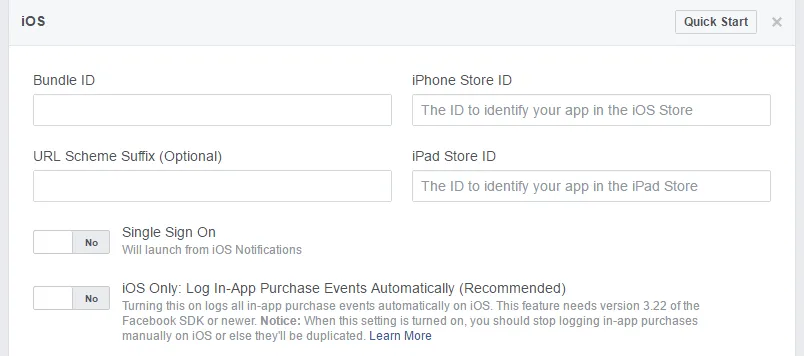
iOS
- After the creation of App, Click on setting into left panel, Select Add Plateform and choose iOS.
- Pass your project bundle ID, iPhone store ID and iPad store ID.
GOOGLE NATIVE LOGIN
Before you can enable native login, you must install the Apache Cordova Google Plugin into your current project for google native login.
lroptions.apikey = "YOUR API KEY HERE";

//Enable native login if available.

lroptions.googleNative = false;
lroptions.googlewebid=""; // if you set google native login then you must be add your webClientId
You need to set googleNative true to ebable the Google Native Login.
Google Configuration for Google Native Login
Android:-
-
To configure Android, generate a configuration file here. Once Google Sign-In is enabled Google will automatically create necessary credentials in Developer Console. There is no need to add the generated google-services.json file into your cordova project.
-
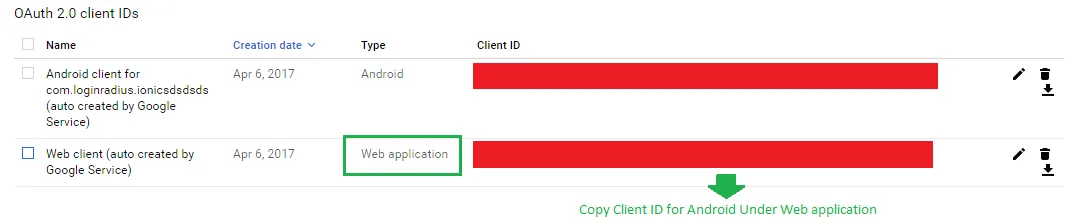
After generating the configuration file, move to Google Credentials Manager and select your project name (Which you have created) in the header section. Now Select Credentials from the left panel and copy the Client ID available under project's web application.
-
Now pass the Client ID as
cordova plugin add cordova-plugin-googleplus --save --variable REVERSED_CLIENT_ID=myClintID -
After Installation set Client ID to LR options.
lroptions.googlewebid="<YOUR CLIENT ID>";
iOS:-
-
To get your iOS REVERSED_CLIENT_ID, generate a configuration file here. This GoogleService-Info.plist and just drag & drop in your project's "Resources" folder.
-
The file contains the REVERSED_CLIENT_ID you'll need during installation and also copy CLIENT_ID from "GoogleService-Info.plist" and pass this on lroptions
lroptions.googlewebid=""; -
Common Error messages: 12501 : This is more commonly caused by an incorrect SHA1 being used to set up your project with Google. Make sure that the SHA1 of the build you are testing matches what you used in the Developer's Console.
10 : Make sure that the client id you're passing in to the plugin (for webClientId) is of type Web Application, not of type Android, iOS, or other.
Make sure that you're Android SDK is completely up to date (see the list posted in my initial response above).
Finally, make sure that the SHA1 you used to set up in the developer's console is the same one that ionic is using when it builds your app. If it's not, log in will not work.
VK NATIVE LOGIN
Before you can enable native login, you must install the Apache Cordova social vk into your current project for vkontakte native login.
lroptions.apikey = "YOUR API KEY HERE";

//Enable native login if available.

lroptions.vkNative = true;
lroptions.vkAppId=""; // if you set vkontakte native login then you must be add your vkAppId
Alternative Language Support
1)Label Customization Hook
This hook provides you with a quick and easy way to access and customize the label for your user registration form
 // "field-name": "New Label"
LRObject.$hooks.call('customizeFormLabel',{
  "emailid" : "Email Address",
  "password" : "Password"
});
Note:
In order to customize custom fields, Please add prefix "cf_" with field-name.
2)Placeholder Customization Hook
This hook helps you setup customized placeholders for form elements.
LRObject.$hooks.call('customizeFormPlaceholder',{
  "emailid" : "Enter your email address",
  "password" : "Enter Your password"
});
3)Customize Button Name
This hook provides you with a quick and easy way to customize the button name of your form.
 // "action-name": "New button name"
LRObject.$hooks.call('setButtonsName',{
 login : "Login",
 registration:'Register'
});
4)Raw Registration Schema
In some cases you want to compare user's profile with the schema you defined in the LoginRadius Admin Console. You can call this function to retrieve the raw schema you defined in your account Admin Console as the first parameter, and when user login from Social Id provider, then you will get userprofile as second parameter in following code:
LRObject.$hooks.register('registrationSchemaFilter',registrationSchema);
function registrationSchema(regSchema, userProfile) {
  // console.log( regSchema );
  // console.log( userprofile );
}
5)Social Login Render Hook
If a user is using social login, then there are chances that the social provider doesn’t give the required field that is needed while implementing registration so you can implement this function to trigger on events after the registration form renders. We can hide the social login interface when the missing required fields form renders. Use cases: "hide the social login interface when the missing required fields form renders"
LRObject.$hooks.register('socialLoginFormRender',function(){
   //on social login form render
});
6)Custom Error Message Hook
This hook allows you to write custom error messages and descriptions based on the error code generated by LoginRadius.
LRObject.$hooks.call('mapErrorMessages',[{
            code: 967,
    message: "email id is not valid formatted",
    description: "email id is not valid formatted"
}, {
    code: 966,
    message: "Username password are wrong",
    description: "Username password are wrong, please enter correct combination of username password"
}]
);
7)Custom Validation Message Hook
This hook allows writing custom validation message by rules generated from LoginRadius. %s will be replaced by field name
LRObject.$hooks.call('mapValidationMessages',[{
    rule: "required",
    message: "The %s field is required."
}, {
    rule: "valid_email",
    message: "The %s field must contain a valid email address."
}]);
Demo
Get a copy of the Ionic Demo projects here.
When you download demo you can configure the demo for ready.In Demo, you must be add in index.html apiKey & appName.Check the above initialization requires an option.
var commonOptions = {};
commonOptions.apiKey = "<your loginradius api key>";
commonOptions.appName = "<LoginRadius tenant name>";
commonOptions.hashTemplate = true;
commonOptions.accessTokenResponse = true;
commonOptions.phoneLogin = false;
commonOptions.sott ="<Get_Sott>";
commonOptions.verificationUrl = "https://auth.lrcontent.com/mobile/verification/index.html";
commonOptions.callbackUrl = 'http://localhost:8100/#/login';
commonOptions.isMobile =true;
commonOptions.formValidationMessage=true;
var LRObject= new LoginRadiusV2(commonOptions);
1)When you set in commonOptions apiKey & appName you get Interface.

2)For Login Interface click Login Button
3)For Register Interface click Register Button

4)For SocialLogin Interface click SocialLogin Button
5)For ForgotPassword Interface click ForgotPassword Button
APIs
Social APIs
After the access token is fetched, we can then safely access any of the Loginradius APIs as follows:
User Profile API
Fetch the user’s details.
<p id="ID"></p>
$scope.lrapi.getUserprofile(function (userprofile) {
    document.getElementById('ID').innerHTML = userprofile.ID;
});
Album API
Fetch the user’s photo albums.
<table id="albums"></table>
$scope.lrapi.getAlbums(function (data) {
    for(var i=0;i<data.length;i++){
        var row = document.createElement('tr');
        var col_1 = document.createElement('td');
        var col_2 = document.createElement('td');
        col_1.innerHTML = 'Title '+(i+1);
        col_2.innerHTML = data[i]['Title'];
        row.appendChild(col_1);
        row.appendChild(col_2);
        document.getElementById('albums').appendChild(row);
    }
});
Audio API
Load the user’s audio files.
<table id="audios"></table>
$scope.lrapi.getAudios(function (data) {
    for(var i=0;i<data.length;i++){
        var row = document.createElement('tr');
        var col_1 = document.createElement('td');
        var col_2 = document.createElement('td');
        col_1.innerHTML = 'Title '+(i+1);
        col_2.innerHTML = data[i]['Title'];
        row.appendChild(col_1);
        row.appendChild(col_2);
        document.getElementById('audios').appendChild(row);
    }
});
Check In API
Loads the user’s checked in data.
<table id="Checkins"></table>
$scope.lrapi.getCheckins(function (data) {
    for(var i=0;i<data.length;i++){
        var row = document.createElement('tr');
        var col_1 = document.createElement('td');
        var col_2 = document.createElement('td');
        col_1.innerHTML = 'PlaceTitle '+(i+1);
        col_2.innerHTML = data[i]['PlaceTitle'];
        row.appendChild(col_1);
        row.appendChild(col_2);
        document.getElementById('Checkins').appendChild(row);
    }
});
Company API
Load the user’s companies they’ve worked for or are working for.
<table id="Company"></table>
$scope.lrapi.getCompanies(function (data) {
    for(var i=0;i<data.length;i++){
        var row = document.createElement('tr');
        var col_1 = document.createElement('td');
        var col_2 = document.createElement('td');
        col_1.innerHTML = 'Name '+(i+1);
        col_2.innerHTML = data[i]['Name'];
        row.appendChild(col_1);
        row.appendChild(col_2);
        document.getElementById('Company').appendChild(row);
    }
});
Contact API
Load the user’s contacts.
<table id="Contacts"></table>
$scope.lrapi.getContacts("0", function (data) {
     for(var i=0;i<data.Data.length;i++){
        var row = document.createElement('tr');
        var col_1 = document.createElement('td');
        var col_2 = document.createElement('td');
        col_1.innerHTML = 'Name '+(i+1);
        col_2.innerHTML = data.Data[i]['Name'];
        row.appendChild(col_1);
        row.appendChild(col_2);
        document.getElementById('Contacts').appendChild(row);
    }
});
Event API
Load the user’s event data.
<table id="Events"></table>
$scope.lrapi.getEvents(function (data) {
    for(var i=0;i<data.length;i++){
        var row = document.createElement('tr');
        var col_1 = document.createElement('td');
        var col_2 = document.createElement('td');
        col_1.innerHTML = 'Name '+(i+1);
        col_2.innerHTML = data[i]['Name'];
        row.appendChild(col_1);
        row.appendChild(col_2);
        document.getElementById('Events').appendChild(row);
    }
});
Following API
Load the user’s following.
<table id="Following"></table>
$scope.lrapi.getFollowings(function (data) {
    for(var i=0;i<data.length;i++){
        var row = document.createElement('tr');
        var col_1 = document.createElement('td');
        var col_2 = document.createElement('td');
        col_1.innerHTML = 'Name '+(i+1);
        col_2.innerHTML = data[i]['Name'];
        row.appendChild(col_1);
        row.appendChild(col_2);
        document.getElementById('Following').appendChild(row);
    }
});
Group API
Load the user’s groups.
<table id="Group"></table>
$scope.lrapi.getGroups(function (data) {
    for(var i=0;i<data.length;i++){
        var row = document.createElement('tr');
        var col_1 = document.createElement('td');
        var col_2 = document.createElement('td');
        col_1.innerHTML = 'Name '+(i+1);
        col_2.innerHTML = data[i]['Name'];
        row.appendChild(col_1);
        row.appendChild(col_2);
        document.getElementById('Group').appendChild(row);
    }
});
Like API
Load the user’s like data.
<table id="Like"></table>
$scope.lrapi.getLikes(function (data) {
    for(var i=0;i<data.length;i++){
        var row = document.createElement('tr');
        var col_1 = document.createElement('td');
        var col_2 = document.createElement('td');
        col_1.innerHTML = 'Name '+(i+1);
        col_2.innerHTML = data[i]['Name'];
        row.appendChild(col_1);
        row.appendChild(col_2);
        document.getElementById('Like').appendChild(row);
    }
});
Mention API
Load the user’s mentions.
<table id="Mention"></table>
$scope.lrapi.getMentions(function (data) {
    for(var i=0;i<data.length;i++){
        var row = document.createElement('tr');
        var col_1 = document.createElement('td');
        var col_2 = document.createElement('td');
        col_1.innerHTML = 'Text '+(i+1);
        col_2.innerHTML = data[i]['Text'];
        row.appendChild(col_1);
        row.appendChild(col_2);
        document.getElementById('Mention').appendChild(row);
    }
});
Message API
Send a Direct Message to a user.
<input type="text" id="receiver" />
<input type="text" id="subject" />
<input type="text" id="message" />
var to = document.getElementById('receiver').value;
var subject = document.getElementById('subject').value;
var message = document.getElementById('message').value;
$scope.lrapi.postMessage(to , subject , message,  function( postmessage){
    if(postmessage.isPosted == true){
        alert("Your status has been successfully posted to the given provider.");
    } else {
        alert("There is some error. Please try again");
    }
});
Page API
Retrieve a liked Page based on PageID
<p id="name"></p>
$scope.lrapi.getPages("put your pageID", function(pages){
   document.getElementById('name').innerHTML = pages['Name'];
});
Post API
Load the user’s posts.
<table id="Post"></table>
$scope.lrapi.getPosts( function ( data){
    for(var i=0;i<data.length;i++){
        var row = document.createElement('tr');
        var col_1 = document.createElement('td');
        var col_2 = document.createElement('td');
        col_1.innerHTML = 'Message '+(i+1);
        col_2.innerHTML = data[i]['Message'];
        row.appendChild(col_1);
        row.appendChild(col_2);
        document.getElementById('Post').appendChild(row);
    }
});
Photo API
Load the user’s photos from an album.
<table id="Photos"></table>
$scope.lrapi.getPhotos("put your albumID",function (data){
    for(var i=0;i<data.length;i++){
        var row = document.createElement('tr');
        var col_1 = document.createElement('td');
        var col_2 = document.createElement('td');
        col_1.innerHTML = 'Name '+(i+1);
        col_2.innerHTML = data[i]['Name'];
        row.appendChild(col_1);
        row.appendChild(col_2);
        document.getElementById('Photos').appendChild(row);
    }
});
Video API
Load the user’s video files.
<table id="Video"></table>
$scope.lrapi.getVideos( function ( data){
    for(var i=0;i<data.length;i++){
        var row = document.createElement('tr');
        var col_1 = document.createElement('td');
        var col_2 = document.createElement('td');
        col_1.innerHTML = 'Name '+(i+1);
        col_2.innerHTML = data[i]['Name'];
        row.appendChild(col_1);
        row.appendChild(col_2);
        document.getElementById('Video').appendChild(row);
    }
});
Status API
Status API can extract the user’s status updates. This API is much more specific to the provider being used in that it works with Facebook or Twitter, but wouldn’t work if the user logged in with Github. The API will check the provider being used against those available and will return an error if it is not supported.
Fetching
Retrieving a list of status updates.
<table id="datatable"></table>
$scope.lrapi.getStatuses( function( data){
    for(var i=0;i<data.length;i++){
        var row = document.createElement('tr');
        var col_1 = document.createElement('td');
        var col_2 = document.createElement('td');
        col_1.innerHTML = 'Status '+(i+1);
        col_2.innerHTML = data[i]['Text'];
        row.appendChild(col_1);
        row.appendChild(col_2);
        document.getElementById('datatable').appendChild(row);
    }
});
Posting
Posting a new status update to the user’s profile.
title<input type="text" id="title" />
url<input type="text" id="url" />
imageurl<input type="text" id="imageurl" />
status<input type="text" id="status" />
caption<input type="text" id="caption" />
description<input type="text" id="description" />
<button type="submit" value="Submit" ng-click="post()">Post Status
</button>
$scope.post=function(){
var status = document.getElementById('status').value;
var title = document.getElementById('title').value;
var url = document.getElementById('url').value;
var imageUrl = document.getElementById('imageurl').value;
var caption = document.getElementById('caption').value;
var description = document.getElementById('description').value;
if(status == "" || status == null) {
    alert("Status cant be null. Please enter some value into the status");
} else {
    $scope.lrapi.postStatus(title,url,status,imageurl,caption,description, function(data){
    if(data.isPosted == true){
    alert("Your status has been successfully posted to the given provider.");
    } else {
    alert("There is some error. Please try again");
    }
});
}
}
Authentication APIs
This API is used to perform operations on a user account after the user has authenticated himself for the changes to be made. Generally, it is used for front end API calls. Following is the list of methods covered under this API:
Check Email Availability
This API is used to check the email exists or not on your site.
$scope.lrapi.checkEmailAvailability("<email>",function(response) {
   alert(JSON.stringify(response));
});
Check Username Availability
This API is used to check the username exists or not on your site.
$scope.lrapi.checkUserNameAvailability("<username>",function(response) {
   alert(JSON.stringify(response));
});
Check Phone Availability
This API is used to check the phone exists or not on your site.
$scope.lrapi.checkPhoneNumberAvailability("<phone>",function(response) {
   alert(JSON.stringify(response));
});
Validate Access Token
This API is used to check the phone exists or not on your site.
$scope.lrapi.validateToken("<access_token>",function(response) {
   alert(JSON.stringify(response));
});
Invalidate Access Token
This API is used to check the phone exists or not on your site.
$scope.lrapi.invalidateToken("<access_token>",function(response) {
   alert(JSON.stringify(response));
});
Resend Verification Email
This API resends the verification email to the user.
$scope.lrapi.resendEmailVerification("<email>",function(response) {
   alert(JSON.stringify(response));
});
Add Email
This API is used to add additional emails to a user's account.
$scope.lrapi.addEmail("<email>","<type>",function(response) {
   alert(JSON.stringify(response));
});
Remove Email
This API is used to remove additional emails from a user's account.
$scope.lrapi.removeEmail("<email>",function(response) {
   alert(JSON.stringify(response));
});
Auth Verify Email
This API is used to verify the email of user. Note: This API will only return the full profile if you have 'Enable auto login after email verification' set in your LoginRadius Admin Console's Email Workflow settings under 'Verification Email'.
$scope.lrapi.emailVerification("<vtoken>",function(response) {
   alert(JSON.stringify(response));
});
Forgot Password
This API is used to send the reset password url to a specified account. Note: If you have the UserName workflow enabled, you may replace the 'email' parameter with 'username'.
$scope.lrapi.forgotPassword("<email>",function(response) {
   alert(JSON.stringify(response));
});
Reset Password by Reset Token
This API is used to set a new password for the specified account.
$scope.lrapi.resetPassword("<resettoken>","<password>","<confirmpassword>",function(response) {
   alert(JSON.stringify(response));
});
Reset Password by Phone
This API is used to reset password for the specified account by Phone.
$scope.lrapi.resetPasswordByPhone("<otp>","<phone>","<password>",function(response) {
   alert(JSON.stringify(response));
});
Forgot Password by Phone
This API is used to send the reset password url to a specified account by Phone.
$scope.lrapi.forgotPasswordbyPhone("<phone>",function(response) {
   alert(JSON.stringify(response));
});
Custom Objects APIs
These APIs are used to read/write/update/Delete information in JSON format to the custom object for the specified account.
Firstly Initialize the object.
commonOptions.objectName="";
-
Get custom objects
LRObject.api.getCustomObjects(token, onSuccess, onError); -
Create custom object
LRObject.api.createCustomObject(token, customObjectJSON, onSuccess, onError); -
Get custom object by id
LRObject.api.getCustomObjectById(token, objectrecordid, onSuccess, onError); -
Delete custom object
LRObject.api.deleteCustomObject(token, objectrecordid, onSuccess, onError); -
Update custom object
LRObject.api.updateCustomObjectByRecordId(token, objectrecordid, customObjectJSON, onSuccess, onError);