
iOS Library
This document provides instructions to integrate the LoginRadius User Registration Service or Social Login in an iOS app.
This library is meant to help you with a quick implementation of the LoginRadius platform and also to serve as a reference point for the LoginRadius API. Keep in mind that it is an open-source library, which means you are free to download and customize the library functions based on your specific application needs.
Requirements
OS X, Xcode and iOS 11 or higher.
This release has breaking changes from the previous SDK.
This version is a complete revamp of the previous SDK. Please refer to the changelog for a complete list of changes and improvements.
Installation
We recommend using CocoaPods for installing the library in a project.
CocoaPods
CocoaPods is a dependency manager for Cocoa projects. You can install it with the following command:
$ gem install cocoapods
Podfile
Open a terminal window and navigate to the location of the Xcode project for your application. If you have not already created a Podfile for your application, create one now:
$ pod init
To integrate LoginRadiusSDK into your Xcode project using CocoaPods, specify it in your Podfile:
source 'https://github.com/CocoaPods/Specs.git'
platform :ios, '11.0'
target 'TargetName' do

## Comment the next line if you don't want to use dynamic frameworks
use_frameworks!
pod 'LoginRadiusSDK', '~> 6.0.0'
end
Then, run the following command:
$ pod install
Swift Package Manager
The Swift Package Manager is a tool for automating the distribution of Swift code and is integrated into the swift compiler.
To add LoginRadiusSDK to your project using SwiftPM follow these steps:
- Open your project in Xcode
- In the main menu, select File > Swift Packages > Add Package Dependency.
- In the window, enter the package url: https://github.com/LoginRadius/ios-sdk.git.
To use LoginRadiusSDK in your code, import the module or header files as needed:
Objective-C
Swift
#import <LoginRadiusSDK/LoginRadius.h>
import LoginRadiusSDK
Setup Prerequisites
To get your app supported by LoginRadius iOS SDK, you need to slightly configure your LoginRadius user account.
- Enable
<AppName>://- in your Admin Console > Tenant settings > Configured Domains. Ex: sampleapp://
- Configure Email Templates.
Change the following URL
#Url#?vtype=emailverification&vtoken=#GUID#
to
#Url#?vtype=emailverification&vtoken=#GUID#&apikey=<Your-LoginRadius-API-Key>
And the same changes should also be applied to your Reset Password Email Template Configuration.
Initialize SDK
-
Create a new File
LoginRadius.plistand add it to your App -
Add the following entries to your
LoginRadius.plist
| Key | Type | Required |
|---|---|---|
| apiKey | String | Yes |
| siteName | String | Yes |
| verificationUrl | String | Optional,(Default URL: https://auth.lrcontent.com/mobile/verification/index.html) |
| useKeychain* | Boolean | Optional, No by default |
| customDomain | String | Optional,(Default URL: https://api.loginradius.com/) |
| customHeaders | Dictionary | Optional,(add string type key value pairs, e.g “x-headerkeyExample": “<< header value>>" ) |
| registrationSource | String | Optional,(Default: iOS) |
useKeychain needs to enable keychain sharing to work properly, to see visually how to enable it see here
Obtaining Sitename and API key
Details on obtaining Sitename can be found here and for API key click here
- Import the module in your source code.
Objective-C
Swift
#import <LoginRadiusSDK/LoginRadius.h>
import LoginRadiusSDK
Swift
For Swift projects, you need to create an Objective-C Bridging Header, please check Apple Documentation
Application is launched
Initialize the SDK with your API key and tenant name in your AppDelegate.m or AppDelegate.swift
Objective-C
Swift
//  AppDelegate.m

#import <LoginRadiusSDK/LoginRadius.h>

- (BOOL)application:(UIApplication _)application didFinishLaunchingWithOptions:(NSDictionary _)launchOptions {
  LoginRadiusSDK \* sdk = [LoginRadiusSDK instance];
  [sdk applicationLaunchedWithOptions:launchOptions];

      //Your code

      return YES;

  }
import LoginRadiusSDK
 ...

@UIApplicationMain class AppDelegate: UIResponder, UIApplicationDelegate {

...

func application(_ application: UIApplication, didFinishLaunchingWithOptions launchOptions:[UIApplicationLaunchOptionsKey: Any]?) -> Bool {

            let sdk:LoginRadiusSDK = LoginRadiusSDK.instance();
            sdk.applicationLaunched(options: launchOptions);

            //Your code

            return true
 }

...

}
Application to listen your URL
You need to configure your Custom URL Scheme for this library to work.
- In Xcode, right-click on your project's .plist file and select Open As -> Source Code. Default plist is usually your Info.plist file
- Insert the following XML snippet into the body of your file just before the final
</dict>element. Replace{your-sitename}with your LoginRadius tenant name. And then Replace{your-app-bundle-identifier}with your app's bundle identifier. If you don't know where is your app bundle identifier, see 2a.
<key>CFBundleURLTypes</key>
<array>
  <dict>
    <key>CFBundleURLSchemes</key>
    <array>
      <string>`{your-sitename}.{your-app-bundle-identifier}`</string>
    </array>
  </dict>
</array>
- If you don't know where is your app bundle identifier, see below

Application is asked to open URL
Call this to handle URL's for social login to work properly in your AppDelegate.m
Objective-C
Swift
//  AppDelegate.m
- (BOOL)application:(UIApplication *)app openURL:(NSURL *)url options:(NSDictionary<UIApplicationOpenURLOptionsKey,id> *)options {
    return [[LoginRadiusSDK sharedInstance] application:app
                                                openURL:url
                                      sourceApplication:options[UIApplicationOpenURLOptionsSourceApplicationKey]
                                             annotation:options[UIApplicationOpenURLOptionsAnnotationKey]];
}
@UIApplicationMain class AppDelegate: UIResponder, UIApplicationDelegate {
func application(_ app: UIApplication, open url: URL, options: [UIApplicationOpenURLOptionsKey : Any] = [:])
-> Bool
{
return LoginRadiusSDK.sharedInstance().application(app, open: url, sourceApplication: options[UIApplicationOpenURLOptionsKey.sourceApplication] as? String, annotation: options[UIApplicationOpenURLOptionsKey.annotation])
}
}
Integrate Registration Service
Registration service supports traditional registration and login methods.
Registration Service is done through the Authentication API.
Registration requires a parameter called SOTT. You can create the SOTT token by following this doc
Parameters and their Description:
| Name | Description | Required |
|---|---|---|
| SOTT | Secure One-time Token which you can check information about sott here | Yes for Registration. You can generate a long term SOTT token from the Admin Console under Deployment -> Apps -> Mobile Apps (SOTT). |
| smstemplate | SMS template allows you to customize the formatting and text of SMS sent by users who share your content. | NO |
| emailTemplate | Email templates allow you to customize the formatting and text of emails sent by users who share your content. Templates can be text-only, or HTML and text, in which case the user's email client will determine which is displayed. | NO Go To API Configuration -> Email Workflow to get the template names |
Registration by Email:
Objective-C
Swift
NSDictionary *payload=@{ @"Email": @[ @{ @"Type": @"Primary", @"Value": @"test@gmail.com"}],@"Password": @"password" };

[[AuthenticationAPI authInstance]  userRegistrationWithSott:@"<your sott here>"  payload:payload emailtemplate:nil smstemplate:nil preventVerificationEmail:false completionHandler:^(NSDictionary * _Nullable data, NSError * _Nullable error) {

    if (!error) {
        // Registration only registers the user. Call login to set the session
        NSLog(@"successfully reg %@", data);
    } else {
        NSLog(@"Error: %@", [error description]);
    }

}];
let email:AnyObject = [ "Type":"Primary","Value":"test@gmail.com" ] as AnyObject
let parameter:AnyObject = [ "Email": [email],
                            "Password":"password"
                          ]as AnyObject

AuthenticationAPI.authInstance().userRegistration(withSott:sott,payload:parameter as! [AnyHashable : Any], emailtemplate:nil, smstemplate:nil,preventVerificationEmail:false, completionHandler: { (data, error) in

        if let err = error
        {
            print(err.localizedDescription)
        }else{
            print("successfully registered");
        }

})
Registration API will only create a user. To retrieve userprofile and access_token, please call Login API.
For all the possible payload fields, please check the Auth User Registration by Email API
Registration by Phone:
Objective-C
Swift
NSDictionary *payload=@{ @"PhoneId": @"xxxxxxxxxxx",
                          @"Password": @"password"
                        };

[[AuthenticationAPI authInstance]  userRegistrationWithSott:@"<your sott here>"  payload:payload emailtemplate:nil smstemplate:nil preventVerificationEmail:false completionHandler:^(NSDictionary * _Nullable data, NSError * _Nullable error) {

    if (!error) {
        // Registration only registers the user. Call login to set the session
        NSLog(@"successfully reg %@", data);
    } else {
        NSLog(@"Error: %@", [error description]);
    }

}];
let parameter:AnyObject = [ "PhoneId": "xxxxxxx",
                            "Password":"password"
                          ]as AnyObject

AuthenticationAPI.authInstance().userRegistration(withSott:sott,payload:parameter as! [AnyHashable : Any], emailtemplate:nil, smstemplate:nil,preventVerificationEmail:false, completionHandler: { (data, error) in

        if let err = error
        {
            print(err.localizedDescription)
        }else{
            print("successfully registered");
        }

})
Integrate Traditional Login
Following code can be used for the implementation of traditional login:
Login by Email:
Call this function to login the user by email.
Objective-C
Swift
NSDictionary *parameter =  @{ @"Email":@"email",
                           @"Password":@"password",
                           @"securityanswer":@""
                           };

[[AuthenticationAPI authInstance] loginWithPayload:parameter loginurl:nil emailtemplate:nil smstemplate:nil g_recaptcha_response:nil completionHandler:^(NSDictionary * _Nullable data, NSError * _Nullable error) {
        if (!error) {
            NSLog(@"successfully logged in %@", data);
        } else {
            NSLog(@"Error: %@", [error description]);
        }
    }];
let parameter:AnyObject = ["email":"email",
                           "password":"password",
                           "securityanswer":""
                          ]as AnyObject

AuthenticationAPI.authInstance().login(withPayload:parameter as! [AnyHashable : Any], loginurl:nil, emailtemplate:nil, smstemplate:nil, g_recaptcha_response:nil,completionHandler: { (data, error) in

     if let err = error {
        print(err.localizedDescription)
    } else {
        print("login successful")
    }
})
Login by Phone:
Call this function to login the user by phone.
Objective-C
Swift
NSDictionary *parameter =  @{ @"Phone":@"",
                              @"Password":@"",
                              @"securityanswer":@""
                            };
[[AuthenticationAPI authInstance] loginWithPayload:parameter loginurl:nil emailtemplate:nil smstemplate:nil g_recaptcha_response:nil completionHandler:^(NSDictionary * _Nullable data, NSError * _Nullable error) {
        if (!error) {
            NSLog(@"successfully logged in %@", data);
        } else {
            NSLog(@"Error: %@", [error description]);
        }
    }];
let parameter:AnyObject = ["phone":"",
                          "password":"",
                          "securityanswer":""
                        ]as AnyObject
AuthenticationAPI.authInstance().login(withPayload:parameter as! [AnyHashable : Any], loginurl:nil, emailtemplate:nil, smstemplate:nil, g_recaptcha_response:nil,completionHandler: { (data, error) in

     if let err = error {
        print(err.localizedDescription)
    } else {
        print("login successful")
    }
})
Login by UserName:
Call this function to login the user by username.
Objective-C
Swift
NSDictionary *parameter =  @{ @"username":@"",
                            @"Password":@"",
                            @"securityanswer":@""
                          };
[[AuthenticationAPI authInstance] loginWithPayload:parameter loginurl:nil emailtemplate:nil smstemplate:nil g_recaptcha_response:nil completionHandler:^(NSDictionary * _Nullable data, NSError * _Nullable error) {
        if (!error) {
            NSLog(@"successfully logged in %@", data);
        } else {
            NSLog(@"Error: %@", [error description]);
        }
    }];
let parameter:AnyObject = ["username":"","password":"",
                           "securityanswer":""
                          ]as AnyObject
AuthenticationAPI.authInstance().login(withPayload:parameter as! [AnyHashable : Any], loginurl:nil, emailtemplate:nil, smstemplate:nil, g_recaptcha_response:nil,completionHandler: { (data, error) in

     if let err = error {
        print(err.localizedDescription)
    } else {
        print("login successful")
    }
})
You can store access_token and userProfile after successful login in LRSession for a long time.
Objective-C
Swift
LRSession *session = [[LRSession alloc] initWithAccessToken:access_token userProfile:[[data mutableCopy] replaceNullWithBlank]];
LRSession.init(accessToken:access_token as String, userProfile:data!)
After storing the value, you can get the userProfile and access_token from LRSession.
Objective-C
Swift
// Check for `isLoggedIn` on app launch to check if the user is logged in.

NSDictionary *profile =  [[[LoginRadiusSDK sharedInstance] session] userProfile];
NSString *access_token =  [[[LoginRadiusSDK sharedInstance] session] accessToken];
NSString *alreadyLoggedIn =  [[[LoginRadiusSDK sharedInstance] session] isLoggedIn];
//Check for `isLoggedIn` on app launch to check if the user is logged in.
let profile = LoginRadiusSDK.sharedInstance().session.userProfile
let access_token = LoginRadiusSDK.sharedInstance().session.accessToken
let alreadyLoggedIn = LoginRadiusSDK.sharedInstance().session.isLoggedIn
Integrate Forgot Password
Following code can used for the implementation of forgot password feature:
Forgot Password by Email
This API is used to send the reset password URL to a specified account. Note: If you have the UserName workflow-enabled, you may replace the 'email' parameter with 'username.' Call this function to send a reset password link to the specified account.
Objective-C
Swift
[[AuthenticationAPI authInstance] forgotPasswordWithEmail:@"<your email>" emailtemplate:nil completionHandler:^(NSDictionary * _Nullable data, NSError * _Nullable error) {
       if (!error) {
           NSLog(@"Successfully sent email");
       } else {
           NSLog(@"Error: %@", [error description]);
       }
    }];
AuthenticationAPI.authInstance().forgotPassword(withEmail:"<your email>", emailtemplate:nil,completionHandler: {(response, error) in
    if let err = error {
        print(err.localizedDescription)
    } else {
        print("Successfully sent email");
    }
})
Forgot Password By Phone
Call this function to send a reset password link to the specified account.
Objective-C
Swift
[[AuthenticationAPI authInstance ] forgotPasswordWithPhone:@"<phone>" smstemplate:nil completionHandler:^(NSDictionary * _Nullable data, NSError * _Nullable error) {
       if (!error) {
           NSLog(@"Successfully sent email");
       } else {
           NSLog(@"Error: %@", [error description]);
       }
    }];
AuthenticationAPI.authInstance().forgotPassword(withPhone:"<your phone>", smstemplate:nil,completionHandler: {(data, error) in
    if let err = error {
        print(err.localizedDescription)
    } else {
        print("Successfully sent email");
    }
})
Integrate Social Login
Social Login can be done in two ways.
- Web Social Login: This is done using
SFSafariViewControllerorWKWebView.
Note: Facebook and Google no longer allow OAuth requests in embedded browsers on iOS. For Google or Facebook social login to work, you will need to use the Native Social Login implementation method.
- Native Social Login
Login is done natively, utilizing the respective provider SDK's.
Web Social Login
Social Login with the given provider. Call this function in the view controller you have set up for the button views.
To integrate Web Social Login. Follow the steps
-
Enable https://auth.lrcontent.com in your site list, please add it under Admin Console > Tenant settings > Configured Domains for Social Login to work correctly.
-
Whitelist the Apps callback URL where you want to redirect your users after successfuly social login in the Admin Console > Tenant settings > Configured Domains section of the Admin console. e.g
<<LoginRadius tenant name>>.com.loginradius.SwiftDemo:// -
Call
loginWithProvider:inController:completionHandler:method with the appropriate params in your Application to start Web Social Login.For complete list of social login providers: Ref to this support doc
Example:
Objective-C
Swift
[[LoginRadiusSocialLoginManager sharedInstance] loginWithProvider:@"facebook" inController:self completionHandler:^(NSDictionary *data, NSError *error) {
        if (success) {
            NSLog(@"Successfully logged in");
        } else {
            NSLog(@"Error: %@", [error description]);
        }
    }];
LoginRadiusSocialLoginManager.sharedInstance().login(withProvider: "facebook", in: self, completionHandler: { (data, error) in

        if let err = error {
            print(err.localizedDescription)
        } else {
            print("successfully logged in");
        }
    })
Native Social Login
Apple native login
For Native Apple login to work, create and configure your apple app as per loginradius docs.
Apple sign-in is being done by the Xcode inbuild apple authentication services. This is an inbuilt service that provides Sign in with Apple Feature. By adding the Apple sign in from Xcode prebuild libraries, get added, and for implementing apple sign in for IOS, please follow the below steps.
Project Configuration First, set the development team in the Signing & Capabilities tab in your project so Xcode can create a provisioning profile that. If you've already created a project and provisioning profile, then ignore this. After that, click on capability and Add the Sign In with Apple in your project. This will add an entitlement that lets your app use Sign In with Apple.
- Add Apple Login Button AuthenticationServices framework provides ASAuthorizationAppleIDButton to enables users to initiate the Sign In with Apple flow. Adding this button is very simple. You just need to create an instance of ASAuthorizationAppleIDButton and add a target for touchUpInside action. After that, you can add this button in your view.
let btnAuthorization = ASAuthorizationAppleIDButton()
btnAuthorization.frame = CGRect(x: 0, y: 0, width: 200, height: 40)
btnAuthorization.center = self.view.center
btnAuthorization.addTarget(self, action: #selector(actionHandleAppleSignin), for: .touchUpInside)
self.view.addSubview(btnAuthorization)
- Handle Login Process Now on the press of Sign In with Apple Button, we need to use a provider (ASAuthorizationAppleIDProvider) to create a request (ASAuthorizationAppleIDRequest), which we then use to initialize a controller (ASAuthorizationController) that performs the request. We can use one or more of ASAuthorization.Scope values in the requested scopes array to request certain contact information from the user.
 // Perform acton on click of Sign in with Apple button
 @objc func actionHandleAppleSignin() {
    let appleIDProvider = ASAuthorizationAppleIDProvider()
    let request = appleIDProvider.createRequest()
    request.requestedScopes = [.fullName, .email]

    let authorizationController = ASAuthorizationController(authorizationRequests: [request])
    authorizationController.delegate = self
    authorizationController.presentationContextProvider = self
    authorizationController.performRequests()
}
- ASAuthorizationController Delegate AuthorizationController(controller: didCompleteWithAuthorization:) tells the delegate that authorization completed successfully.
 // ASAuthorizationControllerDelegate function for successful authorization
 func authorizationController(controller: ASAuthorizationController, didCompleteWithAuthorization authorization: ASAuthorization) {
    if let appleIDCredential = authorization.credential as? ASAuthorizationAppleIDCredential {
        // Create an account as per your requirement
        let appleId = appleIDCredential.user
        let appleUserFirstName = appleIDCredential.fullName?.givenName
        let appleUserLastName = appleIDCredential.fullName?.familyName
        let appleUserEmail = appleIDCredential.email
        let appleUserToken = appleIDCredential.authorizationCode as! Data
        if let string = String(bytes: appleUserToken, encoding: .utf8) {
        print(string)
        exchangeAppleToken(code : string)
        } else {
            print("not a valid UTF-8 sequence")
        }
        //Write your code
    } else if let passwordCredential = authorization.credential as? ASPasswordCredential {
        let appleUsername = passwordCredential.user
        let applePassword = passwordCredential.password
        //Write your code
    }
}
- Exchange LoginRadius Token After getting Authorization Code from Apple you should exchange the code with LoginRadius with a simple LoginRadius Apple Sign in Native API.
func exchangeAppleToken(code : String) {
//@param socialAppName  should have unique social app name as a provider in case of multiple social apps for the same provider (eg. apple_<social app name> )

 LoginRadiusSocialLoginManager.sharedInstance()?.convertAppleCode(toLRToken:code, withSocialAppName:"", completionHandler: {(data, error) in
    if let _ = data
    {
      //Your Code after LoginRadius Authenticate Apple Code
    }else if let err = error
    {
      //User canceled or errored on LoginRadius Authentication Page
    }
})
}
Note:-
In the iOS device, if you want to setup multiple social apps for the same social provider then you can provide a unique app name for that provider.This unique social app name will be passed in the native login as a provider name like : + (eg: "apple_myproduct1" )
For more information regarding the apple setup please look the swift demo
Facebook native login
For Native Facebook login to work, create and configure your Facebook app as per facebook docs.
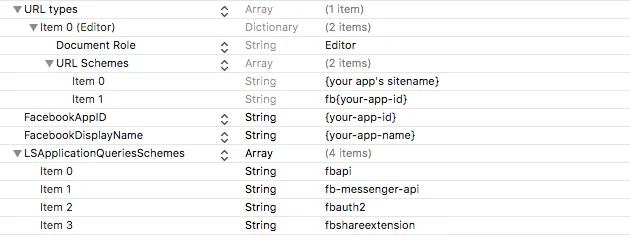
You don't need to download and integrate the Facebook SDK with your project. It is distributed as a dependency with LoginRadius SDK. Just make sure your Info.plist looks like this.
If you are using our demo, then go to our AppDelegate.m / AppDelegate.swift and set useFacebookNative to true to display our native facebook ui.
If you are making your app, then proceed to add these lines of codes.
and you are calling
application:openURL:sourceApplication:annotation in your AppDelegate.m.
Objective-C
Swift
//  AppDelegate.m

- (BOOL)application:(UIApplication *)app openURL:(NSURL *)url options:(NSDictionary<UIApplicationOpenURLOptionsKey,id> *)options {
    return [[LoginRadiusSDK sharedInstance] application:app
                                                openURL:url
                                      sourceApplication:options[UIApplicationOpenURLOptionsSourceApplicationKey]
                                             annotation:options[UIApplicationOpenURLOptionsAnnotationKey]];
}
@UIApplicationMain class AppDelegate: UIResponder, UIApplicationDelegate {

...

func application(_ app: UIApplication, open url: URL, options: [UIApplicationOpenURLOptionsKey : Any] = [:]) -> Bool{
        return LoginRadiusSDK.sharedInstance().application(app, open: url, sourceApplication: options[UIApplicationOpenURLOptionsKey.sourceApplication] as? String, annotation: options[UIApplicationOpenURLOptionsKey.annotation])
 }
...

}
Replace the values with your Facebook App ID and Display name from your App Settings page in Facebook Developer portal
Call the function to start Facebook Native Login.
Objective-C
Swift
//@param socialAppName  should have unique social app name as a provider in case of multiple social apps for the same provider (eg. facebook_<social app name> )

[[LoginRadiusSocialLoginManager sharedInstance] nativeFacebookLoginWithPermissions:@{@"facebookPermissions":@[@"public_profile"]} withSocialAppName:@"" inController:self
      completionHandler: ^(NSDictionary *data, NSError *error){
        if(error){
            [self errorMessage:data error:error];
        }else {
            NSString *access_token= [data objectForKey:@"access_token"];
            NSString *refresh_token= [data objectForKey:@"refresh_token"];
            NSLog(@"LR Token%@",access_token);
            NSLog(@"LR Refresh Token%@",refresh_token);

        }
    }];
//@param socialAppName  should have unique social app name as a provider in case of multiple social apps for the same provider (eg. facebook_<social app name> )

LoginRadiusSocialLoginManager.sharedInstance().nativeFacebookLogin(withPermissions: ["facebookPermissions": ["public_profile"]],withSocialAppName: "", in: self, completionHandler: {( data, error) -> Void in

    if let err = error {
        print(err.localizedDescription)
    } else {
        print("Successfully logged in with facebook")
    }
})
Twitter native login
As of iOS 11, Twitter Native Login is done through the TwitterKit Library. The TwitterKit library works to perform native login on previous iOS versions.
First, you need to create a Twitter App. Get your Twitter Keys from Twitter Dev Console. Go to your App Page, and you will find the keys under Keys And Access Tokens tab.
Then add "TwitterKit" Library to your iOS Project's Podfile.
pod 'TwitterKit'
You can follow the original guide over at Twitter's documentation
Or follow these steps:
1. Instantiate the TwitterKit in AppDelegate during app launch
Objective-C
Swift
- (BOOL)application:(UIApplication *)application didFinishLaunchingWithOptions:(NSDictionary *)launchOptions {

      [[TWTRTwitter sharedInstance] startWithConsumerKey:@"Your twitter consumer key" consumerSecret:@"Your twitter consumer SECRET key"];

      //Your other Library that needs instantiation, e.g. LoginRadiusSDK
  }
func application(_ application: UIApplication, didFinishLaunchingWithOptions launchOptions: [UIApplicationLaunchOptionsKey: Any]?) -> Bool {

      TWTRTwitter.sharedInstance().start(withConsumerKey:"Your twitter consumer key", consumerSecret:"Your twitter consumer SECRET key")

      //Your other Library that needs instantiation, e.g. LoginRadiusSDK
  }
2. Add these in your Info.plist
<key>CFBundleURLTypes</key>
<array>
<dict>
<key>CFBundleURLSchemes</key>
<array>
<string>twitterkit-<consumerKey></string>
</array>
</dict>
</array>
<key>LSApplicationQueriesSchemes</key>
<array>
<string>twitter</string>
<string>twitterauth</string>
</array>
3. Linking your UIButton to Twitter Native Login link it with LoginRadius on success
Objective-C
Swift
//This is the function call linked to a UIButton, you can add IBAction in here to link with the storyboard
  - (void)showNativeTwitterLogin {
      [[TWTRTwitter sharedInstance] logInWithCompletion:
      ^(TWTRSession * _Nullable session, NSError * _Nullable error) {
          if (session){
          //@param socialAppName  should have unique social app name as a provider in case of multiple social apps for the same provider (eg. twitter_<social app name> )

              [[LoginRadiusSocialLoginManager sharedInstance] convertTwitterTokenToLRToken:session.authToken twitterSecret:session.authTokenSecret withSocialAppName:@"" inController:self
              completionHandler:^(NSDictionary * _Nullable data, NSError * _Nullable error) {
                  if (error){
                      //User cancelled or errored on LoginRadius Authentication Page
                  }else{
                      //Your Code after LoginRadius Authenticate Twitter Token
                  }
              }];
          } else if (error){
              //User cancelled or errored on Twitter Authentication Page
          }
      }];
  }
//This is the function call linked to a UIButton, you can add IBAction in here to link with the storyboard
  func showNativeTwitterLogin(){
      TWTRTwitter.sharedInstance().logIn(completion: { (session, error) in
          if let session = session {

          //@param socialAppName  should have unique social app name as a provider in case of multiple social apps for the same provider (eg. twitter_<social app name> )

              LoginRadiusSocialLoginManager.sharedInstance().convertTwitterToken(toLRToken: session.authToken, twitterSecret: session.authTokenSecret, withSocialAppName: "", in: self, completionHandler: {(data, error) in
                  if let _ = data
                  {
                    //Your Code after LoginRadius Authenticate Twitter Token
                  }else if let err = error
                  {
                    //User canceled or errored on LoginRadius Authentication Page
                  }
              })
          } else if let err = error{
            //User cancelled or errored on Twitter Authentication Page
          }
      })
  }
4. Add these code to handle Twitter's URL Redirection in AppDelegate
Objective-C
Swift
- (BOOL)application:(UIApplication *)app openURL:(NSURL *)url options:(NSDictionary<UIApplicationOpenURLOptionsKey,id> *)options {
      BOOL canOpen = NO;
      canOpen = (canOpen || [[TWTRTwitter sharedInstance] application:app openURL:url options:options]);
      canOpen = (canOpen || [[LoginRadiusSDK sharedInstance] application:app
                                                  openURL:url
                                        sourceApplication:options[UIApplicationOpenURLOptionsSourceApplicationKey]
                                               annotation:options[UIApplicationOpenURLOptionsAnnotationKey]]);
      return canOpen;
  }
func application(_ app: UIApplication, open url: URL, options: [UIApplicationOpenURLOptionsKey : Any] = [:]) -> Bool{
      var canOpen = false
      canOpen = (canOpen || TWTRTwitter.sharedInstance().application(app, open: url, options: options))
      canOpen = (canOpen || LoginRadiusSDK.sharedInstance().application(app, open: url, sourceApplication: options[UIApplicationOpenURLOptionsKey.sourceApplication] as? String, annotation: options[UIApplicationOpenURLOptionsKey.annotation]))

      return canOpen
  }
5. As the final step, handle Twitter log out
Objective-C
Swift
- (void)logoutPressed:(id)sender {

      [self twitterLogout];
      [LoginRadiusSDK logout];

      //do your UI logout behaviour, e.g:
      [self.navigationController popViewControllerAnimated:YES];
  }

  - (void) twitterLogout
  {
      NSArray * twitterSessions;
      twitterSessions = [[[Twitter sharedInstance] sessionStore] existingUserSessions];
      if (twitterSessions){
          for (id session in twitterSessions){
              [[[TWTRTwitter sharedInstance] sessionStore] logOutUserID:[session userID]];
          }
      }
  }
func logoutPressed() {
      twitterLogout()
      LoginRadiusSDK.logout()

      //do your UI logout behaviour, e.g:
      let _ = self.navigationController?.popViewController(animated: true)
  }

  func twitterLogout(){
      if let twitterSessions = Twitter.sharedInstance().sessionStore.existingUserSessions() as? [TWTRAuthSession]{
          for session in twitterSessions{
              TWTRTwitter.sharedInstance().sessionStore.logOutUserID(session.userID)
          }
      }
  }
We suggest you to OBFUSCATE YOUR KEYS.
Google native login
Google Native Login is done through Google SignIn Library since this is a static library and has problems when you are using CocoaPods with uses_frameworks!, you have to manually install the SDK.
Follow these steps:
-
For Google SignIn, you would need a configuration file
GoogleServices-Info.plist.You can generate one following the steps here. -
Drag the
GoogleService-Info.plistfile you just downloaded into the root of your Xcode project and add it to all targets. -
Google SignIn requires a custom URL Scheme to be added to your project. Add it to your
Info.plistfile. Make sure your URL Schemes in URL Types look like this.
Replace
{your REVERSED_CLIENT_ID}with value ofREVERSED_CLIENT_IDfromGoogleServices-Info.plistfile. -
Add Google Sign In by following the documentation
-
If you are using our demo, go to our AppDelegate.m / AppDelegate.swift and set useGoogleNative to true to display our native google ui. Our demo already contain all the necessary code to perform native Google Sign in, you just have to uncomment any instance of
/* Google Native SignIn <code block> */If you are making your own app, proceed to add these lines of codes. You can also see our demo to see the native google sign in action!
-
Add Google SignIn Library to your
Podfile.pod 'Google/SignIn' -
Now change your App Delegate's open URL to handle both google native sign in and our default logins
Objective-C
Swift
- (BOOL)application:(UIApplication *)app openURL:(NSURL *)url options:(NSDictionary<UIApplicationOpenURLOptionsKey,id> *)options {

        BOOL canOpen = NO;

        canOpen = [[GIDSignIn sharedInstance] handleURL:url
        sourceApplication:options[UIApplicationOpenURLOptionsSourceApplicationKey]
        annotation:options[UIApplicationOpenURLOptionsAnnotationKey]];

        canOpen = (canOpen || [[LoginRadiusSDK sharedInstance]
        application:app
        openURL:url
        sourceApplication:options[UIApplicationOpenURLOptionsSourceApplicationKey]
        annotation:options[UIApplicationOpenURLOptionsAnnotationKey]]);

        return canOpen;
    }
func application(_ app: UIApplication, open url: URL, options: [UIApplicationOpenURLOptionsKey : Any] = [:]) -> Bool
    {
        var canOpen = false

        canOpen = (canOpen || GIDSignIn.sharedInstance().handle(url, sourceApplication: options[UIApplicationOpenURLOptionsKey.sourceApplication] as! String, annotation: options[UIApplicationOpenURLOptionsKey.annotation]))

        canOpen = (canOpen || LoginRadiusSDK.sharedInstance().application(app, open: url, sourceApplication: options[UIApplicationOpenURLOptionsKey.sourceApplication] as? String, annotation: options[UIApplicationOpenURLOptionsKey.annotation]))

        return canOpen
    }
8. You have to exchange the Google token with LoginRadius Token. Call the following function in the SignIn delegate method after successful sign in.
Objective-C
Swift
- (BOOL)application:(UIApplication *)app openURL:(NSURL *)url options:(NSDictionary<UIApplicationOpenURLOptionsKey,id> *)options {

        BOOL canOpen = NO;

        canOpen = [[GIDSignIn sharedInstance] handleURL:url
        sourceApplication:options[UIApplicationOpenURLOptionsSourceApplicationKey]
        annotation:options[UIApplicationOpenURLOptionsAnnotationKey]];

        canOpen = (canOpen || [[LoginRadiusSDK sharedInstance]
        application:app
        openURL:url
        sourceApplication:options[UIApplicationOpenURLOptionsSourceApplicationKey]
        annotation:options[UIApplicationOpenURLOptionsAnnotationKey]]);

        return canOpen;
    }
func sign(_ signIn: GIDSignIn!, didSignInFor user: GIDGoogleUser!, withError error: Error!) {

        if let err = error
        {
            print("Error: \(err.localizedDescription)")
        }
        else
        {
            let googleToken: String = user.authentication.accessToken
            let refreshToken: String = user.authentication.refreshToken
            let clientID: String = user.authentication.clientID
            if let navVC = self.window?.rootViewController as? UINavigationController,
            let currentVC = navVC.topViewController
            {
            //@param socialAppName  should have unique social app name as a provider in case of multiple social apps for the same provider (eg. google_<social app name> )

                LoginRadiusSocialLoginManager.sharedInstance().convertGoogleToken(toLRToken: googleToken,google_refresh_token:refreshToken, google_client_id:clientID, withSocialAppName:"", in:currentVC, completionHandler: {( data ,  error) -> Void in
                NotificationCenter.default.post(name: Notification.Name("userAuthenticatedFromNativeGoogle"), object: nil, userInfo: ["data":data as Any,"error":error as Any])
                })
            }
        }
    }
9. As the final step, add the google native signOut on your logout button.
Objective-C
Swift
- (IBAction)logoutPressed:(id)sender {

      [[GIDSignIn sharedInstance] signOut];

      [LoginRadiusSDK logout];
      [self.navigationController popViewControllerAnimated:YES];
    }
func logoutPressed() {
        GIDSignIn.sharedInstance().signOut()

        LoginRadiusSDK.logout()
        let _ = self.navigationController?.popViewController(animated: true)
    }
WeChat native login
Firstly you will need to apply for a WeChat ID. The English site is at https://open.wechat.com and the Chinese: https://open.weixin.qq.com. It may only be possible to get the ID using the Chinese site so you will need to enlist the help of a Chinese speaker or Google Translate. There are also two different versions of the SDK, the Chinese and English version.
For Native WeChat login to work, create and configure please look wechat official guide
Wechat Native Login is done through Wechat SignIn Library you can add the library via CocoaPods with use_modular_headers!.
pod 'WechatOpenSDK'
As there are several Objective-C header (.h) files we need to add them to our projects Bridging Header file, just #import "WXApi.h" will suffice.
We also need to add the URL Scheme. Just go to the Info tab in your project and expand URL Types. Add a type with the identifier weixin and the URL Schemes set to the WeChat AppID you got when registering your app.
Finally right click on the Info.plist and edit source to look like so:
<key>LSApplicationQueriesSchemes</key>
<array>
    <string>weixin</string>
</array>
<key>NSAppTransportSecurity</key>
<dict>
    <key>NSAllowsArbitraryLoads</key>
    <true/>
</dict>
This is necessary because iOS9 limits HTTP access.
Exchange LoginRadius Token After getting Authorization Code from Apple you should exchange the code with LoginRadius with a simple LoginRadius Wechat Native API.
 [[LoginRadiusSocialLoginManager sharedInstance] convertWeChatCodeToLRToken:code completionHandler:^(NSDictionary * _Nullable data, NSError * _Nullable error) {
                if(error){
                           self.completion(nil, error);
                       }else {
                           NSString *access_token= [data objectForKey:@"access_token"];
                           NSString *refresh_token= [data objectForKey:@"refresh_token"];
                           NSLog(@"LR Token%@",access_token);
                           NSLog(@"LR Refresh Token%@",refresh_token);
                       }
            }];
For more details please look the WeChat Demo.
Touch ID
LoginRadius SDK provides local authentication with TouchID, if available.
Call the function to start Authentication using TouchID.
Objective-C
Swift
[[LRTouchIDAuth sharedInstance] localAuthenticationWithFallbackTitle:@"" completion:^(BOOL success, NSError *error) {
    if (success) {
        NSLog(@"successfully authenticated with touch id");
    } else {
        NSLog(@"Error: %@", [error description]);
    }
}];
LRTouchIDAuth.sharedInstance().localAuthentication(withFallbackTitle: "", completion: { (success, error) in
    if let err = error{
        print(err.localizedDescription)
    }else{
        print("successfully authenticated with touch id");
    }
})
This way, on logout, the access token, and user profile are conserved, and the TouchID UI appears. You can use the TouchID authentication to go to the profile page. You can only do this if the user logged in once using social login or traditional login.
Face ID
Face ID revolutionizes authentication using facial recognition. Biometric authentication for iOS applications is implemented using the Local Authentication Framework. For detailed information, please refer to the following link https://developer.apple.com/documentation/localauthentication/logging_a_user_into_your_app_with_face_id_or_touch_id.
LoginRadius SDK contains a helper named FaceID. You can use this helper to authenticate using facial recognition, to enable the biometric authentication using face id you need to include the NSFaceIDUsageDescription (Privacy - Face ID Usage Description) key in your app’s Info.plist file. Without this key, the system won’t allow your app to use Face ID. The value for this key is a string that the system presents to the user the first time your app attempts to use Face ID.
| Key | Type | Value |
|---|---|---|
| Privacy - Face ID Usage Description | String | This app uses facial recognition |
Please call the following function for facilitating facial recognition:
Objective-C
Swift
[[LRFaceIDAuth sharedInstance]localAuthenticationWithFallbackTitle:@""    completion:^(BOOL success, NSError *error) {
        if (success){
            NSLog(@"Successfully authenticated with Face ID");
            [self showProfileController];
        }
 else{
            NSLog(@"Error: %@", [error description]);
        }
    }];
LRFaceIDAuth.sharedInstance().localAuthentication(withFallbackTitle: " ", completion: {
        (success, error) in
            if let err = error{
                self.showAlert(title: "ERROR", message: err.localizedDescription)
            }else{
                self.showAlert(title: "SUCCESS", message:"Valid User")
                print("Face ID authentication successfull")
                self.showProfileController()
            }
        })
If you want to validate the type of biometry supported by your device i.e., either FaceID or TouchID, you can use the following code:
Objective-C
Swift
- (void) biometryType
 {
    LAContext *laContext = [[LAContext alloc] init];

    NSError *error;

    if ([laContext  canEvaluatePolicy:LAPolicyDeviceOwnerAuthenticationWithBiometrics error:&error]) {

        if (error != NULL) {
            NSLog(error.description);
        } else {

            if (@available(iOS 11.0.1, *)) {
                if (laContext.biometryType == LABiometryTypeFaceID) {
                    //localizedReason = "Unlock using Face ID"
                    [self showFaceIDLogin];
                    NSLog(@"FaceId support");

                } else if (laContext.biometryType == LABiometryTypeTouchID) {
                    //localizedReason = "Unlock using Touch ID"
                    [self showTouchIDLogin];
                    NSLog(@"TouchId support");

                } else {
                    //localizedReason = "Unlock using Application Passcode"
                    NSLog(@"No Biometric support");
                }

            }
        }
    }
 }
func biometryType()
    {

        let context = LAContext()

            var error: NSError?

            if context.canEvaluatePolicy(
                LAPolicy.deviceOwnerAuthenticationWithBiometrics,
                error: &error) {
           if (error != nil) {
               print(error?.description)
           } else {
               if #available(iOS 11.0.1, *) {
                   if (context.biometryType == .faceID) {
                       //localizedReason = "Unlock using Face ID"
                       self.showFaceIDLogin()
                      print("Face ID supports")
                   } else if (context.biometryType == .touchID) {
                       //localizedReason = "Unlock using Touch ID"
                       self.showTouchIDLogin()
                       print("TouchId support")
                  } else {
                       //localizedReason = "Unlock using Application Passcode"
                     print("No Biometric support")
                    }
                }
            }
        }
    }
Face ID and Touch ID implementation for native iOS applications
Touch ID and Face ID are preferred because these authentication mechanisms let the users access their devices in a secured manner, with minimal efforts. When you adopt the LocalAuthentication framework, you streamline the consumer authentication experience in the typical case while providing a fallback option when biometrics are not available.
Below are the implementation steps to authenticate a user using Face ID or Touch ID :
-
Login a user with email and password leveraging the LoginRadius Login by Email API in LoginRadius iOS SDK.
-
After the successful authentication, the Access Token session will be created and validated as per the Access Token lifetime configured for your site.
-
Now you can leverage the below method to store the token and profile value in the session.
LRSession.init(accessToken:access_token as String, userProfile:data!)
-
You can make your users authenticate using Touch ID or Face ID each time they open the app, and the session will be continued as per their Access Token lifetime.
-
To check if the session already exists or not, use the below method:
let alreadyLoggedIn = LoginRadiusSDK.sharedInstance().session.isLoggedIn -
Now you can implement the Touch ID and Face ID Native Code in your mobile application as per your business requirement.
Refer to the documentation here for more information on logging a user into your application with Touch ID or Face ID.
In the success method, that is called after the success of biometric authentication, you can implement the LoginRadius Auth Read all Profiles by Token API and call this API based on the session store token or you may also be able to get the profile as a well using the below method:
NSDictionary *profile = [[[LoginRadiusSDK sharedInstance] session] userProfile];

NSString *access_token = [[[LoginRadiusSDK sharedInstance] session] accessToken];

//We added a small boolean function if you want to check whether the user is logged in or not.

BOOL isUserLoggedIn = [[[LoginRadiusSDK sharedInstance] session] isLoggedIn];
Refer to the following flow for user’s experience while interacting with the application:
-
User runs the application and needs to login via their credentials (email and password).
-
User closes the application and visits the application after some time (say 2 days).
-
After 2 days, the application will ask the user to login again via Face ID or Touch ID.
-
When a user is successfully authenticated with any of these Biometric Authentication methods, then they can proceed to use the application.
Credential Encryption in Secure Enclave
The Secure Enclave is a hardware-based key manager that’s isolated from the main processor to provide an extra layer of security. Using a secure enclave, we can create the key, securely store the key, and perform operations with the key. Thus makes it difficult for the key to be compromised. For detailed information, please refer to the following link. https://support.apple.com/en-in/guide/security/sec59b0b31ff/web
LoginRadius SDK contains a helper named as SecEnclaveWrapper. You can use this wrapper to encrypt/decrypt sensitive data using Secure Enclave. It provides an extra level of security for Api Credentials inside the SDK using secure enclave encryption, this encryption will encrypt the LoginRadius ApiKey, to enable this encryption you need to set true for setEncryption key into LoginRadius.plist.
| Key | Type | Value |
|---|---|---|
| setEncryption | Boolean | YES |
By default, LoginRadius stores ApiKey in a secure enclave but if you want to store access token or some sensitive data. Please call the following function which return the decrypted NSData value :
NSData  *AccessToken = [@“<access_token_value>”dataUsingEncoding:NSUTF8StringEncoding];
NSData *DecryptedValue = [[LoginRadiusEncryptor sharedInstance]EncryptDecryptText : AccessToken];
NSString *myString:
myString = [[NSString alloc] initWithData:DecryptedValue encoding:NSASCIIStringEncoding];
NSLog(myString);
IP Address
This code retrieves the IP address of your iPhone.
Objective-C
Swift
#include <ifaddrs.h>
#include <arpa/inet.h
#include <net/if.h>
- (NSString *)getIPAddress {
   NSString *address = @"error";
    struct ifaddrs *interfaces = NULL;
    struct ifaddrs *temp_addr = NULL;
    int success = 0;

    // retrieve the current interfaces - returns 0 on success
    success = getifaddrs(&interfaces);
    if (success == 0) {
        // Loop through linked list of interfaces
        temp_addr = interfaces;
        while(temp_addr != NULL) {
            if(temp_addr->ifa_addr->sa_family == AF_INET) {
                // Check if interface is en0 which is the wifi connection on the iPhone
                if([[NSString stringWithUTF8String:temp_addr->ifa_name] isEqualToString:@"en0"]) {
                    // Get NSString from C String
                    address = [NSString stringWithUTF8String:inet_ntoa(((struct sockaddr_in *)temp_addr->ifa_addr)->sin_addr)];
                }
                else if([[NSString stringWithUTF8String:temp_addr->ifa_name] isEqualToString:@"pdp_ip0"]) {
                    // Get NSString from C String
                    address = [NSString stringWithUTF8String:inet_ntoa(((struct sockaddr_in *)temp_addr->ifa_addr)->sin_addr)];
                }
            }

            temp_addr = temp_addr->ifa_next;
        }
    }

    // Free memory
    freeifaddrs(interfaces);

    return address;
}
func getIPAddress() -> String?
{
        var address : String?
        // Get list of all interfaces on the local machine:
        var ifaddr : UnsafeMutablePointer<ifaddrs>?
        guard getifaddrs(&ifaddr) == 0 else { return nil }
        guard let firstAddr = ifaddr else { return nil }
        // For each interface ...
        for ifptr in sequence(first: firstAddr, next: { $0.pointee.ifa_next }) {
            let interface = ifptr.pointee
            // Check for IPv4 or IPv6 interface:
            let addrFamily = interface.ifa_addr.pointee.sa_family
            if addrFamily == UInt8(AF_INET) || addrFamily == UInt8(AF_INET6) {
                // Check interface name:
                // wifi = ["en0"]
                // wired = ["en2", "en3", "en4"]
                // cellular = ["pdp_ip0","pdp_ip1","pdp_ip2","pdp_ip3"]

                let name = String(cString: interface.ifa_name)
                if  name == "en0" || name == "en2" || name == "en3" || name == "en4" || name == "pdp_ip0" || name == "pdp_ip1" || name == "pdp_ip2" || name == "pdp_ip3" {
                    // Convert interface address to a human readable string:
                    var hostname = [CChar](repeating: 0, count: Int(NI_MAXHOST))
                    getnameinfo(interface.ifa_addr, socklen_t(interface.ifa_addr.pointee.sa_len),
                                &hostname, socklen_t(hostname.count),
                                nil, socklen_t(0), NI_NUMERICHOST)
                    address = String(cString: hostname)
                }
            }
        }
        freeifaddrs(ifaddr)
        return address
    }
Latitude and Longitude
This method retrieves the current latitude and longitude of the location. Add a key NSLocationAlwaysUsageDescription in your info.plist.
| Key | Type | Value |
|---|---|---|
| Privacy - Location Always Usage Description | String | App required Location |
Objective-C
Swift
#import "ViewController.h"
 #import <CoreLocation/CoreLocation.h>
 @interface ViewController()
  @end
 @implementation ViewController
 - (void)viewDidLoad {
    [super viewDidLoad];
    // Do any additional setup after loading the view.


    _locationManager = [[CLLocationManager alloc] init];
    _locationManager.delegate = self;
    _locationManager.distanceFilter = kCLDistanceFilterNone;
    _locationManager.desiredAccuracy = kCLLocationAccuracyBest;
           if ([[[UIDevice currentDevice] systemVersion] floatValue] >= 8.0)
               [self.locationManager requestWhenInUseAuthorization];{

                   [_locationManager startUpdatingLocation];
               }

 }

 - (void)locationManager:(CLLocationManager *)manager didUpdateLocations:(NSArray *)locations
     {
        CLLocation *location = [locations lastObject];
        NSLog(@"lat%f - lon%f", location.coordinate.latitude, location.coordinate.longitude);
        [_locationManager stopUpdatingLocation];
    }
@end
import UIKit
import CoreLocation
class ViewController: UIViewController, CLLocationManagerDelegate {

    let locationManager = CLLocationManager()

        override func viewDidLoad()
   {
        super.viewDidLoad()
        // Do any additional setup after loading the view.
        locationManager.delegate = self
        locationManager.requestWhenInUseAuthorization()

  //Call startUpdatingLocation Method to get the coordinates
           locationManager.startUpdatingLocation()


    }
 func locationManager(_ manager: CLLocationManager, didUpdateLocations    locations: [CLLocation]) {
        guard let location = locations.last else { return }
        let latitude = location.coordinate.latitude
        let longitude = location.coordinate.longitude
        print("Latitude: \(latitude), Longitude: \(longitude)")
        locationManager.stopUpdatingLocation()

    }
 }
Device OS Version
This code retrieves the current ios version of your iPhone.
Objective-C
Swift
- (void) OSVersion
{
  NSString *osVersion = [[UIDevice currentDevice] systemVersion];
    NSLog(osVersion);

}
func OSVersion()
    {
        let osVersions = UIDevice.current.systemVersion
        print("Device OS Version: \(osVersions)")
    }
Device Type
This code retrieves the machine code that represents the model of your iPhone, which indicates the type of device you own.
Objective-C
Swift
#import <sys/utsname.h>

 NSString* deviceName()
   {
       struct utsname systemInfo;
       uname(&systemInfo);

       return [NSString stringWithCString:systemInfo.machine
                                 encoding:NSUTF8StringEncoding];
   }
func deviceName() -> String {
        var size = 0
        sysctlbyname("hw.machine", nil, &size, nil, 0)
        var machine = [CChar](repeating: 0, count: size)
        sysctlbyname("hw.machine", &machine, &size, nil, 0)
        return String(cString: machine)
    }
Logout
Log out the user.
Objective-C
Swift
[LoginRadiusSDK logout];
LoginRadiusSDK.logout()
Access Token and User Profile
After successful login or social login, LoginRadius access token and user profile can be accessed like this.
Objective-C
Swift
NSDictionary *profile = [[[LoginRadiusSDK sharedInstance] session] userProfile];
NSString *access_token = [[[LoginRadiusSDK sharedInstance] session] accessToken];
let profile = LoginRadiusSDK.sharedInstance().session.userProfile
let access_token = LoginRadiusSDK.sharedInstance().session.accessToken
We added a small boolean function if you want to check whether the user is logged in or not.
Objective-C
Swift
BOOL isUserLoggedIn = [[[LoginRadiusSDK sharedInstance] session] isLoggedIn];
let isUserLoggedIn = LoginRadiusSDK.sharedInstance().session.isLoggedIn
Single Sign-On
If you have multiple iOS apps and want to have a single sign-on across all of them, here are the steps to do it with the LoginRadius iOS SDK. Under the hood, we use iOS' keychain to do this.
Add this to your LoginRadius.plist for your apps.
| Key | Type | Value |
|---|---|---|
| useKeychain | BOOL | YES |
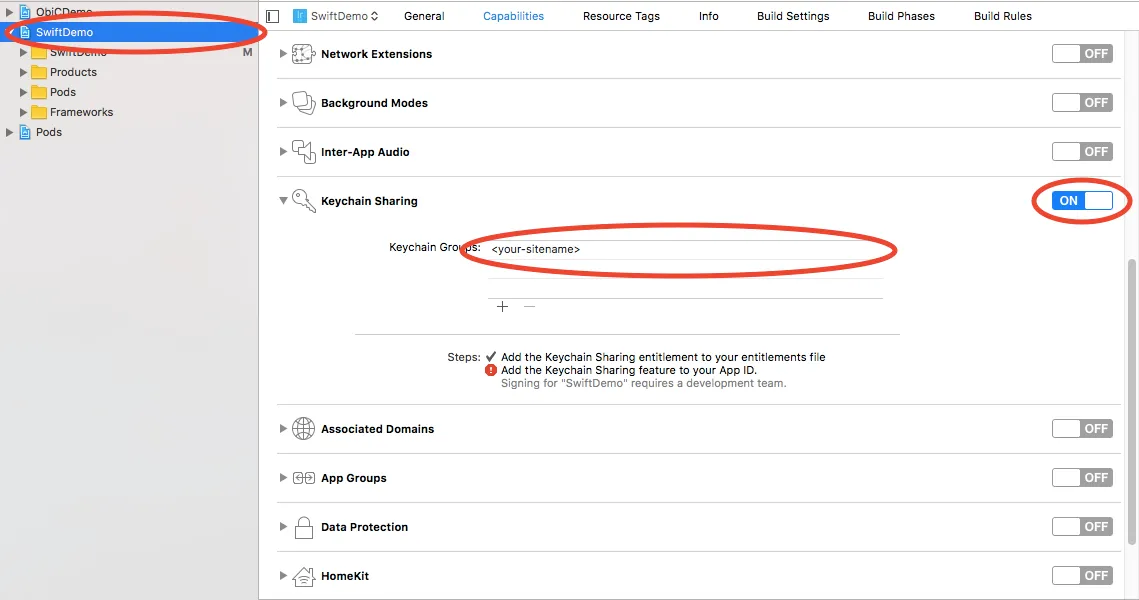
Go to your Project Folder -> Capabilities and under Keychain Sharing add your sitename.
If you are just testing Single Sign-On on LoginRadius' demo apps, you can stop here. All the coding implementation is already done in the demo, and you can just try out the objective c demo and swift demo for the functionality.
If you are creating a fresh new app, continue. For SSO to work, you need to add a few more things to trigger the sign in when the app is moving from background to foreground. Add NSNotification observer on the view controllers that could log the user in. You can see the examples in objective c demo and swift demo.
Objective-C
Swift
- (void)viewWillAppear: (BOOL)animated {
[super viewWillAppear: animated];

...

[
[NSNotificationCenter defaultCenter] addObserver: self
selector: @selector(showProfileController)
name: UIApplicationWillEnterForegroundNotification
object: nil
];


...
}

- (void)viewWillDisappear: (BOOL)animated {
[super viewWillDisappear: animated];

...

[[NSNotificationCenter defaultCenter] removeObserver: self name: UIApplicationWillEnterForegroundNotification object: nil];

...
}
override func viewWillAppear(_ animated: Bool) {
super.viewWillAppear(animated)

...

NotificationCenter.default.addObserver(self, selector: #selector(self.setupForm), name: NSNotification.Name.UIApplicationWillEnterForeground, object: nil)

...
}

override func viewWillDisappear(_ animated: Bool) {
super.viewWillDisappear(animated)

...

NotificationCenter.default.removeObserver(self, name: NSNotification.Name.UIApplicationWillEnterForeground, object: nil)

...
}

deinit
{
NotificationCenter.default.removeObserver(self)
}
When the app triggers "UIApplicationWillEnterForegroundNotification" check our accessToken and userProfile to fetch it from the keychain
Objective-C
Swift
- (void) showProfileController {
if ([[[LoginRadiusSDK sharedInstance] session] isLoggedIn])
{
//go to vc after user logged in
}else
{
//failed to logged in
}
}
func showProfileController () {
if LoginRadiusSDK.sharedInstance().session.isLoggedIn
{
//go to vc after user logged in
}else
{
//failed to logged in
}
}
Do this with all your iOS apps that use the same tenant name.
To make your app, other apps logged out when one of your apps logged out. You need to the same observers to the same events on the viewcontrollers that assumes that the user logged in.
Objective-C
Swift
- (void)viewWillAppear: (BOOL)animated {
[super viewWillAppear: animated];

...

[
[NSNotificationCenter defaultCenter] addObserver: self
selector: @selector(checkForLogin)
name: UIApplicationWillEnterForegroundNotification
object: nil
];


...
}

- (void)viewWillDisappear: (BOOL)animated {
[super viewWillDisappear: animated];

...

[[NSNotificationCenter defaultCenter] removeObserver: self name: UIApplicationWillEnterForegroundNotification object: nil];

...
}

- (void)setupForm{
BOOL loggedIn =  [[[LoginRadiusSDK sharedInstance] session] isLoggedIn];
if (!loggedIn)
{
[self showAlert: @"ERROR" message: @"User is not logged in"];
[self logoutPressed];
return;
}

//do normal logged in view controller behavior
}
override func viewWillAppear(_ animated: Bool) {
super.viewWillAppear(animated)

...

NotificationCenter.default.addObserver(self, selector: #selector(self.setupForm), name: NSNotification.Name.UIApplicationWillEnterForeground, object: nil)

...
}

override func viewWillDisappear(_ animated: Bool) {
super.viewWillDisappear(animated)

...

NotificationCenter.default.removeObserver(self, name: NSNotification.Name.UIApplicationWillEnterForeground, object: nil)

...
}

func setupForm(){
let loggedIn = LoginRadiusSDK.sharedInstance().session.isLoggedIn
if(!loggedIn)
{
self.showAlert(title: "ERROR", message: "User is not logged in")
self.logoutPressed()
return
}
}
LoginRadius API Showcase
This section helps you to explore various API methods of LoginRadius IOS SDK. They can be used to fulfill your identity-based needs related to traditional login, registration, social login, and many more.
Authentication API
This API is used to perform operations on a user account after the user has authenticated himself for the changes to be made. Generally, it is used for front end API calls. Following is the list of methods covered under this API:
- Registration By Email
- Login By Email
- Login By Username
- Read Complete User Profile
- Get Social Identity
- Link Social Account
- Unlink Social Account
- Update User Profile
- Check Email Availability
- Add Email
- Verify Email
- Remove Email
- Resend Verification Email
- Change Password
- Forgot Password By Email Or UserName
- Validate Access Token
- Invalidate Access Token
- Get Security Questions By Email
- Get Security Questions By Username
- Get Security Questions By AccessToken
- Update Security Questions By AccessToken
- Check Username Availability
- Set or Change Username
- Reset Password By Reset Token
- Reset Password By Security Questions using Email
- Reset Password By Security Questions using Username
- Auth Verify Email by OTP
- Auth Reset Password by OTP
- Auth Send Welcome Email
- Auth Privacy Policy Accept
- Delete Account
- Delete Account with Email confirmation
Registration By Email
This API creates a user in the database as well as sends a verification email to the user. For all the possible payload fields, please check the Auth User Registration by Email API
Objective-C
Swift
NSDictionary *payload=@{ @"Email": @[ @{ @"Type": @"Primary", @"Value": @"test@gmail.com"}
                                    ],@"Password": @"password" };

[[AuthenticationAPI authInstance]  userRegistrationWithSott:@"<your sott here>"  payload:payload emailtemplate:nil smstemplate:nil preventVerificationEmail:false completionHandler:^(NSDictionary * _Nullable data, NSError * _Nullable error) {

        if (!error) {
            // Registration only registers the user. Call login to set the session
            NSLog(@"successfully reg %@", data);
        } else {
            NSLog(@"Error: %@", [error description]);
        }

}];
let email:AnyObject = [ "Type":"Primary","Value":"test@gmail.com" ] as AnyObject
let parameter:AnyObject = [ "Email": [email],
                            "Password":"password"
                          ]as AnyObject

AuthenticationAPI.authInstance().userRegistration(withSott:sott,payload:parameter as! [AnyHashable : Any], emailtemplate:nil, smstemplate:nil,preventVerificationEmail:false, completionHandler: { (data, error) in

        if let err = error
        {
            print(err.localizedDescription)
        }else{
            print("successfully registered");
        }

})
Note : The referer header is used to determine the registration source from which the user has created the account and is synced in the RegistrationSource field for the user profile. Add the registrationSource entity in the LoginRadius.plist file as follows to change the registration source of the user in IOS SDK.

Login By Email
This API retrieves a copy of the user data based on the Email.
Objective-C
Swift
NSDictionary *parameter =  @{ @"Email":@"email",
                           @"Password":@"password",
                           @"securityanswer":@""
                           };

[[AuthenticationAPI authInstance] loginWithPayload:parameter loginurl:nil emailtemplate:nil smstemplate:nil g_recaptcha_response:nil completionHandler:^(NSDictionary * _Nullable data, NSError * _Nullable error) {
        if (!error) {
            NSLog(@"successfully logged in %@", data);
        } else {
            NSLog(@"Error: %@", [error description]);
        }
    }];
let parameter:AnyObject = ["email":"email",
                           "password":"password",
                           "securityanswer":""
                          ]as AnyObject

AuthenticationAPI.authInstance().login(withPayload:parameter as! [AnyHashable : Any], loginurl:nil, emailtemplate:nil, smstemplate:nil, g_recaptcha_response:nil,completionHandler: { (data, error) in

     if let err = error {
        print(err.localizedDescription)
    } else {
        print("login successful")
    }
})
Login By Username
This API retrieves a copy of the user data based on the Username.
Objective-C
Swift
NSDictionary *parameter =  @{ @"username":@"",
                            @"Password":@"",
                            @"securityanswer":@""
                          };
[[AuthenticationAPI authInstance] loginWithPayload:parameter loginurl:nil emailtemplate:nil smstemplate:nil g_recaptcha_response:nil completionHandler:^(NSDictionary * _Nullable data, NSError * _Nullable error) {
        if (!error) {
            NSLog(@"successfully logged in %@", data);
        } else {
            NSLog(@"Error: %@", [error description]);
        }
    }];
let parameter:AnyObject = ["username":"","password":"",
                           "securityanswer":""
                          ]as AnyObject
AuthenticationAPI.authInstance().login(withPayload:parameter as! [AnyHashable : Any], loginurl:nil, emailtemplate:nil, smstemplate:nil, g_recaptcha_response:nil,completionHandler: { (data, error) in

     if let err = error {
        print(err.localizedDescription)
    } else {
        print("login successful")
    }
})
Read Complete User Profile
This API retrieves a copy of the user data based on the access_token.
Objective-C
Swift
[[AuthenticationAPI authInstance] profilesWithAccessToken:@"<access_token>" completionHandler:^(NSDictionary * _Nullable data, NSError * _Nullable error) {
        if (!error) {
            NSLog(@"success %@", data);
        } else {
            NSLog(@"Error: %@", [error description]);
        }
    }];
AuthenticationAPI.authInstance().profiles(withAccessToken:"<access_token>", completionHandler:{ (data, error) in

        if let err = error {
         print(err.localizedDescription)
        } else {
         print("success",data)
    }
})
Get Social Identity
This API is called just after account linking API, and it prevents the raas profile of the second account from getting created.
Objective-C
Swift
[[AuthenticationAPI authInstance] socialIdentityWithAccessToken:@"<access_token>" completionHandler:^(NSDictionary * _Nullable data, NSError * _Nullable error) {
        if (!error) {
            NSLog(@"success %@", data);
        } else {
            NSLog(@"Error: %@", [error description]);
        }
    }];
AuthenticationAPI.authInstance().socialIdentity(withAccessToken:"<access_token>", completionHandler: {(response, error) in
    if let err = error {
        print(err.localizedDescription)
      } else {
        print(response)
    }
})
Link Social Account
This API is called just after account linking API, and it prevents the raas profile of the second account from getting created.
Objective-C
Swift
[[AuthenticationAPI authInstance] linkSocialIdentitiesWithAccessToken:@"<access_token>" candidatetoken:@"<candidatetoken>" completionHandler:^(NSDictionary * _Nullable data, NSError * _Nullable error) {
        if (!error) {
            NSLog(@"successfully Link Account %@", data);
        } else {
            NSLog(@"Error: %@", [error description]);
        }
    }];
AuthenticationAPI.authInstance().linkSocialIdentities(withAccessToken:"<access_token>", candidatetoken:"<candidatetoken>", completionHandler: {(response, error) in

   if let err = error {
     print(err.localizedDescription)
   } else {
     print(response)
   }
})
Unlink Social Account
Objective-C
Swift
[[AuthenticationAPI authInstance] unlinkSocialIdentitiesWithAccessToken:@"<access_token>" provider:@"<provider>" providerid:@"<providerid>" completionHandler:^(NSDictionary * _Nullable data, NSError * _Nullable error) {
        if (!error) {
            NSLog(@"successfully Unlink Account %@", data);
        } else {
            NSLog(@"Error: %@", [error description]);
        }
    }];
AuthenticationAPI.authInstance().unlinkSocialIdentities(withAccessToken:"<access_token>", provider:"<provider>", providerid:"<providerid>",completionHandler: {(response, error) in
    if let err = error {
       print(err.localizedDescription)
    } else {
       print(response)
    }
})
Update User Profile
This API is used to update the user profile by the access token. For all the possible payload fields, please check the Auth Update Profile by Token API.
Objective-C
Swift
NSDictionary *parameter=   @{
                               @"FirstName":@"Test",
                               @"Gender": @"M"
                            };
[[AuthenticationAPI authInstance] updateProfileWithAccessToken:@"<access_token>" emailtemplate:nil smstemplate:nil payload:parameter completionHandler:^(NSDictionary * _Nullable data, NSError * _Nullable error) {
        if (!error) {
            NSLog(@"success %@", data);
        } else {
            NSLog(@"Error: %@", [error description]);
        }
    }];
let parameter:AnyObject = ["FirstName":"Test","Gender":"M"
            ]as AnyObject
AuthenticationAPI.authInstance().updateProfile(withAccessToken:"<access_token>", emailtemplate:nil, smstemplate:nil, payload:parameter as! [AnyHashable : Any],completionHandler: {(response, error) in
     if let err = error {
         print(err.localizedDescription)
      } else {
         print(response)
     }
})
Check Email Availability
This API is used to check the email exists or not on your site.
Objective-C
Swift
[[AuthenticationAPI authInstance] checkEmailAvailability:@"<email>" completionHandler:^(NSDictionary * _Nullable data, NSError * _Nullable error) {
        if (!error) {
            NSLog(@"success %@", data);
        } else {
            NSLog(@"Error: %@", [error description]);
        }
    }];
AuthenticationAPI.authInstance().checkEmailAvailability("<email>",completionHandler: { (data, error) in

    if let err = error {
       print(err.localizedDescription)
    } else {
       print("success",data as Any)
    }
})
Add Email
This API is used to add additional emails to a user's account.
Objective-C
Swift
NSDictionary *parameter =   @{
                                @"email":@"xyz@example.com",
                                @"type":@"Secondary"
                              };
[[AuthenticationAPI authInstance] addEmailWithAccessToken:@"<access_token>" emailtemplate:nil payload:parameter completionHandler:^(NSDictionary * _Nullable data, NSError * _Nullable error) {
        if (!error) {
            NSLog(@"success %@", data);
        } else {
            NSLog(@"Error: %@", [error description]);
        }
    }];
let parameter:AnyObject = ["email":"xyz@example.com",
                                   "type":"Secondary"
            ]as AnyObject

AuthenticationAPI.authInstance().addEmail(withAccessToken:"<access_token>", emailtemplate:nil, payload:parameter as! [AnyHashable : Any], completionHandler: { (data, error) in

  if let err = error {
     print(err.localizedDescription)
  } else {
     print("success",data as Any)
  }
 })
Verify Email
This API is used to verify the email of the user.
Objective-C
Swift
[[AuthenticationAPI authInstance] verifyEmailWithVerificationToken:@"<verificationtoken>" url:nil welcomeemailtemplate:nil completionHandler:^(NSDictionary * _Nullable data, NSError * _Nullable error) {
        if (!error) {
            NSLog(@"success %@", data);
        } else {
            NSLog(@"Error: %@", [error description]);
        }
    }];
AuthenticationAPI.authInstance().verifyEmail(withVerificationToken:"<access_token>", url:nil, welcomeemailtemplate:nil,completionHandler: {(response, error) in
    if let err = error {
       print(err.localizedDescription)
    } else {
       print(response)
    }
})
Remove Email
This API is used to remove additional emails from a user's account.
Objective-C
Swift
[[AuthenticationAPI authInstance] removeEmailWithAccessToken:@"<access_token>" email:@"<email>" completionHandler:^(NSDictionary * _Nullable data, NSError * _Nullable error) {
        if (!error) {
            NSLog(@"success %@", data);
        } else {
            NSLog(@"Error: %@", [error description]);
        }
    }];
AuthenticationAPI.authInstance().removeEmail(withAccessToken:"<access_token>", email:"<email>",completionHandler: {(response, error) in
    if let err = error {
       print(err.localizedDescription)
    } else {
       print(response)
    }
})
Resend Verification Email
This API resends the verification email to the user.
Objective-C
Swift
[[AuthenticationAPI authInstance] resendEmailVerification:@"<email>" emailtemplate:nil completionHandler:^(NSDictionary * _Nullable data, NSError * _Nullable error) {
        if (!error) {
            NSLog(@"success %@", data);
        } else {
            NSLog(@"Error: %@", [error description]);
        }
    }];
AuthenticationAPI.authInstance().resendEmailVerification("<email>", emailtemplate:nil,completionHandler: {(response, error) in
    if let err = error {
       print(err.localizedDescription)
    } else {
       print(response)
    }
})
Change Password
This API is used to change the account's password based on the previous password.
Objective-C
Swift
[[AuthenticationAPI authInstance] changePasswordWithAccessToken:@"<access_token>" oldpassword:@"" newpassword:@"" completionHandler:^(NSDictionary * _Nullable data, NSError * _Nullable error) {
        if (!error) {
            NSLog(@"success %@", data);
        } else {
            NSLog(@"Error: %@", [error description]);
        }
    }];
AuthenticationAPI.authInstance().changePassword(withAccessToken:"<access_token>", oldpassword:"<oldpassword>", newpassword:"<newpassword>",completionHandler: {(response, error) in
    if let err = error {
       print(err.localizedDescription)
    } else {
       print(response)
    }
})
Forgot Password By Email Or UserName
This API is used to send the reset password URL to a specified account. Note: If you have the UserName workflow-enabled, you may replace the 'email' parameter with 'username.'
Objective-C
Swift
[[AuthenticationAPI authInstance] forgotPasswordWithEmail:@"<your email>" emailtemplate:nil completionHandler:^(NSDictionary * _Nullable data, NSError * _Nullable error) {
       if (!error) {
           NSLog(@"Success");
       } else {
           NSLog(@"Error: %@", [error description]);
       }
    }];
AuthenticationAPI.authInstance().forgotPassword(withEmail:"<your email>", emailtemplate:nil,completionHandler: {(response, error) in
    if let err = error {
        print(err.localizedDescription)
    } else {
        print("Success");
    }
})
Validate Access Token
This api validates the access token, if valid, then returns a response with its expiry otherwise error.
Objective-C
Swift
[[AuthenticationAPI authInstance] validateAccessToken:@"<access_token>" completionHandler:^(NSDictionary * _Nullable data, NSError * _Nullable error) {
       if (!error) {
           NSLog(@"Success");
       } else {
           NSLog(@"Error: %@", [error description]);
       }
    }];
AuthenticationAPI.authInstance().validateAccessToken("<access_token>",  completionHandler: {(response, error) in
    if let err = error {
        print(err.localizedDescription)
    } else {
        print("Success");
    }
})
Invalidate Access Token
This api call invalidates the active access token or expires an access token's validity.
Objective-C
Swift
[[AuthenticationAPI authInstance] invalidateAccessToken:@"<access_token>" completionHandler:^(NSDictionary * _Nullable data, NSError * _Nullable error) {
       if (!error) {
           NSLog(@"Success");
       } else {
           NSLog(@"Error: %@", [error description]);
       }
    }];
AuthenticationAPI.authInstance().invalidateAccessToken("<access_token>", completionHandler: {(response, error) in
    if let err = error {
        print(err.localizedDescription)
    } else {
        print("Success");
    }
})
Get Security Questions By Email
This API is used to retrieve the list of questions that are configured on the respective LoginRadius site.
Objective-C
Swift
[[AuthenticationAPI authInstance] getSecurityQuestionsWithEmail:@"<email>" completionHandler:^(NSDictionary * _Nullable data, NSError * _Nullable error) {
       if (!error) {
           NSLog(@"Success");
       } else {
           NSLog(@"Error: %@", [error description]);
       }
    }];
AuthenticationAPI.authInstance().getSecurityQuestions(withEmail:"<email>", completionHandler: {(response, error) in
    if let err = error {
      print(err.localizedDescription)
     } else {
    let json = response!["Data"] as! NSArray
    for data in json{
       print(data)
    }
   }
})
Get Security Questions By Username
This API is used to retrieve the list of questions that are configured on the respective LoginRadius site.
Objective-C
Swift
[[AuthenticationAPI authInstance] getSecurityQuestionsWithUserName:@"<username>" completionHandler:^(NSDictionary * _Nullable data, NSError * _Nullable error) {
       if (!error) {
           NSLog(@"Success");
       } else {
           NSLog(@"Error: %@", [error description]);
       }
    }];
AuthenticationAPI.authInstance().getSecurityQuestions(withUserName:"<username>", completionHandler: {(response, error) in
    if let err = error {
        print(err.localizedDescription)
    } else {
        print("Success");
    }
})
Get Security Questions By AccessToken
This API is used to retrieve the list of questions that are configured on the respective LoginRadius site.
Objective-C
Swift
[[AuthenticationAPI authInstance] getSecurityQuestionsWithAccessToken:@"<access_token>" completionHandler:^(NSDictionary * _Nullable data, NSError * _Nullable error) {
       if (!error) {
           NSLog(@"Success");
       } else {
           NSLog(@"Error: %@", [error description]);
       }
    }];
AuthenticationAPI.authInstance().getSecurityQuestions(withAccessToken:"<access_token>", completionHandler: {(response, error) in
    if let err = error {
        print(err.localizedDescription)
    } else {
        print("Success");
    }
})
Update Security Questions By AccessToken
This API is used to update security questions by the access token.
Objective-C
Swift
NSDictionary *securityquestionanswer = @{@"<Put Your Security Question ID>":@"<Put Your Answer>"};
  NSDictionary *parameter =   @{@"securityquestionanswer":securityquestionanswer};

[[AuthenticationAPI authInstance] updateSecurityQuestionWithAccessToken:@"<access_token>" payload:parameter completionHandler:^(NSDictionary * _Nullable data, NSError * _Nullable error) {
       if (!error) {
           NSLog(@"Success");
       } else {
           NSLog(@"Error: %@", [error description]);
       }
    }];
let securityquestionanswer:AnyObject = ["<Put Your Security Question ID>":"<Put Your Answer>"] as AnyObject
let parameter:AnyObject = [  "securityquestionanswer":securityquestionanswer
                            ]as AnyObject

AuthenticationAPI.authInstance().updateSecurityQuestion(withAccessToken:"<access_token>", payload:parameter as! [AnyHashable : Any],  completionHandler: {(response, error) in
    if let err = error {
        print(err.localizedDescription)
    } else {
        print("Success");
    }
})
Check Username Availability
This API is used to check the UserName exists or not on your site.
Objective-C
Swift
[[AuthenticationAPI authInstance] checkUserNameAvailability:@"<username>" completionHandler:^(NSDictionary * _Nullable data, NSError * _Nullable error) {
       if (!error) {
           NSLog(@"Success");
       } else {
           NSLog(@"Error: %@", [error description]);
       }
    }];
AuthenticationAPI.authInstance().checkUserNameAvailability("<username>", completionHandler: {(response, error) in

    if let err = error {
        print(err.localizedDescription)
    } else {
        print("Success");
    }
})
Set or Change Username
This API is used to set or change UserName by the access token.
Objective-C
Swift
[[AuthenticationAPI authInstance] changeUserNameWithAccessToken:@"<access_token>" username:@"<username>" completionHandler:^(NSDictionary * _Nullable data, NSError * _Nullable error) {
       if (!error) {
           NSLog(@"Success");
       } else {
           NSLog(@"Error: %@", [error description]);
       }
    }];
AuthenticationAPI.authInstance().changeUserName(withAccessToken:"<access_token>", username:"<username>", completionHandler: {(response, error) in

    if let err = error {
        print(err.localizedDescription)
    } else {
        print("Success");
    }
})
Reset Password By Reset Token
This API is used to set a new password for the specified account.
Objective-C
Swift
NSDictionary *parameter =   @{
                               @"resettoken": @"xxxxxxxxxxxxxxxxxxxx",
                               @"password": @"xxxxxxxxxxxxx",
                               @"welcomeemailtemplate": @"",
                               @"resetpasswordemailtemplate": @""
                             };
[[AuthenticationAPI authInstance] resetPasswordByResetToken:parameter completionHandler:^(NSDictionary * _Nullable data, NSError * _Nullable error) {
       if (!error) {
           NSLog(@"Success");
       } else {
           NSLog(@"Error: %@", [error description]);
       }
    }];
let parameter:AnyObject = [
                            "resettoken":"",
                            "password":"",
                            "welcomeemailtemplate":"",
                            "resetpasswordemailtemplate":""
                            ]as AnyObject

AuthenticationAPI.authInstance().resetPassword(byResetToken:parameter as! [AnyHashable : Any],completionHandler: {(response, error) in
    if let err = error {
        print(err.localizedDescription)
    } else {
        print("Success");
    }
})
Reset Password By Security Questions using Email
This API is used to reset the password for the specified account by a security question.
Objective-C
Swift
NSDictionary *securityquestionanswer = @{@"<Put Your Security Question ID>":@"<Put Your Answer>"};
NSDictionary *parameter =   @{
                                @"securityanswer": securityquestionanswer,
                                @"email": @"",
                                @"password": @"xxxxxxxxxxxxx",
                                @"resetpasswordemailtemplate": @""
                              };

[[AuthenticationAPI authInstance] resetPasswordBySecurityAnswer_and_Email:parameter completionHandler:^(NSDictionary * _Nullable data, NSError * _Nullable error) {
       if (!error) {
           NSLog(@"Success");
       } else {
           NSLog(@"Error: %@", [error description]);
       }
    }];
let securityquestionanswer:AnyObject = ["<Put Your Security Question ID>":"<Put Your Answer>"] as AnyObject
         let parameter:AnyObject = [
             "securityanswer": securityquestionanswer,
             "email":"",
             "password":"",
             "resetpasswordemailtemplate":""]as AnyObject

AuthenticationAPI.authInstance().resetPassword(bySecurityAnswer_and_Email:parameter as! [AnyHashable : Any], completionHandler: {(response, error) in
    if let err = error {
        print(err.localizedDescription)
    } else {
        print("Success");
    }
})
Reset Password By Security Questions using Username
This API is used to reset the password for the specified account by a security question.
Objective-C
Swift
NSDictionary *securityquestionanswer = @{@"<Put Your Security Question ID>":@"<Put Your Answer>"};
 NSDictionary *parameter =   @{
                                @"securityanswer": securityquestionanswer,
                                @"username": @"",
                                @"password": @"xxxxxxxxxxxxx",
                                @"resetpasswordemailtemplate": @""
                              };

[[AuthenticationAPI authInstance] resetPasswordBySecurityAnswer_and_UserName:parameter completionHandler:^(NSDictionary * _Nullable data, NSError * _Nullable error) {
       if (!error) {
           NSLog(@"Success");
       } else {
           NSLog(@"Error: %@", [error description]);
       }
    }];
let securityquestionanswer:AnyObject = ["<Put Your Security Question ID>":"<Put Your Answer>"] as AnyObject
         let parameter:AnyObject = [
             "securityanswer": securityquestionanswer,
             "username":"",
             "password":"",
             "resetpasswordemailtemplate":""]as AnyObject

AuthenticationAPI.authInstance().resetPassword(bySecurityAnswer_and_UserName:parameter as! [AnyHashable : Any], completionHandler: {(response, error) in
    if let err = error {
        print(err.localizedDescription)
    } else {
        print("Success");
    }
})
Auth Verify Email by OTP
This API is used to verify the email of the user when the OTP Email verification flow is enabled, and please note that you must contact LoginRadius to have this feature enabled.
Objective-C
Swift
NSDictionary *securityquestionanswer = @{@"<Put Your Security Question ID>":@"<Put Your Answer>"};
NSDictionary *payload =  @{ @"otp":@"",
                            @"email":@""
                            };
[[AuthenticationAPI authInstance] verifyEmailByOtpWithPayload:payload url:@"" welcomeemailtemplate:@"" completionHandler:^(NSDictionary *data, NSError * error) {
  if (!error) {
      NSLog(@"Success");
  } else {
      NSLog(@"Error: %@", [error description]);
  }
}];
let securityquestionanswer:AnyObject = ["<Put Your Security Question ID>":"<Put Your Answer>"] as AnyObject
let payload:AnyObject = ["otp":"",
                        "email":""
    ]as AnyObject
AuthenticationAPI.authInstance().verifyEmailByOtp(withPayload:payload as! [AnyHashable : Any], url:"", welcomeemailtemplate:"", completionHandler:{ (data, error) in

    if let err = error {
        print(err.localizedDescription)
    } else {
        print("Email verification success")
    }
})
Auth Reset Password by OTP
This API is used to set a new password for the specified account.
Objective-C
Swift
NSDictionary *payload =  @{ @"password":@"xxxxx",
                            @"email":@"",
                            @"otp":@"",
                            @"welcomeemailtemplate":@"",
                            @"resetpasswordemailtemplate":@""
                          };

[[AuthenticationAPI authInstance]resetPasswordByOtpWithPayload:payload completionHandler:^(NSDictionary *data, NSError * error) {
    if (!error) {
        NSLog(@"Success");
    } else {
        NSLog(@"Error: %@", [error description]);
    }
}];
let payload:AnyObject = [
        "password": "xxxxxxxxxxxxx",
        "welcomeemailtemplate": "",
        "resetpasswordemailtemplate": "",
        "Email": "",
        "Otp": ""
        ]as AnyObject
AuthenticationAPI.authInstance().resetPasswordByOtp(withPayload:payload as! [AnyHashable : Any], completionHandler:{ (data, error) in

        if let err = error {
            print(err.localizedDescription)
        } else {
            print("Password reset success")
        }
})
Auth Send Welcome Email
This API will send a welcome email.
Objective-C
Swift
[[AuthenticationAPI authInstance]sendWelcomeEmailWithAccessToken:@"<access_token>" welcomeemailtemplate:@""  completionHandler:^(NSDictionary *data, NSError * error) {
    if (!error) {
        NSLog(@"Success");
    } else {
        NSLog(@"Error: %@", [error description]);
    }
}];
AuthenticationAPI.authInstance().sendWelcomeEmail(withAccessToken:"<access_token>", welcomeemailtemplate:"", completionHandler:{ (data, error) in

    if let err = error {
        print(err.localizedDescription)
    } else {
        print("Welcome email send success")
    }
})
Auth Privacy Policy Accept
This API is used to update the privacy policy stored in the user's profile by providing the access_token of the user accepting the privacy policy.
Objective-C
Swift
[[AuthenticationAPI authInstance]privacyPolicyAcceptWithAccessToken:@"<access_token>" completionHandler:^(NSDictionary *data, NSError * error) {
    if (!error) {
        NSLog(@"Success");
    } else {
        NSLog(@"Error: %@", [error description]);
    }
}];
AuthenticationAPI.authInstance().privacyPolicyAccept(withAccessToken:"<access_token>", completionHandler:{ (data, error) in

    if let err = error {
        print(err.localizedDescription)
    } else {
        print("Privacy policy update success")
    }
})
Delete Account
This API is used to delete the account using a delete token.
Objective-C
Swift
[[AuthenticationAPI authInstance] deleteAccountWithDeleteToken:@"<deletetoken>" completionHandler:^(NSDictionary * _Nullable data, NSError * _Nullable error) {
       if (!error) {
           NSLog(@"Success");
       } else {
           NSLog(@"Error: %@", [error description]);
       }
    }];
AuthenticationAPI.authInstance().deleteAccount(withDeleteToken:"<deletetoken>",  completionHandler: {(response, error) in

    if let err = error {
        print(err.localizedDescription)
    } else {
        print("Success");
    }
})
Delete Account with Email confirmation
API deletes the user account by the access token.
Objective-C
Swift
[[AuthenticationAPI authInstance] deleteAccountWithEmailConfirmation:@"<access_token>" emailtemplate:nil completionHandler:^(NSDictionary * _Nullable data, NSError * _Nullable error) {
       if (!error) {
           NSLog(@"Success");
       } else {
           NSLog(@"Error: %@", [error description]);
       }
    }];
AuthenticationAPI.authInstance().deleteAccount(withEmailConfirmation:"<access_token>",emailtemplate:nil,completionHandler: {(response, error) in

    if let err = error {
        print(err.localizedDescription)
    } else {
        print("Success");
    }
})
Phone Authentication API
This API is used to perform operations on a user account by Phone after the user has authenticated himself for the changes to be made. Generally, it is used for front end API calls. Following is the list of methods covered under this API:
- Registration By Phone
- Login By Phone
- Forgot Password By Phone
- Phone ResetPassword By Otp
- Check Phone Availability
- Phone Resend OTP
- Phone Resend OTP By Access Token
- Phone Verify OTP
- Phone Verify OTP By Token
- Get Security Questions By Phone
- Update Phone
- Reset Password By Security Questions using Phone
- Remove Phone ID by Access Token
Registration By Phone
This API registers the new users into your Cloud Directory and triggers the phone verification process. For all the possible payload fields, please check the Auth User Registration by Email API
Objective-C
Swift
NSDictionary *payload=@{ @"PhoneId": @"xxxxxxxxxxx",
                          @"Password": @"password"
                        };

[[AuthenticationAPI authInstance]  userRegistrationWithSott:@"<your sott here>"  payload:payload emailtemplate:nil smstemplate:nil preventVerificationEmail:false completionHandler:^(NSDictionary * _Nullable data, NSError * _Nullable error) {

        if (!error) {
            // Registration only registers the user. Call login to set the session
            NSLog(@"successfully reg %@", data);
        } else {
            NSLog(@"Error: %@", [error description]);
        }

}];
let parameter:AnyObject = [ "PhoneId": "xxxxxxx",
                            "Password":"password"
                          ]as AnyObject

AuthenticationAPI.authInstance().userRegistration(withSott:sott,payload:parameter as! [AnyHashable : Any], emailtemplate:nil, smstemplate:nil,preventVerificationEmail:false, completionHandler: { (data, error) in

        if let err = error
        {
            print(err.localizedDescription)
        }else{
            print("successfully registered");
        }

})
Login By Phone
This API retrieves a copy of the user data based on the Phone.
Objective-C
Swift
NSDictionary *parameter =  @{ @"Phone":@"",
                              @"Password":@"",
                              @"securityanswer":@""
                            };
[[AuthenticationAPI authInstance] loginWithPayload:parameter loginurl:nil emailtemplate:nil smstemplate:nil g_recaptcha_response:nil completionHandler:^(NSDictionary * _Nullable data, NSError * _Nullable error) {
        if (!error) {
            NSLog(@"successfully logged in %@", data);
        } else {
            NSLog(@"Error: %@", [error description]);
        }
    }];
let parameter:AnyObject = ["phone":"",
                          "password":"",
                          "securityanswer":""
                        ]as AnyObject
AuthenticationAPI.authInstance().login(withPayload:parameter as! [AnyHashable : Any], loginurl:nil, emailtemplate:nil, smstemplate:nil, g_recaptcha_response:nil,completionHandler: { (data, error) in

     if let err = error {
        print(err.localizedDescription)
    } else {
        print("login successful")
    }
})
Forgot Password By Phone
This API is used to send the OTP to reset the account password.
Objective-C
Swift
[[AuthenticationAPI authInstance ] forgotPasswordWithPhone:@"<phone>" smstemplate:nil completionHandler:^(NSDictionary * _Nullable data, NSError * _Nullable error) {
       if (!error) {
           NSLog(@"Success");
       } else {
           NSLog(@"Error: %@", [error description]);
       }
    }];
AuthenticationAPI.authInstance().forgotPassword(withPhone:"<your phone>", smstemplate:nil,completionHandler: {(data, error) in
    if let err = error {
        print(err.localizedDescription)
    } else {
        print("Success");
    }
})
Phone ResetPassword By Otp
This API is used to reset the password.
Objective-C
Swift
NSDictionary *payload =  @{ @"password":@"xxxxx",
                              @"phone":@"",
                              @"otp":@"",
                              @"smstemplate":@"",
                              @"resetpasswordemailtemplate":@""
                            };

[[AuthenticationAPI authInstance]phoneResetPasswordByOtpWithPayload:payload completionHandler:^(NSDictionary *data, NSError * error) {
      if (!error) {
          NSLog(@"Success");
      } else {
          NSLog(@"Error: %@", [error description]);
      }
}];
let parameter:AnyObject = [
        "phone":"",
        "otp":"",
        "password":"",
        "smstemplate":"",
        "resetpasswordemailtemplate":""
        ]as AnyObject
AuthenticationAPI.authInstance().phoneResetPasswordByOtp(withPayload:parameter as! [AnyHashable : Any], completionHandler:{ (data, error) in

        if let err = error {
            print(err.localizedDescription)
        } else {
            print("Password reset success")
        }
})
Check Phone Availability
This API is used to check the Phone Number exists or not on your site.
Objective-C
Swift
[[AuthenticationAPI authInstance ] phoneNumberAvailability:@"<phone>" completionHandler:^(NSDictionary * _Nullable data, NSError * _Nullable error) {
       if (!error) {
           NSLog(@"Success");
       } else {
           NSLog(@"Error: %@", [error description]);
       }
    }];
AuthenticationAPI.authInstance().phoneNumberAvailability("<phone>",  completionHandler: {(response, error) in
    if let err = error {
        print(err.localizedDescription)
    } else {
        print("Success");
    }
})
Phone Resend OTP
This API is used to resend a verification OTP to verify a user's Phone Number. The user will receive a verification code that they will need to input.
Objective-C
Swift
[[AuthenticationAPI authInstance] resendOtpWithPhone:@"<phone>" smstemplate:nil completionHandler:^(NSDictionary * _Nullable data, NSError * _Nullable error) {
       if (!error) {
           NSLog(@"Success");
       } else {
           NSLog(@"Error: %@", [error description]);
       }
    }];
AuthenticationAPI.authInstance().resendOtp(withPhone:"<phone>", smstemplate:nil, completionHandler: {(response, error) in
    if let err = error {
        print(err.localizedDescription)
    } else {
        print("Success");
    }
})
Phone Resend OTP By Access Token
This API is used to resend a verification OTP to verify a user's Phone Number in cases in which an active token already exists.
Objective-C
Swift
[[AuthenticationAPI authInstance] resendOtpWithAccessToken:@"<access_token>" smstemplate:nil completionHandler:^(NSDictionary * _Nullable data, NSError * _Nullable error) {
       if (!error) {
           NSLog(@"Success");
       } else {
           NSLog(@"Error: %@", [error description]);
       }
    }];
AuthenticationAPI.authInstance().resendOtp(withAccessToken:"<access_token>", smstemplate: nil, completionHandler: {(response, error) in
    if let err = error {
        print(err.localizedDescription)
    } else {
        print("Success");
    }
})
Phone Verify OTP
This API is used to validate the verification code sent to verify a user's phone number.
Objective-C
Swift
[[AuthenticationAPI authInstance] phoneVerificationWithOtp:@"<otp>" phone:@"<phone>" smstemplate:nil completionHandler:^(NSDictionary * _Nullable data, NSError * _Nullable error) {
       if (!error) {
           NSLog(@"Success");
       } else {
           NSLog(@"Error: %@", [error description]);
       }
    }];
AuthenticationAPI.authInstance().phoneVerification(withOtp:"<otp>", phone:"<phone>", smstemplate:nil,  completionHandler: {(response, error) in
    if let err = error {
        print(err.localizedDescription)
    } else {
        print("Success");
    }
})
Phone Verify OTP By Token
This API is used to consume the verification code sent to verify a user's phone number. Use this call for front-end purposes in cases where the user is already logged in by passing the user's access token.
Objective-C
Swift
[[AuthenticationAPI authInstance] phoneVerificationOtpWithAccessToken:@"<access_token>" otp:@"<otp>" smstemplate:nil completionHandler:^(NSDictionary * _Nullable data, NSError * _Nullable error) {
       if (!error) {
           NSLog(@"Success");
       } else {
           NSLog(@"Error: %@", [error description]);
       }
    }];
AuthenticationAPI.authInstance().phoneVerificationOtp(withAccessToken:"<access_token>", otp:"<otp>", smstemplate:nil, completionHandler: {(response, error) in
    if let err = error {
        print(err.localizedDescription)
    } else {
        print("Success");
    }
})
Get Security Questions By Phone
This API is used to retrieve the list of questions that are configured on the respective LoginRadius site.
Objective-C
Swift
[[AuthenticationAPI authInstance] getSecurityQuestionsWithPhone:@"<phone>" completionHandler:^(NSDictionary * _Nullable data, NSError * _Nullable error) {
       if (!error) {
           NSLog(@"Success");
       } else {
           NSLog(@"Error: %@", [error description]);
       }
    }];
AuthenticationAPI.authInstance().getSecurityQuestions(withPhone:"<phone>",completionHandler: {(response, error) in
    if let err = error {
        print(err.localizedDescription)
    } else {
        print("Success");
    }
})
Update Phone
This API is used to update the login Phone Number of users
Objective-C
Swift
[[AuthenticationAPI authInstance] phoneNumberUpdateWithAccessToken:@"<access_token>" phone:@"<phone>" smstemplate:nil completionHandler:^(NSDictionary * _Nullable data, NSError * _Nullable error) {
       if (!error) {
           NSLog(@"Success");
       } else {
           NSLog(@"Error: %@", [error description]);
       }
    }];
AuthenticationAPI.authInstance().phoneNumberUpdate(withAccessToken:"<access_token>", phone:"<phone>", smstemplate:nil, completionHandler: {(response, error) in

    if let err = error {
        print(err.localizedDescription)
    } else {
        print("Success");
    }
})
Reset Password By Security Questions using Phone
This API is used to reset password for the specified account by security question.
Objective-C
Swift
NSDictionary *securityquestionanswer = @{@"<Put Your Security Question ID>":@"<Put Your Answer>"};
NSDictionary *parameter =   @{
                                @"securityanswer": securityquestionanswer,
                                @"phone": @"",
                                @"password": @"xxxxxxxxxxxxx",
                                @"resetpasswordemailtemplate": @""
                              };

[[AuthenticationAPI authInstance] resetPasswordBySecurityAnswer_and_Phone:parameter completionHandler:^(NSDictionary * _Nullable data, NSError * _Nullable error) {
       if (!error) {
           NSLog(@"Success");
       } else {
           NSLog(@"Error: %@", [error description]);
       }
    }];
let securityquestionanswer:AnyObject = ["<Put Your Security Question ID>":"<Put Your Answer>"] as AnyObject
         let parameter:AnyObject = [
             "securityanswer": securityquestionanswer,
             "phone":"",
             "password":"",
             "resetpasswordemailtemplate":""]as AnyObject

AuthenticationAPI.authInstance().resetPassword(bySecurityAnswer_and_Phone:parameter as! [AnyHashable : Any], completionHandler: {(response, error) in
    if let err = error {
        print(err.localizedDescription)
    } else {
        print("Success");
    }
})
Remove Phone ID by Access Token
This API is used to update the privacy policy stored in the user's profile by providing the access_token of the user accepting the privacy policy.
Objective-C
Swift
[[AuthenticationAPI authInstance] removePhoneIDWithAccessToken:@"<access_token>" completionHandler:^(NSDictionary * _Nullable data, NSError * _Nullable error) {
    if (!error) {
        NSLog(@"success %@", data);
    } else {
        NSLog(@"Error: %@", [error description]);
    }
}];
AuthenticationAPI.authInstance().removePhoneID(withAccessToken:"<access_token>",completionHandler: {(response, error) in
    if let err = error {
        print(err.localizedDescription)
    } else {
        print(response)
    }
})
Custom Object API
This API is used to create additional custom fields for user registration. It provides methods for creating, updating and deleting custom objects. Following is the list of methods covered under this API:
- Create Custom Object
- Read Custom Object By Token
- Read Custom Object By Record ID
- Update Custom Object
- Delete Custom Object
Create Custom Object
This API is used to write information in JSON format to the custom object for the specified account.
Objective-C
Swift
NSDictionary *parameter =   @{
                                @"customdata1":@"Store my customdata1 value",
                                @"customdata2":@"Store my customdata2 value"
                              };
[[CustomObjectAPI customInstance] createCustomObjectWithObjectName:@"<objectname>" accessToken:@"<access_token>" payload:parameter completionHandler:^(NSDictionary * _Nullable data, NSError * _Nullable error) {
       if (!error) {
           NSLog(@"Success");
       } else {
           NSLog(@"Error: %@", [error description]);
       }
    }];
let parameter:AnyObject = [
                            "customdata1":"Store my customdata1 value",
                            "customdata2":"Store my customdata2 value"
                            ]as AnyObject

CustomObjectAPI.customInstance().createCustomObject(withObjectName:"<objectname>", accessToken:"access_token", payload:parameter as! [AnyHashable : Any], completionHandler: {(response, error) in

    if let err = error {
        print(err.localizedDescription)
    } else {
        print("Success");
    }
})
Read Custom Object By Token
This API is used to retrieve the Custom Object data for the specified account.
Objective-C
Swift
[[CustomObjectAPI customInstance] getCustomObjectWithObjectName:@"<objectname>" accessToken:@"<access_token>" completionHandler:^(NSDictionary * _Nullable data, NSError * _Nullable error) {
       if (!error) {
           NSLog(@"Success");
       } else {
           NSLog(@"Error: %@", [error description]);
       }
    }];
CustomObjectAPI.customInstance().getCustomObject(withObjectName:"<objectname>", accessToken:"<access_token>", completionHandler: {(response, error) in

    if let err = error {
        print(err.localizedDescription)
    } else {
        print("Success");
    }
})
Read Custom Object By Record ID
This API is used to retrieve the Custom Object data for the specified account.
Objective-C
Swift
[[CustomObjectAPI customInstance] getCustomObjectWithObjectRecordId:@"<objectrecordid>" accessToken:@"<access_token>" objectname:@"<objectname>" completionHandler:^(NSDictionary * _Nullable data, NSError * _Nullable error) {
       if (!error) {
           NSLog(@"Success");
       } else {
           NSLog(@"Error: %@", [error description]);
       }
    }];
CustomObjectAPI.customInstance().getCustomObject(withObjectRecordId:"<objectrecordid>", accessToken:"<access_token>", objectname:"<objectname>", completionHandler: {(response, error) in

    if let err = error {
        print(err.localizedDescription)
    } else {
        print("Success");
    }
})
Update Custom Object
This API is used to update the specified custom object data of the specified account. If the value of updatetype is 'replace', then it will fully replace the custom object with the new custom object, and if the value of updatetype is 'partialreplace', then it will perform an upsert type operation.
Objective-C
Swift
NSDictionary *parameter =   @{
                                @"field1":@"Store my field1 value",
                                @"field2":@"Store my field2 value"
                             };
[[CustomObjectAPI customInstance] updateCustomObjectWithObjectName:@"<objectname>" accessToken:@"<access_token>" objectRecordId:@"<objectrecordid>" updatetype:@"<updatetype>" payload:parameter completionHandler:^(NSDictionary * _Nullable data, NSError * _Nullable error) {
       if (!error) {
           NSLog(@"Success");
       } else {
           NSLog(@"Error: %@", [error description]);
       }
    }];
let parameter:AnyObject = [
                            "field1": "Store my field1 value",
                            "field2": "Store my field2 value"
                            ]as AnyObject
CustomObjectAPI.customInstance().updateCustomObject(withObjectName:"<objectname>", accessToken:"<access_token>", objectRecordId:"<objectrecordid>",updatetype:"<updatetype>", payload:parameter as! [AnyHashable : Any], completionHandler: {(response, error) in

    if let err = error {
        print(err.localizedDescription)
    } else {
        print("Success");
    }
})
Delete Custom Object
This API is used to remove the specified Custom Object data using ObjectRecordId of a specified account.
Objective-C
Swift
[[CustomObjectAPI customInstance] deleteCustomObjectWithObjectRecordId:@"<objectrecordid>" accessToken:@"<access_token>" objectname:@"<objectname>" completionHandler:^(NSDictionary * _Nullable data, NSError * _Nullable error) {
       if (!error) {
           NSLog(@"Success");
       } else {
           NSLog(@"Error: %@", [error description]);
       }
    }];
CustomObjectAPI.customInstance().deleteCustomObject(withObjectRecordId:"<objectrecordid>", accessToken:"<access_token>", objectname:"<objectname>", completionHandler: {(response, error) in

    if let err = error {
        print(err.localizedDescription)
    } else {
        print("Success");
    }
})
PIN Authentication API
PIN Authentication is a mechanism for prompting your customers to provide a PIN code as part of your Authentication processes.
- Login By PIN
- Set PIN By PinAuthToken
- Forgot PIN By Email
- Forgot PIN By Phone
- Forgot PIN By UserName
- Invalidate PIN Session Token
- Reset PIN By Email and OTP
- Reset PIN By UserName and OTP
- Reset PIN By Phone and OTP
- Reset PIN By ResetToken
- Reset PIN By SecurityAnswer and Email
- Reset PIN By SecurityAnswer and UserName
- Reset PIN By SecurityAnswer and Phone
- Change PIN By Access Token
Login By PIN
Use this endpoint to allow customers to login by providing their PIN.
Objective-C
Swift
NSDictionary *payload=@{ @"pin": @""};
    [[PinAuthentication pinAuthInstance] loginWithPin:@"session_token" payload:payload completionHandler:^(NSDictionary *data, NSError * error) {
        if (!error) {
            NSLog(@"Success");
        } else {
            NSLog(@"Error: %@", [error description]);
        }
    }];
let payload:AnyObject = ["pin":""]as AnyObject
PinAuthentication.pinAuthInstance()?.login(withPin:"session_token", payload:payload, completionHandler:{ (data, error) in

    if let err = error {
        print(err.localizedDescription)
    } else {
        print("Pin Login success")
    }
})
Set PIN By PinAuthToken
Use this Endpoint to allow your customers to change their PIN using a PIN Auth Token.
Objective-C
Swift
[[PinAuthentication pinAuthInstance] setPinWithPinAuthToken:@"pinauthtoken" pin:@"pin" completionHandler:^(NSDictionary *data, NSError * error) {
        if (!error) {
            NSLog(@"Success");
        } else {
            NSLog(@"Error: %@", [error description]);
        }
    }];
PinAuthentication.pinAuthInstance().setPinWithPinAuthToken("pinauthtoken", pin:"pin", completionHandler:{ (data, error) in

            if let err = error {
                print(err.localizedDescription)
            } else {
                print("pin set success")
            }
        })
Forgot PIN By Email
Use this Endpoint to trigger the Forgot PIN process, where an email is sent to the customer.
Objective-C
Swift
[[PinAuthentication pinAuthInstance] forgotPinWithEmail:@"email" emailtemplate:@"emailtemplate" resetpinurl:@"resetpinurl" completionHandler:^(NSDictionary *data, NSError * error) {
        if (!error) {
            NSLog(@"Success");
        } else {
            NSLog(@"Error: %@", [error description]);
        }
    }];
PinAuthentication.pinAuthInstance().forgotPin(withEmail:"email", emailtemplate:"emailtemplate", resetpinurl:"resetpinurl",completionHandler:{ (data, error) in

            if let err = error {
                print(err.localizedDescription)
            } else {
                print("forgot pin by email success")
            }
        })
Forgot PIN By Phone
Use this Endpoint to trigger the Forgot PIN process, where an SMS is sent to the customer with a One Time Passcode (OTP) to use in order to change their PIN.
Objective-C
Swift
[[PinAuthentication pinAuthInstance] forgotPinWithPhone:@"phone" smstemplate:@"smstemplate"  completionHandler:^(NSDictionary *data, NSError * error) {
        if (!error) {
            NSLog(@"Success");
        } else {
            NSLog(@"Error: %@", [error description]);
        }
    }];
PinAuthentication.pinAuthInstance().forgotPin(withPhone:"phone", smstemplate:"smstemplate",
        completionHandler:{ (data, error) in

            if let err = error {
                print(err.localizedDescription)
            } else {
                print("forgot pin by phone success")
            }
        })
Forgot PIN By UserName
Use this Endpoint to trigger the Forgot PIN process, where an email is sent to the customer.
Objective-C
Swift
[[PinAuthentication pinAuthInstance] forgotPinWithUserName:@"username" emailtemplate:@"emailtemplate" resetpinurl:@"resetpinurl" completionHandler:^(NSDictionary *data, NSError * error) {
        if (!error) {
            NSLog(@"Success");
        } else {
            NSLog(@"Error: %@", [error description]);
        }
    }];
PinAuthentication.pinAuthInstance().forgotPin(withUserName:"username", emailtemplate:"emailtemplate", resetpinurl:"resetpinurl",completionHandler:{ (data, error) in

            if let err = error {
                print(err.localizedDescription)
            } else {
                print("forgot pin by username success")
            }
        })
Invalidate PIN Session Token
Use this endpoint to invalidate session tokens that have been created as part of the PIN workflows.
Objective-C
Swift
[[PinAuthentication pinAuthInstance] invalidatePinSessionToken:@"session_token" completionHandler:^(NSDictionary *data, NSError * error) {
        if (!error) {
            NSLog(@"Success");
        } else {
            NSLog(@"Error: %@", [error description]);
        }
    }];
PinAuthentication.pinAuthInstance().invalidatePinSessionToken("session_token", completionHandler:{ (data, error) in

            if let err = error {
                print(err.localizedDescription)
            } else {
                print("invalidate pin session_token success")
            }
        })
Reset PIN By Email and OTP
Use this Endpoint to complete the forgot PIN Process by setting a new PIN on the account by providing the Email and OTP.
Objective-C
Swift
NSDictionary *payload=@{ @"pin": @"",
                         @"otp":@"",
                         @"email":@""
                         };
[[PinAuthentication pinAuthInstance] resetPinWithEmailAndOtp:payload  completionHandler:^(NSDictionary *data, NSError * error) {
    if (!error) {
        NSLog(@"Success");
    } else {
        NSLog(@"Error: %@", [error description]);
    }
}];
let payload:AnyObject = ["pin":"",
                         "otp":"",
                         "email":""]as AnyObject
PinAuthentication.pinAuthInstance().resetPin(withEmailAndOtp:payload as? [AnyHashable : Any], completionHandler:{ (data, error) in

    if let err = error {
        print(err.localizedDescription)
    } else {
        print("reset pin with email and otp success")
    }
})
Reset PIN By UserName and OTP
Use this Endpoint to complete the forgot PIN Process by setting a new PIN on the account by providing the username and OTP.
Objective-C
Swift
NSDictionary *payload=@{ @"pin": @"",
                         @"otp":@"",
                         @"username":@""
                         };
[[PinAuthentication pinAuthInstance] resetPinWithUserNameAndOtp:payload  completionHandler:^(NSDictionary *data, NSError * error) {
    if (!error) {
        NSLog(@"Success");
    } else {
        NSLog(@"Error: %@", [error description]);
    }
}];
let payload:AnyObject = ["pin":"",
                         "otp":"",
                         "username":""]as AnyObject
PinAuthentication.pinAuthInstance()?.resetPin(withUserNameAndOtp:payload as! [AnyHashable : Any],  completionHandler:{ (data, error) in

    if let err = error {
        print(err.localizedDescription)
    } else {
        print("reset pin with username and otp success")
    }
})
Reset PIN By Phone and OTP
Use this Endpoint to complete the forgot PIN Process by setting a new PIN on the account by providing the Phone and OTP.
Objective-C
Swift
NSDictionary *payload=@{ @"pin": @"",
                         @"otp":@"",
                         @"phone":@""
                         };
[[PinAuthentication pinAuthInstance] resetPinWithPhoneAndOtp:payload  completionHandler:^(NSDictionary *data, NSError * error) {
    if (!error) {
        NSLog(@"Success");
    } else {
        NSLog(@"Error: %@", [error description]);
    }
}];
let payload:AnyObject = ["pin":"",
                         "otp":"",
                         "phone":""]as AnyObject
PinAuthentication.pinAuthInstance().resetPin(withPhoneAndOtp:payload as! [AnyHashable : Any], completionHandler:{ (data, error) in

    if let err = error {
        print(err.localizedDescription)
    } else {
        print("reset pin with phone and otp success")
    }
})
Reset PIN By ResetToken
Use this Endpoint to complete the forgot PIN Process by setting a new PIN on the account by providing the ResetToken.
Objective-C
Swift
NSDictionary *payload=@{ @"pin": @"",
                         @"ResetToken":@""
                         };
[[PinAuthentication pinAuthInstance] resetPinWithResetToken:payload  completionHandler:^(NSDictionary *data, NSError * error) {
    if (!error) {
        NSLog(@"Success");
    } else {
        NSLog(@"Error: %@", [error description]);
    }
}];
let payload:AnyObject = ["pin":"",
                  "ResetToken":""]as AnyObject
PinAuthentication.pinAuthInstance()?.resetPin(withResetToken:payload as? [AnyHashable : Any], completionHandler:{ (data, error) in

if let err = error {
print(err.localizedDescription)
} else {
print("reset pin with resettoken success")
}
})
Reset PIN By SecurityAnswer and Email
Use this Endpoint to complete the forgot PIN Process by setting a new PIN on the account by providing the SecurityAnswer and Email on the account.
Objective-C
Swift
NSDictionary *payload=@{ @"pin": @"",
                         @"email":@"",
                         @"securityanswer":@""
                         };
[[PinAuthentication pinAuthInstance] resetPinWithSecurityAnswerAndEmail:payload  completionHandler:^(NSDictionary *data, NSError * error) {
    if (!error) {
        NSLog(@"Success");
    } else {
        NSLog(@"Error: %@", [error description]);
    }
}];
let payload:AnyObject = ["pin":"",
                         "email":"",
                         "securityanswer":""]as AnyObject
PinAuthentication.pinAuthInstance()?.resetPin(withSecurityAnswerAndEmail:payload as? [AnyHashable : Any],
completionHandler:{ (data, error) in

    if let err = error {
        print(err.localizedDescription)
    } else {
        print("reset pin with email and securityanswer success")
    }
})
Reset PIN By SecurityAnswer and UserName
Use this Endpoint to complete the forgot PIN Process by setting a new PIN on the account by providing the SecurityAnswer and UserName on the account.
Objective-C
Swift
NSDictionary *payload=@{ @"pin": @"",
                         @"username":@"",
                         @"securityanswer":@""
                         };
[[PinAuthentication pinAuthInstance] resetPinWithSecurityAnswerAndUserName:payload  completionHandler:^(NSDictionary *data, NSError * error) {
    if (!error) {
        NSLog(@"Success");
    } else {
        NSLog(@"Error: %@", [error description]);
    }
}];
let payload:AnyObject = ["pin":"",
                         "username":"",
                         "securityanswer":""]as AnyObject
PinAuthentication.pinAuthInstance()?.resetPin(withSecurityAnswerAndUserName:payload as? [AnyHashable : Any], completionHandler:{ (data, error) in

    if let err = error {
        print(err.localizedDescription)
    } else {
        print("reset pin with username and securityanswer success")
    }
})
Reset PIN By SecurityAnswer and Phone
Use this Endpoint to complete the forgot PIN Process by setting a new PIN on the account by providing the SecurityAnswer and Phone on the account.
Objective-C
Swift
NSDictionary *payload=@{ @"pin": @"",
                         @"phone":@"",
                         @"securityanswer":@""
                         };
[[PinAuthentication pinAuthInstance] resetPinWithSecurityAnswerAndPhone:payload  completionHandler:^(NSDictionary *data, NSError * error) {
    if (!error) {
        NSLog(@"Success");
    } else {
        NSLog(@"Error: %@", [error description]);
    }
}];
let payload:AnyObject = ["pin":"",
"phone":"",
"securityanswer":""]as AnyObject
PinAuthentication.pinAuthInstance()?.resetPin(withSecurityAnswerAndPhone:payload as? [AnyHashable : Any], completionHandler:{ (data, error) in
if let err = error {
print(err.localizedDescription)
} else {
print("reset pin with phone and securityanswer success")
}
})
Change PIN By Access Token
Use this Endpoint to allow the customer to change their PIN (Provided that they know the existing PIN) and are logged in with a valid access_token.
Objective-C
Swift
NSDictionary *payload=@{ @"oldpin": @"",
@"newpin":@""
};
[[PinAuthentication pinAuthInstance] changePinWithAccessToken:@"access_token" payload:payload completionHandler:^(NSDictionary *data, NSError * error) {
if (!error) {
NSLog(@"Success");
} else {
NSLog(@"Error: %@", [error description]);
}
}];
let payload:AnyObject = ["oldpin":"",
"oldpin":""]as AnyObject
PinAuthentication.pinAuthInstance()?.changePin(withAccessToken:"access_token", payload:payload as? [AnyHashable : Any],completionHandler:{ (data, error) in
if let err = error {
print(err.localizedDescription)
} else {
print("change pin with access_token success")
}
})
One Touch Login API
This API is used to simplify the registration process to the minimum steps. It is really useful when there is a need to avoid hassles related to user registration. Following is the list of methods covered under this API:
- One Touch Login by Email
- One Touch Login by Phone
- One Touch Email Verification
- One Touch OTP Verification
- One Touch Login Ping
One Touch Login by Email
This API is used to send a link to a specified email for a frictionless login/registration.
Objective-C
Swift
NSDictionary *payload = @{ @"clientguid":@"",
@"email":@"",
@"name":@"",
@"qq_captcha_ticket":@"",
@"qq_captcha_randstr":@"",
@"g-recaptcha-response":@""
};
[[OneTouchLoginAPI oneTouchInstance] oneTouchLoginEmailWithPayload:payload redirecturl:@"" onetouchloginemailtemplate:@"" welcomeemailtemplate:@"" completionHandler:^(NSDictionary *data, NSError * error) {
if (!error) {
NSLog(@"Success");
} else {
NSLog(@"Error: %@", [error description]);
}
}];
let payload:AnyObject = [
"clientguid":"",
"email":"",
"qq_captcha_ticket":"",
"qq_captcha_randstr":"",
"g-recaptcha-response":""
]as AnyObject
OneTouchLoginAPI.oneTouchInstance().oneTouchLoginEmail(withPayload:payload as! [AnyHashable : Any], redirecturl:"", onetouchloginemailtemplate:"", welcomeemailtemplate:"", completionHandler:{ (data, error) in
if let err = error {
print(err.localizedDescription)
} else {
print("success")
}
})
One Touch Login by Phone
This API is used to send one time password to a given phone number for a frictionless login/registration.
Objective-C
Swift
NSDictionary *payload = @{
@"phone":@"",
@"name":@"",
@"qq_captcha_ticket":@"",
@"qq_captcha_randstr":@"",
@"g-recaptcha-response":@""
};
[[OneTouchLoginAPI oneTouchInstance] oneTouchLoginPhoneWithPayload:payload smstemplate:@"" completionHandler:^(NSDictionary *data, NSError * error) {
if (!error) {
NSLog(@"Success");
} else {
NSLog(@"Error: %@", [error description]);
}
}];
let payload:AnyObject = [
"phone":"",
"name":"",
"qq_captcha_ticket":"",
"qq_captcha_randstr":"",
"g-recaptcha-response":""
]as AnyObject
OneTouchLoginAPI.oneTouchInstance().oneTouchLoginPhone(withPayload:payload as! [AnyHashable : Any], smstemplate:"", completionHandler:{ (data, error) in
if let err = error {
print(err.localizedDescription)
} else {
print("success")
}
})
One Touch Email Verification
This API verifies the provided token for One Touch Login.
Objective-C
Swift
[[OneTouchLoginAPI oneTouchInstance] oneToucEmailVerificationWithVerificationtoken:@"<verificationtoken>" welcomeemailtemplate:@"" completionHandler:^(NSDictionary *data, NSError * error) {
if (!error) {
NSLog(@"Success");
} else {
NSLog(@"Error: %@", [error description]);
}
}];
OneTouchLoginAPI.oneTouchInstance().oneToucEmailVerification(withVerificationtoken:"<verificationtoken>", welcomeemailtemplate:"", completionHandler:{ (data, error) in
if let err = error {
print(err.localizedDescription)
} else {
print("success")
}
})
One Touch OTP Verification
This API is used to verify the otp for One Touch Login.
Objective-C
Swift
[[OneTouchLoginAPI oneTouchInstance] oneTouchLoginVerificationWithOtp:@"<otp>" phone:@"<phone>" smstemplate:@"" completionHandler:^(NSDictionary *data, NSError * error) {
if (!error) {
NSLog(@"Success");
} else {
NSLog(@"Error: %@", [error description]);
}
}];
OneTouchLoginAPI.oneTouchInstance().oneTouchLoginVerification(withOtp:"<otp>", phone:"<phone>", smstemplate:"",completionHandler:{ (data, error) in
if let err = error {
print(err.localizedDescription)
} else {
print("success")
}
})
One Touch Login Ping
This API is used to check if the One Touch Login link has been clicked or not.
Objective-C
Swift
[[OneTouchLoginAPI oneTouchInstance] oneTouchLoginPingWithClientguid:@"<clientguid>" completionHandler:^(NSDictionary *data, NSError * error) {
if (!error) {
NSLog(@"Success");
} else {
NSLog(@"Error: %@", [error description]);
}
}];
OneTouchLoginAPI.oneTouchInstance().oneTouchLoginPing(withClientguid:"<clientguid>", completionHandler:{ (data, error) in
if let err = error {
print(err.localizedDescription)
} else {
print("success")
}
})
Smart Login API
The LoginRadius Smart Login set of APIs that do not require a password to login and are designed to help you delegate the authentication process to a different device. This type of Authentication workflow while not limited to, is common among Smart TV apps, Smart Phone Apps and IoT devices. Following is the list of methods covered under this API:
Smart Login By Email
This API sends a Smart Login link to the user's Email Id.
Objective-C
Swift
[[SmartLoginAPI smartLoginInstance] smartLoginWithEmail:@"<email>" clientguid:@"" smartloginemailtemplate:@"" welcomeemailtemplate:@"" redirecturl:@"" completionHandler:^(NSDictionary *data, NSError * error) {
if (!error) {
NSLog(@"Success");
} else {
NSLog(@"Error: %@", [error description]);
}
}];
SmartLoginAPI.smartLoginInstance().smartLogin(withEmail:"<email>", clientguid:"", smartloginemailtemplate:"", welcomeemailtemplate:"", redirecturl:"", completionHandler:{ (data, error) in
if let err = error {
print(err.localizedDescription)
} else {
print("success")
}
})
Smart Login By UserName
This API sends auto login link to the user's Email Id.
Objective-C
Swift
[[SmartLoginAPI smartLoginInstance] smartLoginWithUsername:@"username" clientguid:@"" smartloginemailtemplate:@"" welcomeemailtemplate:@"" redirecturl:@"" completionHandler:^(NSDictionary *data, NSError * error) {
if (!error) {
NSLog(@"Success");
} else {
NSLog(@"Error: %@", [error description]);
}
}];
SmartLoginAPI.smartLoginInstance().smartLogin(withUsername:"<username>", clientguid:"", smartloginemailtemplate:"", welcomeemailtemplate:"", redirecturl:"",completionHandler:{ (data, error) in
if let err = error {
print(err.localizedDescription)
} else {
print("success")
}
})
Smart Login Ping
This API is used to check if the Smart Login link has been clicked or not.
Objective-C
Swift
[[SmartLoginAPI smartLoginInstance] smartLoginPingWithClientguid:@"clientguid" completionHandler:^(NSDictionary *data, NSError * error) {
if (!error) {
NSLog(@"Success");
} else {
NSLog(@"Error: %@", [error description]);
}
}];
SmartLoginAPI.smartLoginInstance().smartLoginPing(withClientguid:"clientguid",completionHandler:{ (data, error) in
if let err = error {
print(err.localizedDescription)
} else {
print("success")
}
})
Smart Login Verify Token
This API verifies the provided token for Smart Login.
Objective-C
Swift
[[SmartLoginAPI smartLoginInstance] smartAutoLoginWithVerificationToken:@"verificationtoken" welcomeemailtemplate:@"" completionHandler:^(NSDictionary *data, NSError * error) {
if (!error) {
NSLog(@"Success");
} else {
NSLog(@"Error: %@", [error description]);
}
}];
SmartLoginAPI.smartLoginInstance().smartAutoLogin(withVerificationToken:"verificationtoken", welcomeemailtemplate:"",completionHandler:{ (data, error) in
if let err = error {
print(err.localizedDescription)
} else {
print("success")
}
})
Passwordless Login API
This API is used for implementing Passwordless login. It includes methods for sending instant login links through email and username. Also, they allow to verify those links. Following is the list of methods covered under this API:
- Passwordless Login By Email
- Passwordless Login By Username
- Passwordless Login Verification
- Phone Send OTP
- Phone Login Using OTP
Passwordless Login By Email
This API is used to send a Passwordless Login verification link to the provided Email ID.
Objective-C
Swift
[[PasswordlessLoginAPI passwordlessInstance] passwordlessLoginWithEmail:@"<email>" passwordlesslogintemplate:@"" verificationurl:@"" completionHandler:^(NSDictionary *data, NSError * error) {
if (!error) {
NSLog(@"Success");
} else {
NSLog(@"Error: %@", [error description]);
}
}];
PasswordlessLoginAPI.passwordlessInstance().passwordlessLogin(withEmail:"<email>", passwordlesslogintemplate:"", verificationurl:"", completionHandler:{ (data, error) in
if let err = error {
print(err.localizedDescription)
} else {
print("success")
}
})
Passwordless Login By Username
This API is used to send a Passwordless Login Verification Link to a user by providing their UserName.
Objective-C
Swift
[[PasswordlessLoginAPI passwordlessInstance] passwordlessLoginWithUserName:@"<username>" passwordlesslogintemplate:@"" verificationurl:@"" completionHandler:^(NSDictionary *data, NSError * error) {
if (!error) {
NSLog(@"Success");
} else {
NSLog(@"Error: %@", [error description]);
}
}];
PasswordlessLoginAPI.passwordlessInstance().passwordlessLogin(withUserName:"<username>", passwordlesslogintemplate:"", verificationurl:"", completionHandler:{ (data, error) in
if let err = error {
print(err.localizedDescription)
} else {
print("success")
}
})
Passwordless Login Verification
This API is used to verify the Passwordless Login verification link.
Objective-C
Swift
[[PasswordlessLoginAPI passwordlessInstance] passwordlessLoginVerificationWithVerificationToken:@"verificationtoken" welcomeemailtemplate:@"" completionHandler:^(NSDictionary *data, NSError * error) {
if (!error) {
NSLog(@"Success");
} else {
NSLog(@"Error: %@", [error description]);
}
}];
PasswordlessLoginAPI.passwordlessInstance().passwordlessLoginVerification(withVerificationToken:"<verificationtoken>", welcomeemailtemplate:"", completionHandler:{ (data, error) in
if let err = error {
print(err.localizedDescription)
} else {
print("success")
}
})
Phone Send OTP
This API can be used to send a One-time Passcode (OTP) provided that the account has a verified PhoneID.
Objective-C
Swift
[[PasswordlessLoginAPI passwordlessInstance] passwordlessLoginSendOtpWithPhone:@"<phone>" smstemplate:@"" completionHandler:^(NSDictionary *data, NSError * error) {
if (!error) {
NSLog(@"Success");
} else {
NSLog(@"Error: %@", [error description]);
}
}];
PasswordlessLoginAPI.passwordlessInstance().passwordlessLoginSendOtp(withPhone:"phone", smstemplate:"", completionHandler:{ (data, error) in
if let err = error {
print(err.localizedDescription)
} else {
print("success")
}
})
Phone Login Using OTP
This API verifies an account by OTP and allows the user to login.
Objective-C
Swift
NSDictionary *securityquestionanswer = @{@"<Put Your Security Question ID>":@"<Put Your Answer>"};
NSDictionary *payload = @{ @"phone":@"",
@"otp":@"",
@"g-recaptcha-response":@"",
@"qq_captcha_ticket":@"",
@"qq_captcha_response":@"",
@"securityanswer":securityquestionanswer,
};
[[PasswordlessLoginAPI passwordlessInstance] passwordlessPhoneLoginWithPayload:payload smstemplate:@"" completionHandler:^(NSDictionary *data, NSError * error) {
if (!error) {
NSLog(@"Success");
} else {
NSLog(@"Error: %@", [error description]);
}
}];
let securityquestionanswer:AnyObject = ["<Put Your Security Question ID>":"<Put Your Answer>"] as AnyObject
let payload:AnyObject = [
"phone":"",
"otp":"",
"qq_captcha_ticket":"",
"qq_captcha_randstr":"",
"g-recaptcha-response":""
]as AnyObject
PasswordlessLoginAPI.passwordlessInstance().passwordlessPhoneLogin(withPayload:payload as! [AnyHashable : Any], smstemplate:"", completionHandler:{ (data, error) in
if let err = error {
print(err.localizedDescription)
} else {
print("success")
}
})
Configuration API
This API is used to get information about the configuration on the LoginRadius site. Following is the method covered in this API:
Objective-C
Swift
ConfigurationAPI.configInstance().getConfigurationSchema { data, error in
if let err = error {
print(err.localizedDescription)
} else {
// To set LoginRadius Schema (The one that you configured in the LoginRadius Admin Console) through:
LoginRadiusSchema.sharedInstance().setSchema(data!)
// To get LoginRadius Social schema (The one that you configured in the LoginRadius Admin Console) through:
if let providersObj = data!["SocialSchema"]{
let fields:[LoginRadiusField] = LoginRadiusSchema.sharedInstance().providers!
let providersList: NSMutableArray = NSMutableArray()
for field in fields{
providersList.add(field.providerName)
}
print(providersList as![String])
// To get LoginRadius Registration schema (The one that you configured in the LoginRadius Admin Console) through:
let rFields:[LoginRadiusField] = LoginRadiusSchema.sharedInstance().fields!
print("Success",rFields);
}
}
}
You can access the LoginRadius Registration schema (The one that you configured in the LoginRadius Admin Console) through:
Objective-C
Swift
NSArray<LoginRadiusField *> *rFields = [LoginRadiusSchema sharedInstance].fields;
let rFields:[LoginRadiusField] = LoginRadiusSchema.sharedInstance().fields!
Passkey Authentication API
This API is used to perform operations on a user account through Passkeys, enabling secure, passwordless authentication powered by the WebAuthn standard. It is generally used for front-end integrations on iOS apps to allow seamless login and account management with biometrics.
Prerequisites
1. Apple Developer Console Configuration
- In the Apple Developer Portal, enable Associated Domains for your app identifier.
- Use the same domains configured in Xcode.
- Refer to Apple’s Associated Domain Documentation.
2. Apple App Site Association (AASA) File
-
Deploy an
apple-app-site-association(AASA) file on your domain root:
https://your-domain.com/.well-known/apple-app-site-association -
The file must:
- Be served over HTTPS
- Have
Content-Type: application/json - Contain no redirects
Example format:
{
"webcredentials": {
"apps": [
"TEAMID.com.example.app"
]
}
}
- TEAMID with your Apple Developer Team ID.
- Replace com.example.app with your bundle identifier.
3. Associated Domains in Xcode
- In your app’s target, enable the Associated Domains capability.
- Add your domain entries in the following format:
applinks:your-domain.com
webcredentials:your-domain.com
4. Device Settings
-
Enable iCloud Keychain:
-
Settings → Apple ID → iCloud → Passwords and Keychain → Sync this iPhone
-
Enable AutoFill Passwords & Passkeys:
-
Settings → Passwords → Password Options → Turn on AutoFill Passwords and Passkeys
5. Admin Console Configuration
- Before using Passkeys in your iOS SDK integration, configure them in the LoginRadius Admin Console.
- Refer to LoginRadius Admin Console Documentation for details.
6. Presentation Context Setup When working with Passkeys, the system needs a presentation anchor (active window) to show the Passkey/Sign-in sheet.
Implement ASAuthorizationControllerPresentationContextProviding in your UIViewController:
Objective-C
Swift
- (ASPresentationAnchor)presentationAnchorForAuthorizationController:(ASAuthorizationController *)controller {
return self.view.window;
}
func presentationAnchor(for controller: ASAuthorizationController) -> ASPresentationAnchor {
return self.view.window!
}
Available APIs for passkey authentication:
- Register with Passkey
- Login with Passkey
- List User Passkeys
- Delete Passkey
- Add Passkey to Account
- Autofill with Passkey
Register with Passkey
This API registers a new passkey for the user’s account.
Objective-C
Swift
[[PasskeyAPI passkeyInstance] setPresentationContext:self]; // set the presentation context.
NSString *email = @"abc@example.com";
[[PasskeyAPI passkeyInstance] beginRegistrationWithPasskey:email
completion:^(NSDictionary * _Nullable data, NSError * _Nullable error) {
if (!error) {
NSLog(@"Begin registration success: %@", data);
} else {
NSLog(@"Error: %@", [error description]);
}
}];
PasskeyAPI.passkeyInstance().setPresentationContext(self) // set the presentation context.
let email = "test@example.com"
PasskeyAPI.passkeyInstance().beginRegistration(withPasskey: email) { data, error in
if let err = error {
print(err)
} else {
print("Successfully Registered \(data)")
}
}
Login with Passkey
This API authenticates the user using a saved passkey.
Objective-C
Swift
[[PasskeyAPI passkeyInstance] setPresentationContext:self]; // set the presentation context.
NSString *email = @"abc@example.com";
[[PasskeyAPI passkeyInstance] beginLoginWithPasskey:email
completion:^(NSDictionary * _Nullable data, NSError * _Nullable error) {
if (!error) {
NSLog(@"Begin login success: %@", data);
} else {
NSLog(@"Begin login error: %@", error.localizedDescription);
}
}];
PasskeyAPI.passkeyInstance().setPresentationContext(self) // set the presentation context.
let email = "test@example.com"
PasskeyAPI.passkeyInstance().beginLogin(withPasskey: email) { data, error in
if let err = error {
print(err)
} else {
print("Successfully login \(data)")
}
}
List User Passkeys
This API retrieves all passkeys associated with a user’s account.
Objective-C
Swift
[[PasskeyAPI passkeyInstance] listPasskeys:@"<access_token>"
completionHandler:^(NSDictionary * _Nullable data, NSError * _Nullable error) {
if (!error) {
NSLog(@"success %@", data);
} else {
NSLog(@"Error: %@", [error description]);
}
}];
PasskeyAPI.passkeyInstance().listPasskeys("<access_token>") { data, error in
if let err = error {
print(err)
} else {
print(data)
}
}
Delete Passkey
This API removes a specific passkey from the user’s account.
Objective-C
Swift
[[PasskeyAPI passkeyInstance] deletePasskeyWithPasskeyId:@"<passkeyId>"
accesstoken:@"<access_token>"
completionHandler:^(NSDictionary * _Nullable data, NSError * _Nullable error){
if (!error) {
NSLog(@"success %@", data);
} else {
NSLog(@"Error: %@", [error description]);
}
}];
PasskeyAPI.passkeyInstance().setPresentationContext(self) // set the presentation context.
PasskeyAPI.passkeyInstance().deletePasskey(withPasskeyId: "passkeyId", accesstoken: "<access_token>") { data, error in
if let err = error {
print(err)
} else {
print(data)
}
}
Add Passkey to Account
This API Links an additional passkey to an existing user profile.
Objective-C
Swift
[[PasskeyAPI passkeyInstance] setPresentationContext:self]; // set the presentation context.
[[PasskeyAPI passkeyInstance] beginAddPasskeyWithToken:@"<access_token>"
completion:^(NSDictionary * _Nullable data, NSError * _Nullable error){
if (!error) {
NSLog(@"success %@", data);
} else {
NSLog(@"Error: %@", [error description]);
}
}];
PasskeyAPI.passkeyInstance().setPresentationContext(self) // set the presentation context.
PasskeyAPI.passkeyInstance().beginAddPasskey(withToken: "<access_token>") { data, error in
if let err = error {
print(err)
} else {
print(data)
}
}
Autofill with Passkey
This API enables seamless login using iOS AutoFill functionality.
Objective-C
Swift
[[PasskeyAPI passkeyInstance] setPresentationContext:self]; // set the presentation context.
[[PasskeyAPI passkeyInstance] beginAutofillLoginWithPasskey:^(NSDictionary * _Nullable data, NSError * _Nullable error){
if (!error) {
NSLog(@"success %@", data);
} else {
NSLog(@"Error: %@", [error description]);
}
}];
PasskeyAPI.passkeyInstance().setPresentationContext(self) // set the presentation context.
PasskeyAPI.passkeyInstance().beginAutofillLogin(passkey: { data, error in
if let err = error {
print(err)
} else {
print(data)
}
})
Demo
Link to Demo app
The demo app contains implementations of social login and user registration service.
Steps to setup Demo apps.
- Clone the SDK repo. Link
- Run
pod install - Create a plist file named LoginRadius.plist and add it to the demo project.
- Add your Sitename and API key in LoginRadius.plist
- For Native social login to work follow the Social Login guide above.