Drupal v8.x and v9.x Customer Identity and Access Management Module Instruction
LoginRadius Customer Identity and Access Management Plugin simplifies and secures your user registration process, increases user conversion with Social Login that combines 40+ major social platforms, and offers a full solution with Traditional User Registration. Also, you can gather a wealth of user profile data from Social Login and Traditional User Registration, have a centralized view of entire end-user data, and manage it easily. Thus, it helps you to boost user engagement, manage online identities, capture accurate customer data, and get unique social insights into your customer base.
Instructions
This document provides instructions for installing the LoginRadius Customer Identity module for Drupal v8.x and v9.x. If you require additional components that are not included in your plugin, please Contact LoginRadius Support Team
Note: Having both V1 and V2 LoginRadius Drupal v8.x and v9.x plugins running may cause conflicts. Make sure to only enable one plugin at a time.
Installation
Installing manually
-
Download the Drupal v8.x or Drupal v9.x Customer Identity module.
-
Unarchive the module and upload module folder to your Drupal installation's modules directory.
-
Login to Drupal admin panel.
-
Click on the Extend tab and you'll see the CIAM LoginRadius module in modules list in your site's admin account. ** DO NOT ENABLE** the module immediately, the required LoginRadius PHP SDK library needs to be installed.
-
The PHP SDK needs to be updated before enabling the CIAM LoginRadius module. This can be done in following ways: Manually or Through Composer
-
Enable the Customer Identity Modules and click on Save Configuration.
Installing via web interface
-
Download the Drupal v8.x or Drupal v9.x Customer Identity module.
-
Login to Drupal admin panel.
-
Click on the Extend tab and then, click Install new module.
-
Browse for the LoginRadius zip file and hit the install button.
-
Click on the Extend tab and you'll see the CIAM LoginRadius module in modules list in your site's admin account. ** DO NOT ENABLE** the module immediately, the required LoginRadius PHP SDK library needs to be installed.
-
The PHP SDK needs to be updated before enabling the CIAM LoginRadius module. This can be done in the following ways: Manually or Through Composer
-
Enable the Customer Identity Modules and click on Save Configuration.
Note: Make sure you should clear the website's cache. For more information on clearing the cache, click here
For more detailed installation instructions click here
Install LoginRadius PHP SDK
Manual Steps to install php-sdk
You should be using PHP SDK which is at Github path (https://github.com/LoginRadius/php-sdk)
Follow the following instruction to upload PHP SDK manually.
-
Get the LoginRadius folder from given path and copy the folder
-
Go to your FTP.
-
Open the folder /vendor/.
-
Paste the LoginRadius folder into this directory.
-
Add the following path in file /vendor/composer/autoload_namespaces.php 'LoginRadiusSDK\\' => array($vendorDir . '/loginradius/php-sdk/src'),
-
If you have autoload_psr4.php file then please add the following path in this file /vendor/composer/autoload_psr4.php:- 'LoginRadiusSDK\\' => array($vendorDir . '/loginradius/php-sdk/src/LoginRadiusSDK'),
-
If you have autoload_static.php file then please follow the below step for drupal v8.x and v9.x respectively:
a) For Drupal v8.x: Add the following code in this file /vendor/composer/autoload_static.php
'L' => array ( 'LoginRadiusSDK\\' => 15, ),

For Drupal v9.x: Add the following code in the Array as shown in the below screen:
'LoginRadiusSDK\\' => 15,
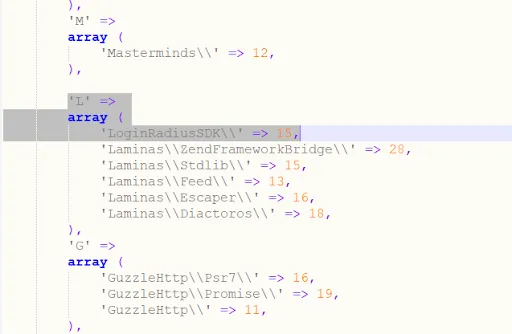
b) For both drupal v8.x and v9.x add the following code as shown in the below screen:
'LoginRadiusSDK\\' => array ( 0 => __DIR__. '/..' .'/LoginRadiusSDK', ),

Through Composer
Please refer to the following steps to install the LoginRadius PHP SDK with Composer:
Note: If Composer is already installed then jump to Step 3.
Step 1: Download and enable Composer Manager module.
Step 2: Initialize Composer Manager
There are two ways of initializing Composer Manager.
Option A: Initialize Composer Manager using the init.php script
-
Go to composer_manager/scripts directory
-
Change the file permission of init.php with a command chmod 700 init.php
-
Execute the init. script with a command ./init.php
Option B: Initialize Composer Manager using Drush
-
If you are using Drush, you can initialize Composer Manager by drush composer-manager-init
-
If you don't know how to use Drush, use option A
Step 3: Download LoginRadius PHP SDK with Composer
Now that we finally have Composer Manager initialized, we are ready to download the LoginRadius PHP SDK library with Composer.
-
Go to the root directory of your Drupal installation
-
Run the following command to install the standalone LoginRadius PHP SDK.
composer require loginradius/php-sdk:11.3.0
Note: If you want to update all required library then use the following command: composer drupal-update
Composer is now aware that the LoginRadius PHP SDK is required. It will first add this dependency to the /core/composer.json file which contains all external dependencies of your site. Then, it will automatically download the latest versions of the required libraries. You can verify the result by checking that LoginRadius PHP SDK is downloaded to /vendor/loginradius/php-sdk directory.
Upgrading Existing Module
- Login to Drupal Admin panel and go to Reports> Available updates.
- Check the LoginRadius Customer Identity and Access Management under Modules list.
- Now, click on the Download these Updates button in bottom.

Activation and Configuration
Note: The complete functionality of this module requires your LoginRadius API Key and Secret. Please find further documentation on how you can obtain this data here:
Activation
-
Click on the Configuration tab in the top menu, click on LoginRadius under People section.

-
Insert LoginRadius API Key, and API Secret as provided in your LoginRadius Admin Console
-
Click Save configuration.

Authentication
Redirection Settings After Login
-
Redirect to the same page: User will be redirected to the same page after login where user was before login.

-
Redirect to the profile page: User will be redirected to the profile page after login.

-
Redirect to a custom page User will be redirected to the custom page after login as per the URL.

Email Authentication Settings
- Admin can configure Email Authentication setting by 4 methods :

- Enable prompt password on Social Login
- Enable login with username
- Ask for email from unverified user
- Ask for required field on Traditional Login
- Email templates can be added/Modified in "Admin Console" which will be displayed in the drupal admin authentication page.

Phone Authentication Settings
Phone Authentication will be displayed in the admin authentication tab only if Phone Workflow is enabled in your app.
Note: If only the Phone Id Login option is enabled for the App, a random Email Id will be generated if a user registered using the PhoneID. Format of random email id is: randomid+timestamp@yourdomain.com
If only the Phone Id Login option is enabled for the App, and user registers only with Phone ID (without Email, Username, first name, Last name) then Phone ID will be displayed as a username.

- SMS templates can be added/Modified in Admin Console which will be displayed in the drupal admin authentication page.

Field Mapping
To enable User Fields mapping to Profile Data follow below steps:
- Login to Drupal admin panel.
- Click on MANAGE FIELDS section under Configuration > Account settings.
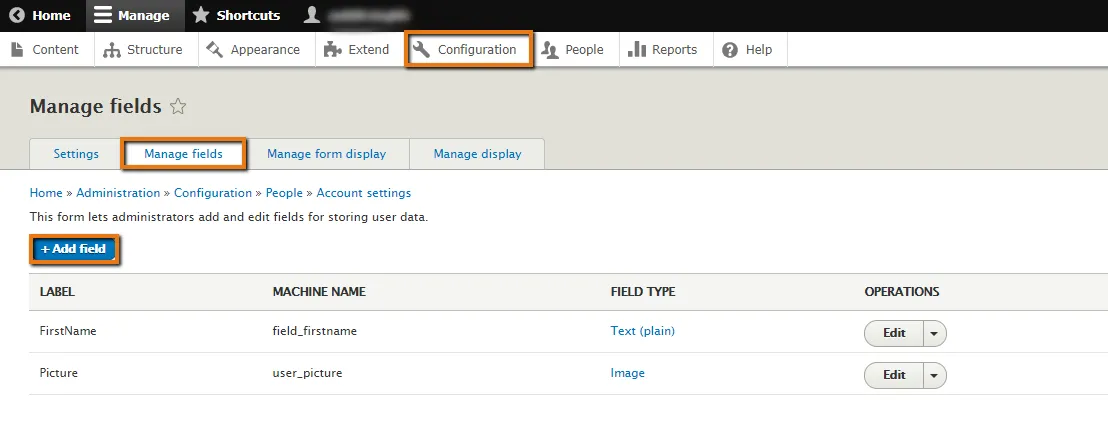
- Create User fields as per your requirements.
- Go to LoginRadius module to map user fields with the LR fields that are enabled from standard login of admin console. All the User Fields created in drupal will be listed down under Field Mapping.

- Hit the Save configuration button.
Note: The mapping will depend on the type of the fields selected from standard login, only similar type of fields can be mapped with each other. And after login, the user can see the mapped value in the View section. Customers can also edit the field values in the Edit section which will be reflected in View page after changes.
Advanced Settings
For the advanced options please refer to the below links:
- Enable Passwordless link login
- Enable Passwordless OTP Login
- Enable password strength
- Message timeout setting
- Store customer email address in the database
- Store customer first and last name as their username in the database
- Delete the customer profile from the LoginRadius database on account delete in Drupal
- Terms and Conditions
- Common Options
- Registration Form Schema
Enable Passwordless link login
LoginRadius customers can set up a login flow that allows users to login without a password by enabling this option. At the same time, Customers have to enable passwordless login from Admin console as well. For more details, Please review our Passwordless Link Login documentation. Passwordless SMS templates can be added/Modified in Admin Console which will be displayed in the drupal admin authentication page.
Enable Passwordless OTP Login
LoginRadius customers can set up a Passwordless OTP flow that lets the end-user enter his phone number and click on the Passwordless OTP login button. Enter the OTP which is received in phone number to login. Customers have to enable Passwordless OTP login from Admin console as well. For more details, Please review our Passwordless OTP Login documentation. Passwordless SMS templates can be added/Modified in "Admin Console" which will be displayed in the drupal admin authentication page.
Enable password strength
Password strength is a measure of the effectiveness of a password in resisting guessing and brute-force attacks. The strength of a password is a function of length, complexity, and unpredictability. For more details review our Javascript Hooks documentation.

Message timeout setting
Admin can set notification timeout (in seconds) by entering the desired time period in ‘Notification timeout settings’. Notification timeout is the time in which admin sets the time for how long success/error message will display.

Store customer email address in the database
Admin can store customer registered email address in the drupal database if this option is enabled otherwise a random email id will be generated and stored in the database.

Store customer first and last name as their username in the database
Admin can store customer first and last name as the username in the drupal database if this option is enabled otherwise provider id will be stored in the database.

Delete the customer profile from the LoginRadius database on account delete in Drupal
Admin can choose either to delete customer profiles from the LoginRadius database on account cancellation from Drupal or not.
If Yes is selected: Deleting an account from Drupal will delete the profile from LoginRadius Database as well. So in this case, if a deleted customer returns on the site:
-
Customer will not be able to login.
-
Customer will need to register again.
If No is selected: User will be deleted from Drupal only but still exists in LoginRadius Database, So in this case, if a deleted customer returns on the site:
-
The customer will not be able to register again with the same email ID.
-
The customer will still be able to log in, and a new profile will be created in Drupal and linked to the existing profile in the LoginRadius database.

Terms and Conditions
Admin can set Terms and Conditions by entering the content that he wants to be displayed on the registration form.

Common Options
Admin can also enter the common options of loginRadius JS in Common options for loginRadius interface field, click here for details on common options. For example :
commonOptions.loginOnEmailVerification = true;

Registration Form Schema
From here, you can customize the default registration form according to your desired fields, validation rules, and field types. All of the standard and custom field configured in your registration form, can be found under Deployment > JS Widgets > Registration Forms.

Single Sign-On
LoginRadius Single Sign-On (SSO) is a feature for multiple site management. It allows your end users to log into one site and when they navigate to other sites belonging to you and are enabled with LoginRadius Single Sign-On(SSO), they are already identified as registered users and logged in automatically to the site
Configuration
Important Note: Make sure same LoginRadius Site should be used in all websites in which you want to enable Single Sign-On.
-
Navigate to SSO tab.
-
Select Yes option under Do you want to enable Single Sign-On (SSO) ?.

Identity Experience Framework
To enable Identity Experience Framework functionality on your web property, follow the below steps:
- Navigate to Identity Experience Framework.
- Select Yes option under Enable Identity Experience Framework?

Update Profile
Customers can update their profile after login from the profile editor section.

Multi-Factor Authentication
In the case of traditional login, if Multi-Factor Authentication is enabled on your app then MFA section will be displayed on the profile page. Click on 2-Step Verification button to enable Multi-Factor Authentication.
By default, MFA is disabled on your LoginRadius site. To enable MFA for your site, in the Admin Console, go to Security > Multi-Factor Auth. Select the Enable option under Multi-Factor Authentication and the relevant flow option under the Select Flow section.

Note: For Multi-Factor Authentication, by default OTP authenticator is enabled on the app and, in order to enable Google Authenticator, you will need to enable it from the LoginRadius Admin Console.
- Scan the barcode from the authenticator app and enter Google Authenticator Code here.
 On successful authentication, option to Reset backup code will appear on profile. User can reset the generated backup codes from here.

Update Phone Number
This option will appear on profile along with the Phone Number field displaying the respective phone number. It will work only when the Phone and Email Simultaneous Login option is enabled on your app.

Interface customization
CSS Customization
To make the designing customization like interface layout, popup designing or interface elements, use current theme's CSS file for overriding the design.
Interface on Custom Page
We have following interfaces to display on any custom/existing pages:
- Displaying Login Form on a page
- Displaying Registration form on a page
- Displaying Forget password form on a page
In order to display the above interfaces please follow the below steps:
-
Navigate to Drupal Admin panel > Structure > Block Layout here, you will find multiple regions. Click on Place block to add the block in particular region.

-
Choose the block from the given list of blocks (like user login block, user registration block or user forgot password block) and click on Place block to display that particular block on any page.

-
To show the link of custom login interface and registration interface on any page add the URL of respective pages, refer to the below screenshot.

-
Click on Pages and add the Page ID where you want to show the block (interface) and hit on Save block button.

-
The following interface will be displayed on the page over the frontend.

Troubleshooting
Installation/Upgrading/Performance issue
If there are issues related to login, user interface, upgrade and/or module performance then you should clear your website's cache after enabling the LoginRadius Module. If you still face the issue, contact LoginRadius support team
Advanced Customization
- Where to look for user details in the database?
- How to verify your server is compatible with LoginRadius API?
- How to clear cache from Admin Panel?
- How to uninstall the Module?
Where to look for user details in the database
User details are stored in the user's table and loginradius_mapusers table:-
users table :
| Column | Info |
|---|---|
| name | Username |
| user's email address |
| Column | Info |
|---|---|
| provider | Social network provider |
| provider_id | Social network provider ID |
How to verify your server is compatible with LoginRadius API
To check the server compatibility, make sure to check curl.dll or allow_url_fopen files are enabled in "php.ini" file.
How to clear cache from Admin panel
Make sure to clear the cache from Drupal admin panel. To find the settings Go to Configuration > Performance and click on Clear all caches button.
How to uninstall the module
-
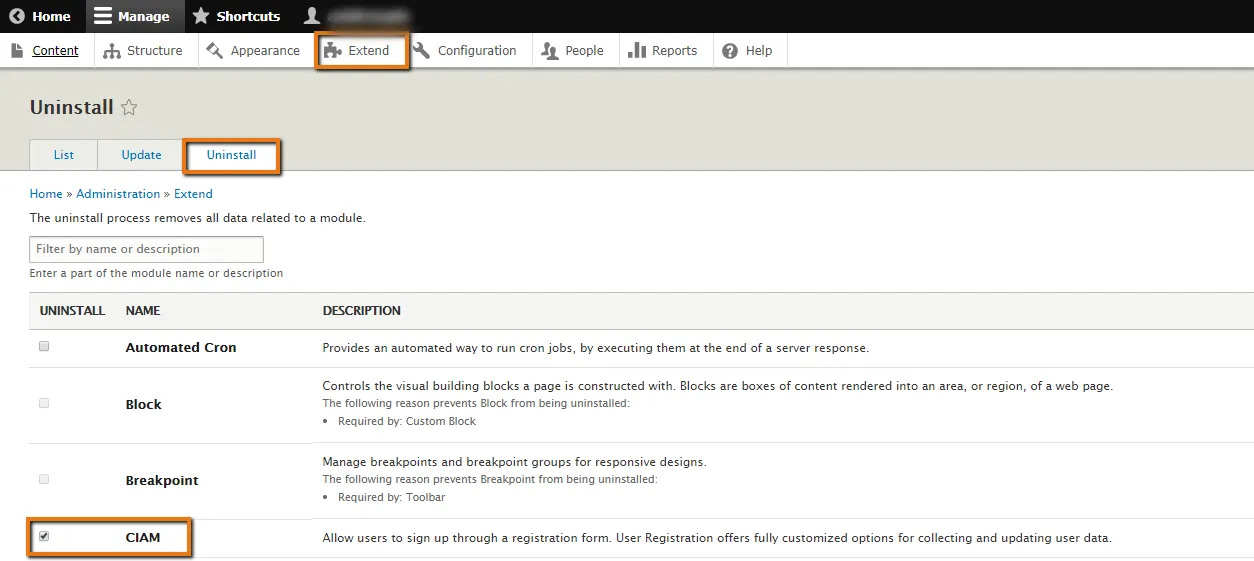
Login to Drupal admin panel.
-
Click on Uninstall under Extends tab and check the CIAM module and hit the uninstall button. Note: Make sure to Uninstall Identity Experience Framework and SSO (Single Sign-On) modules first, in order to uninstall CIAM module.
-
Go to your FTP and then go to the /modules. Delete the customer_identity_and_access_management folder from modules directory. The plugin is uninstalled.
Note:
- Drupal v8.x, tested up to 8.8.1.
- Drupal v9.x, tested up to 9.0.0.