Olark
Olark is a lightweight chat tool that helps businesses interact with their customers to ensure a good customer support interaction
Most of the analytics are done through Olark's own admin-console and this guide is mainly to integrate a customer's Login Radius identity to their Olark chat profile.
Implementation
You will first need the following JavaScript files (you may have some of them already, make sure the order of the scripts is correct).
Deploy the LoginRadius V2 JS
<script src="https://auth.lrcontent.com/v2/js/LoginRadiusV2.js"></script>
Deploy the LoginRadius V2 Integration JS
<script src="https://auth.lrcontent.com/v2/js/LoginRadiusV2.Integrations.js"></script>
Olark JS Code
Start with Olark from here by accessing your Admin-console
In the tab Preferences -> Installation copy and paste your installation code into the page
Within the onSuccess functions (i.e. login.onSuccess), include:
LRObject.identify('olark',response.Profile, map);
<script>
     var mapping={
     standard:[
       "email",
       "firstname"
     ],
     custom:{
       olark:{
         mappings:{
         "Email[0].Value":"Email Address"
          },
         ignoreDefault:true // ignores standard, only does the mappings
       }
     }
   };
    var commonOptions = {};
    commonOptions.apiKey = 'xxxxxxxxxxxxxxxxxxxxxxxxxxxx';
    commonOptions.appName = 'XXXXX';
    var  LRObject = new LoginRadiusV2(commonOptions);
    var login_options = {};
    login_options.onSuccess = function(response) {
    //On Success
    // Use to sync data in your intercom integration.
    LRObject.identify("olark",response.Profile,mapping)
    console.log(response);
    };
    login_options.onError = function(errors) {
    //On Errors
    console.log(errors);
    };
    login_options.container = "login-container";
    LRObject.util.ready(function() {
    LRObject.init("login",login_options);
    });
</script>
Custom Mapping
If you're handling the data yourself, (isCustom == true), then make sure your data is formed correctly to pass into the Olark integration.
- Olark requires that your custom object complies to this:
{
    snippet: ['firstitem','seconditem','thirditem',..*]
}
Example
<script>
    var data = {
    snippet: ['firstitem','seconditem','thirditem',..*]
}
    var commonOptions = {};
    commonOptions.apiKey = 'xxxxxxxxxxxxxxxxxxxxxxxxxxxx';
    commonOptions.appName = 'XXXXX';
    var  LRObject = new LoginRadiusV2(commonOptions);
    var login_options = {};
    login_options.onSuccess = function(response) {
    //On Success
    // Use to sync data in your olark integration.
    LRObject.identify("olark",data,'', true)
    console.log(response);
    };
    login_options.onError = function(errors) {
    //On Errors
    console.log(errors);
    };
    login_options.container = "login-container";
    LRObject.util.ready(function() {
    LRObject.init("login",login_options);
    });
</script>
Correct Behaviour
If installed correctly on Olark, this is how a user should look like in your chat Admin-console.
- This is assuming your Registration Page has the fields for Phone Number, Full Name, and E-mail.
- This is also assuming you left the standard field completely blank meaning every available default field should have been deployed on your Olark Admin-console.
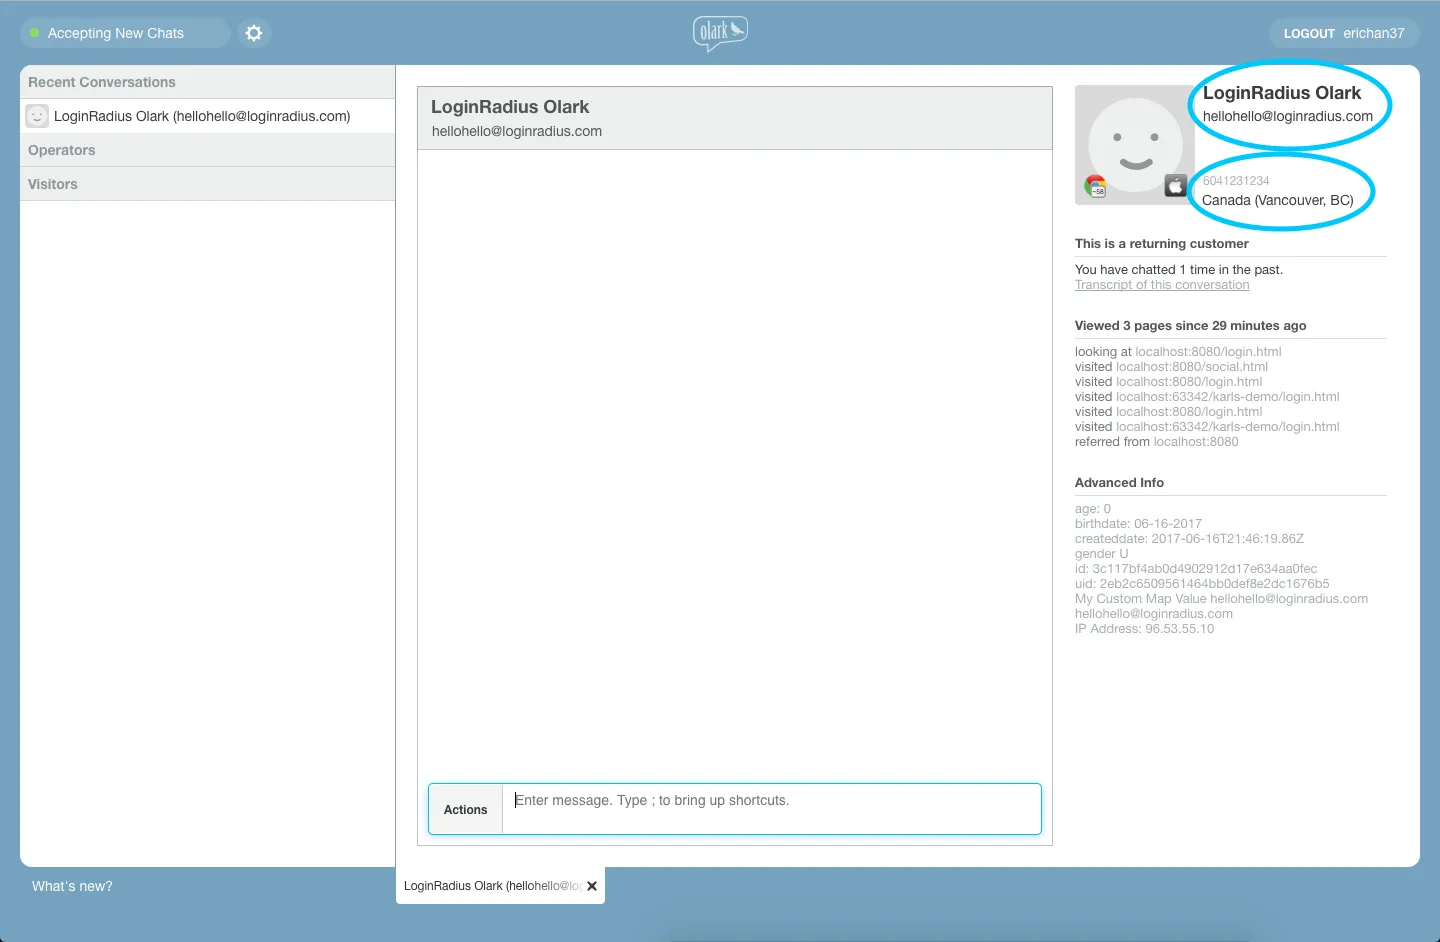
- The correct behavior for your own custom object would just be everything in the "Advanced Info" section of the person's profile.