LoginRadius as IDP with Domo as SP
Domo provides a cloud-based business management suite that integrates with multiple data sources, including spreadsheets, databases, social media, and existing software solutions.
This document goes over the full process of leveraging the Federated Single Sign-On (SSO) SAML authentication feature to have your customers authenticate for accessing the Demo via their identities stored with the LoginRadius Identity Platform.
DOMO as SP Configuration Guide
This guide will take you through the setup and implementation of the IDP initiated SSO. It covers everything you need to configure in your DOMO Application and LoginRadius Admin Console.
Pre-requisites: You will need an account on Domo to proceed. You can apply for an account on the Domo website.
Part 1 - Configuring SAML in DOMO
This section covers everything you need to configure in your DOMO Application.
NOTE: If you have enabled or added a Custom Domain for your existing application, please be aware that you should replace the URL
https://<LoginRadius tenant name>.hub.loginradius.com/withhttps://<Your Custom Domain>/in fields such as Issuer, EntityID, Login and Logout URLs, or any fields having the same format.
Step 1: In a browser, type the URL in https://<<your-domo-environment>>.domo.com format and press enter and log on to your account.
Step 2: On the home page, click the More icon on the top of the page. The following screen will appear:
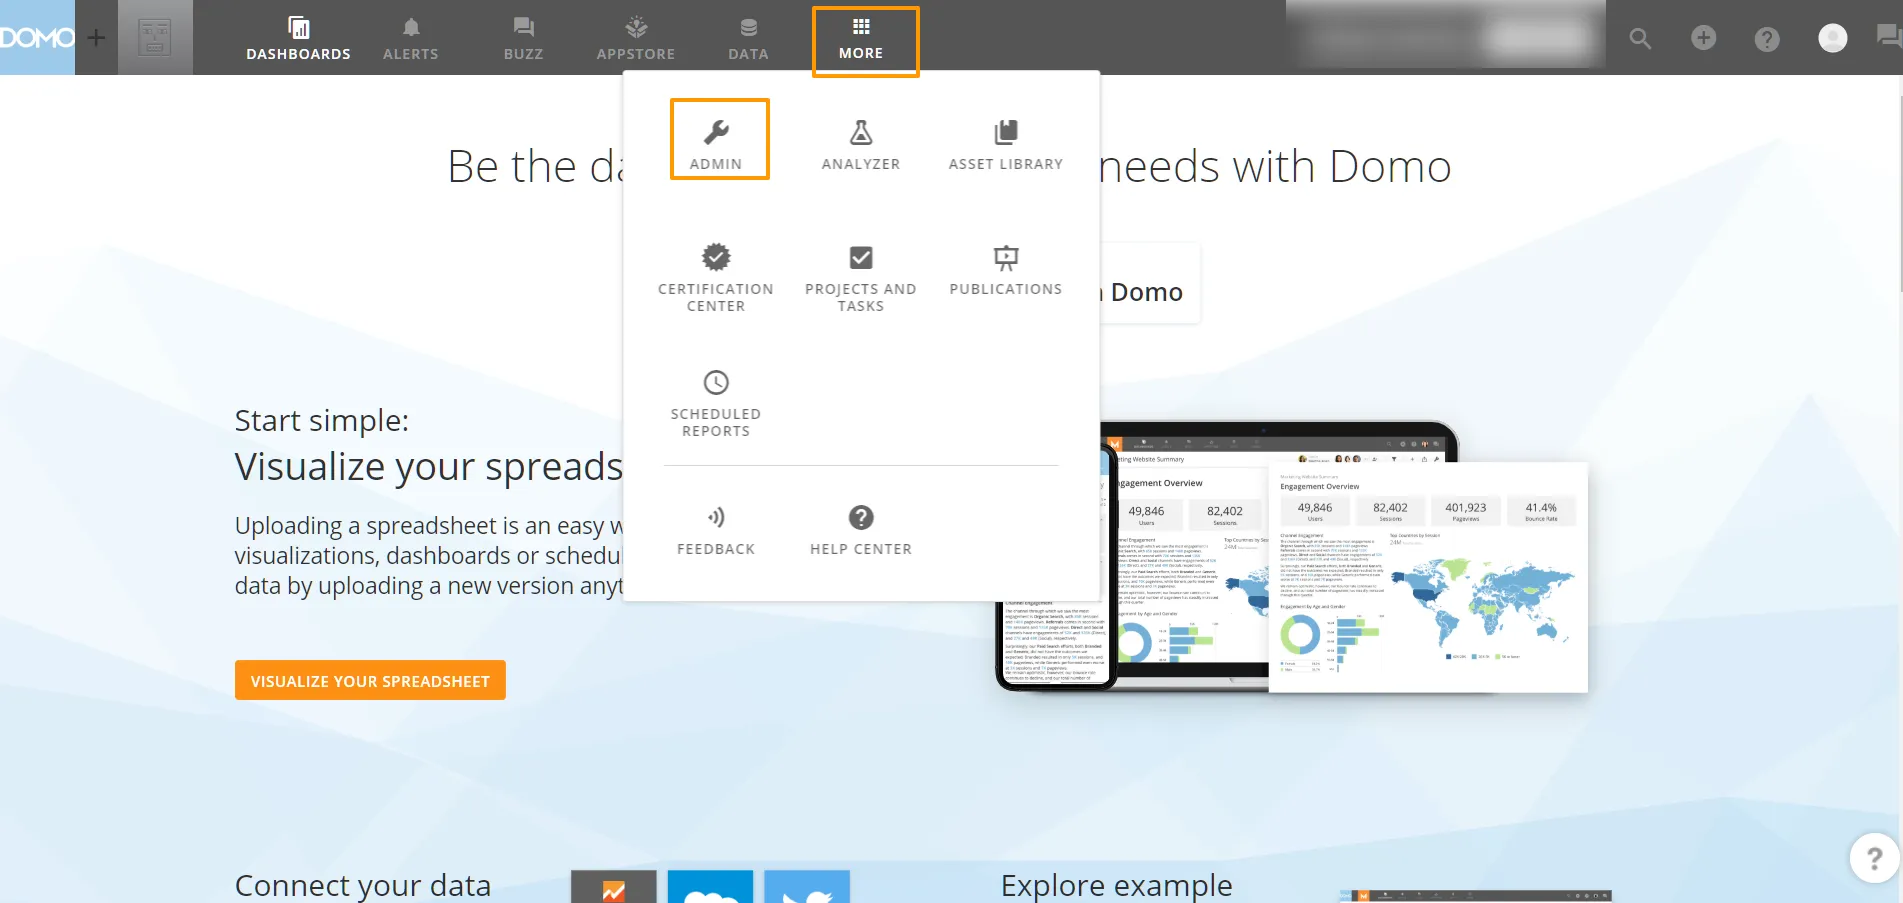
From the given options, click the Admin. The Admin Settings screen will appear.
Step 3: On the Admin Settings screen, from the left navigation pane, click Security > Single Sign-On (SSO) as highlighted in the screen below:

Step 4: If you are visiting this section for the first time, you will be prompted to click Start Setup otherwise, skip to step 6.

Step 5: Clicking the Start Setup button from the above screen will display the following options: select the Manual Setup.
 Select the Manual Setup and fill out the fields as per the details provided below.
Step 6: In the Identity provider endpoint URL box, enter the URL :https://<LoginRadius tenant name>/service/saml/idp/login?appname=<SAMLAppName>;

Step 7: In the Entity ID box, type a unique(your organization’s DOMO URL) entity ID: https://<<your-domoenvironment>>.domo.com
Step 8: In the Upload x.509 certificate to authenticate the request box, upload the certificate. Click the arrow to browse and upload the certificate.

Note: You will need this certificate along with its private key while configuring details in the LoginRadius Admin Console.
Step 9: Under Advanced Settings, select the Use SAML Relay State to redirect option

Step 10: Make sure that Mixed Login has disabled, refer to the Domo documentation for details on disabling Mixed Login.

Step 11: Once you have Mixed Login disabled, In the Advanced Settings section, select On logout, direct people to the following URL checkbox, and type a redirect URL for logging out.
Step 12: You should now have a new field where you can enter the following Logout URL: https://<LoginRadius tenant name>/service/saml/idp/logout?appname=<SAMLAppName>
Step 13: In the upper-right corner, click SAVE CONFIG. You have completed the required configuration in Domo. Now you can move over to Configuring SAML in LoginRadius.
Part 2 - Configuration of SAML in LoginRadius Admin Console
This section covers everything you need to configure in your LoginRadius Admin Console.
NOTE: If you have enabled or added a Custom Domain for your existing application, please be aware that you should replace the URL
https://<LoginRadius tenant name>.hub.loginradius.com/withhttps://<Your Custom Domain>/in fields such as Issuer, EntityID, Login and Logout URLs, or any fields having the same format.
Step 1: Log in to your Admin Console, navigate to Integrations > SSO Integrations, and select the SAML option from the left navigation panel.
The following screen will appear:

Step 2: To configure the details in the Admin Console, click the Add App button from the above screen.
The configuration options will appear on the same screen as displayed below:

Step 3: Select the desired Version of** SAML** from SAML Version.
Step 4: Select IDP initiated Login from Login Flow.
Step 5: In the SAML App Name field, enter a unique App name. This app name will be used by LoginRadius to identify the request originating source.
Step 6: In the Certificates section under Id Provider Certificate Key, enter the LoginRadius Certificate Key. This Key will be used to establish trust between Identity and Service Provider.
Note: Refer to this document, for details on how to generate private and public keys.
Step 7: Copy the values of LoginRadius' certificate and key with headers and enter in ID Provider certificate key and ID provider certificate
Step 8: Leave the service provider certificate input blank
Step 9: For attribute map the LoginRadius fields with the Service Provider fields.
-
In Name, enter the field name of Service Provider(Domo).
-
In Format, enter
urn:oasis:names:tc:SAML:2.0:attrname-format:unspecified. -
In Value, enter LoginRadius mapping field name.
The following table is an example of email field mapping :
| Name | Format | Value |
|---|---|---|
| urn:oasis:names:tc:SAML:2.0:attrname-format:unspecified |
Note: The email attributed is a required field and need to be passed to Domo, to know more about attributes refer to understanding and configuring Domo Single Sign-On using SAML
Step 10: For Name id format, select name Id format that is supported by the Service Provider. The default is urn:oasis:names:tc:SAML:1.1:nameid-format:unspecified.
Step 11: In the URL’s section: https://<LoginRadius tenant name>.hub.loginradius.com/
-
For login URL, enter
https://<LoginRadius tenant name>.hub.loginradius.com/auth.aspx. (In case of custom domain Login url will be<customdomain>/auth.aspx) -
For after** logout URL**, enter
https://<LoginRadius tenant name>.hub.loginradius.com/auth.aspx?action=logout.
Step 12: Service Provider Details section contains the endpoints and settings that LoginRadius will communicate with to establish a SAML session. In this section enter the following details:
- In the service provider logout url, enter the service provider logout URL.
https://<<your-domo-environment>>.domo.com
Note: This URL is used as a placeholder as Domo does not provide a logout URL.
-
In default request binding enter
urn:oasis:names:tc:SAML:2.0:bindings:HTTP-POST -
In assertion, consumer service location add SAML Assertion Endpoint Url (you will get it from Domo Admin Dashboard)

-
In Assertion Consumer Service Binding select
urn:oasis:names:tc:SAML:2.0:bindings:HTTP-POST -
For relay state parameter, enter RelayState.
Step 13: For app audiences, enter https://<<Your LoginRadius Sitename>>.hub.loginradius.com.
Step 14: Select HTTPPost from the SSO method.
Step 15: Click the ADD A SAML APP button to add and save settings.
Part 3 - Customer Login in DOMO via LoginRadius
Step 1: After completing the Part 1 and Part 2 configurations, navigate to the Domo login page, the following screen will appear:

Step 2: Click on Sign In button, you will be redirected to LoginRadius Identity Experience Framework(Hosted-IDX) as displayed below:
