
LoginRadius as IdP with SharePoint as SP
This document describes the step-by-step process to integrate Office365 as an SP and LoginRadius as an IdP in service provider-initiated SAML workflow.
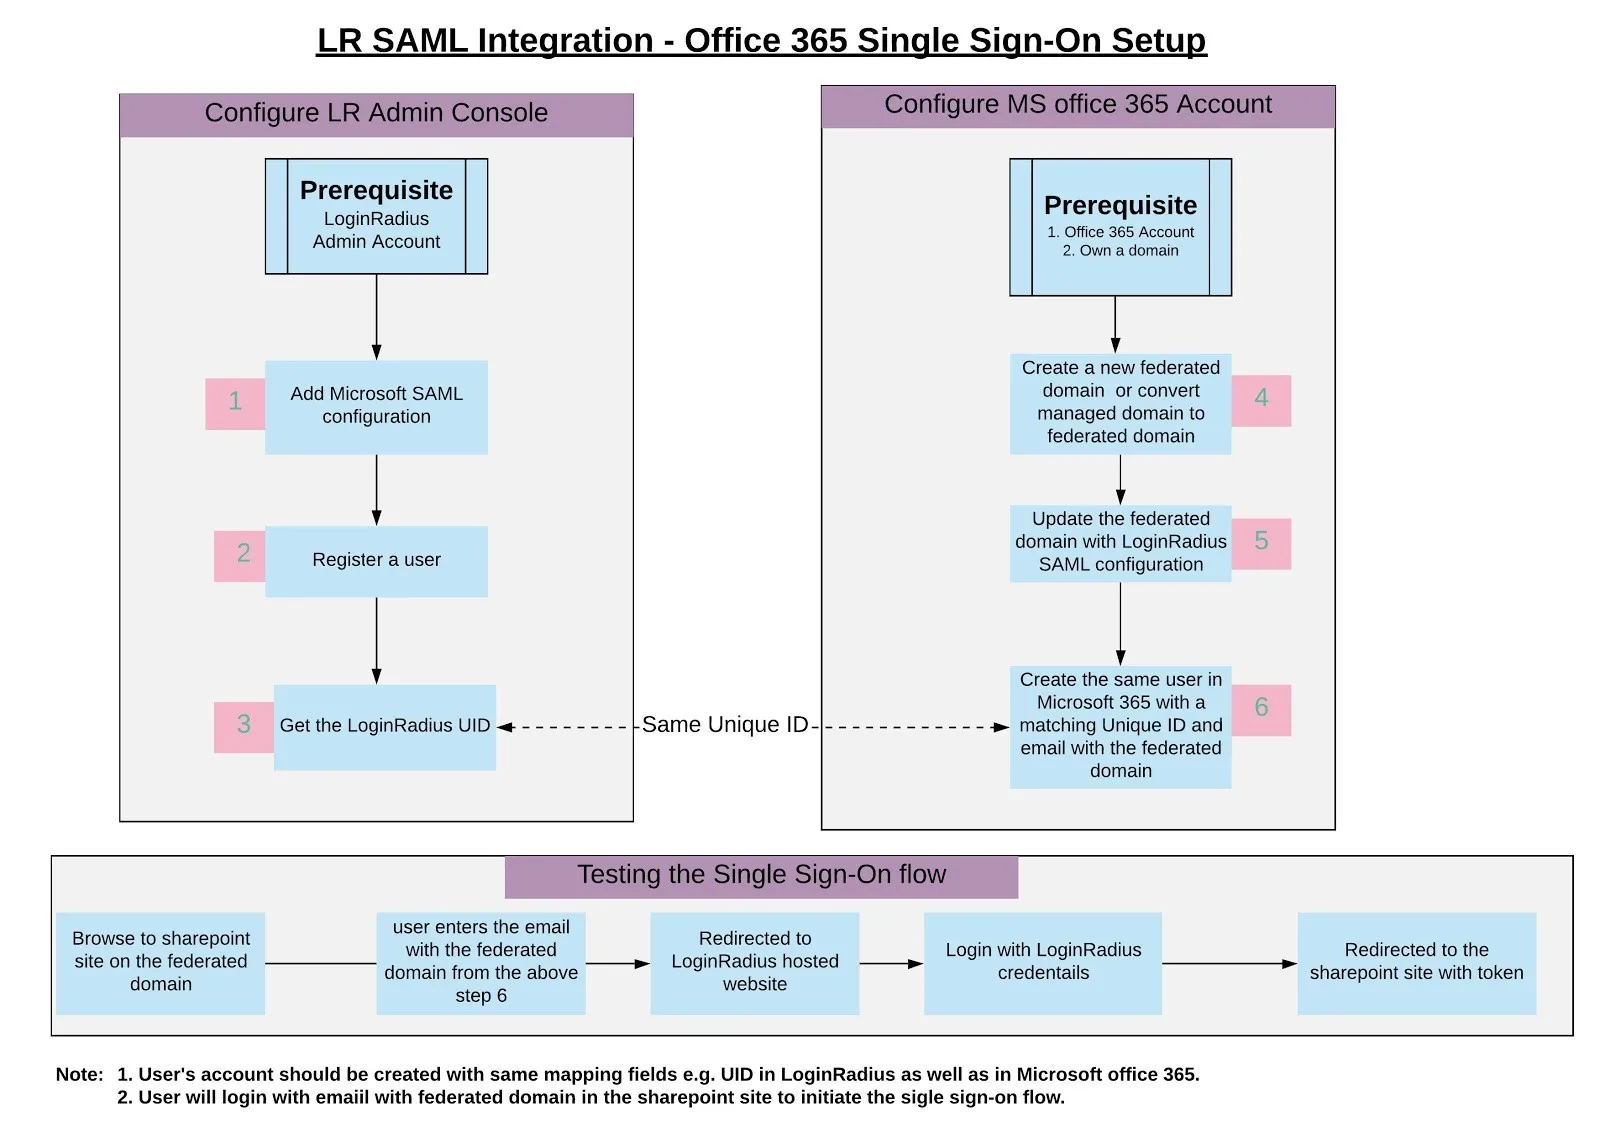
Prerequisites
Before you get started you should ensure that you have the following prerequisites:
- An administrator account for Office365.
- SAML feature is enabled for your account in LoginRadius Admin Console.
- A domain name that you own for Office365.
- Windows PowerShell with the Azure AD PowerShell module installed.
- A public certificate and private key pair are required to successfully connect applications with LoginRadius. Learn how to manage certificates and private keys.
- You must generate a public certificate and private key pair to connect an application to LoginRadius.
Limitation
- To enable single sign-on using SAML workflow between LoginRadius and SharePoint, users can only login with the email address with the federated domain of SharePoint site in Office365.
- The ImmutableId and email address for the user in Office365 should match Uid and email address in LoginRadius respectively.
Configuring LoginRadius Admin Console
This section covers everything you need to configure in your LoginRadius Admin Console.
NOTE: If you have enabled or added a Custom Domain for your existing application, please be aware that you should replace the URL
https://LoginRadius_Site_Name.hub.loginradius.com/withhttps://Your_Custom_Domain/in fields such as Issuer, EntityID, Login and Logout URLs, or any fields having the same format.
-
Login to your LoginRadius Admin Console.
-
Go to Platform Configuration > Access Configuration > Federated SSO.
-
Select the SAML tab and click on the ‘Add APP’ button.

-
Select SAML 2.0 in the SAML Version dropdown.
-
Select Service Provider Initiated Login flow in the Login Flow dropdown.
-
Enter your desired SAML app name in the SAML App Name field.
-
Enter https://login.windows.net/common/oauth2/logout in the Service Provider Logout URL field.
-
Enter the LoginRadius Certificate key under the ID Provider Certificate Key.
-
Enter the LoginRadius Certificate in ID Provider Certificate field.
-
Enter the SharePoint Certificate under Service Provider Certificate[https://nexus.microsoftonline-p.com/federationmetadata/saml20/federationmetadata.xml].
-
Enter urn:oasis:names:tc:SAML:2.0:bindings:HTTP-POST under DEFAULT REQUEST BINDING.
-
Enter urn:oasis:names:tc:SAML:2.0:bindings:HTTP-POST under Assertion Consumer Service.
-
Enter
https://login.microsoftonline.com/login.srfunder Assertion Consumer Service Location. -
For ATTRIBUTES map the LoginRadius fields with SharePoint 365 fields.
- In Name enter the fields name of SP.
- In Format enter urn:oasis:names:tc:SAML:2.0:attrname-format:unspecified.
- In Value enter the LoginRadius mapping field name. Get the allowed fields of LoginRadius from here.
-
Select urn:oasis:names:tc:SAML:2.0:nameid-format:transient for Name Id Format.
-
Enter
https://LoginRadius_Site_Name.hub.loginradius.com/auth.aspxin Login URL. -
For AFTER LOGOUT URL enter
https://LoginRadius_Site_Name.hub.loginradius.com/auth.aspx?action=logout. -
For RELAY STATE PARAMETER enter RelayState.
-
Enter
https://LoginRadius_Site_Name.hub.loginradius.com/under APP AUDIENCES. -
Select HTTPPost from SSO METHOD.
-
Click “Add a SAML App” button to add the SAML app.
Configure SharePoint SAML settings
Download and install the Windows Azure Active Directory Module for Windows PowerShell. Once installed, you will use the cmdlets to configure your Windows Azure AD domains as federated domains. For instructions about how to download and install the cmdlets, see https://technet.microsoft.com/library/jj151815.aspx.
Create a Federated Domain on Office365
Before configuring federation on an Azure AD domain, it must have a custom domain configured. You cannot federate the default domain that is provided by Microsoft. The default domain from Microsoft ends with “onmicrosoft.com”.
- Create a managed domain on
https://admin.microsoft.com/AdminPortal/Home-> Setup -> Domains -> Add domain. - Follow steps to verify ownership of the domain.
- Ensure that the created domain is NOT the default domain.
Configuring a Federated Domain on Office365
This section covers everything you need to configure federated domain on your Office365.
NOTE: If you have enabled or added a Custom Domain for your existing application, please be aware that you should replace the URL
https://LoginRadius_Site_Name.hub.loginradius.com/withhttps://Your_Custom_Domain/in fields such as Issuer, EntityID, Login and Logout URLs, or any fields having the same format.
- Open PowerShell and run the command
‘Connect-MsolService’and log in using Office365 Login credentials. - Run command
‘Get-MsolDomain’in the PowerShell and ensure the newly created managed domain is listed there. - Use the following values for setting up the federated domain:
$domainname = “Your_Custom_Domain”
$logoffuri = “https://LoginRadius_Site_Name/service/saml/idp/logout?appname=<SAMLAppName>”
$passivelogonuri = “https://LoginRadius_Site_Name/service/saml/idp/login?appname=<SAMLAppName>”
$cert = “Your_LoginRadius_Certificate”
$issueruri = “https://LoginRadius_Site_Name.hub.loginradius.com/”
$protocol = “SAMLP”
Note: You should remove the following from
Your_LoginRadius_Certificate content: new-line character, -----BEGIN CERTIFICATE-----, -----END CERTIFICATE-----.
- Run the following command to assign the listed values from the previous step to the federated domain:
Set-MsolDomainAuthentication -DomainName $domainname -FederationBrandName $domainname -Authentication Federated -IssuerUri $issueruri -LogOffUri $logoffuri -PassiveLogOnUri $passivelogonuri -SigningCertificate $cert -PreferredAuthenticationProtocol $protocol’.
-
Verify that the domain is now set to federated using
‘Get-MsolDomain’. -
To modify any of the parameters already set for the domain, switch the domain back to Managed by using the command:
‘Set-MsolDomainAuthentication -DomainName “Your_Custom_Domain” -Authentication Managed’after which (assuming the constants $domainname, $issueruri etc. have already been set, update whichever constant you need to by reassigning a value to it, and call the command:‘Set-MsolDomainAuthentication -DomainName $domainname -FederationBrandName $domainname -Authentication Federated -IssuerUri $issueruri -LogOffUri $logoffuri -PassiveLogOnUri $passivelogonuri -SigningCertificate $cert -PreferredAuthenticationProtocol $protocol’again. -
Verify your changes with
‘Get-MsolDomainFederationSettings -DomainName “Your_Custom_Domain” | Format-List *’.
Create a user in Office365 corresponding LoginRadius user account
Before you can authenticate your users to Office365 you must provision Azure AD with user principals that correspond to the assertion in the SAML 2.0 claim. If these user principals are not known to Azure AD in advance then they cannot be used for federated Sign-in.
- Create a new MsolUser with an Immutableid corresponding to a LoginRadius Uid and with an email using the newly created domain name:
New-MsolUser
-UserPrincipalName john.doe@companydomain.com
-ImmutableId 2e28f6ce-4e3b-4538-b284-1461f9379b48
-DisplayName "John Doe"
-FirstName “John”
-LastName “Doe”
-AlternateEmailAddresses "john.doe@company.com"
-UsageLocation “CA”’

**Note**: **-ImmutableId** and **-UserPrincipalName** in Office365 should match Uid and email in LoginRadius.

2. Assign a license to the newly created user, using
Set-MsolUserLicense -UserPrincipalName “john.doe@company.com” -AddLicenses “licensename”
**Note**: You can view the currently available license using **Get-MsolAccountSku**.

3. Verify the user details using

```shell
Get-MsolUser -UserPrincipalName john.doe@companydomain.com | select UserprincipalName,ImmutableID,WhenCreated,isLicensed