Identity Provider Initiated SSO
Within this document, you'll delve into the LoginRadius Identity Provider (IDP) initiated SAML flow.
The IDP-initiated SSO begins with the user clicking on a Login button within the Service Provider (SP) interface. Subsequently, they are redirected to the IDP Login Page. After successful authentication, the IDP dispatches a SAML response containing an assertion to the Service Provider's Assertion Consumer Service endpoint.
Flow diagram for IDP-initiated SAML workflow:
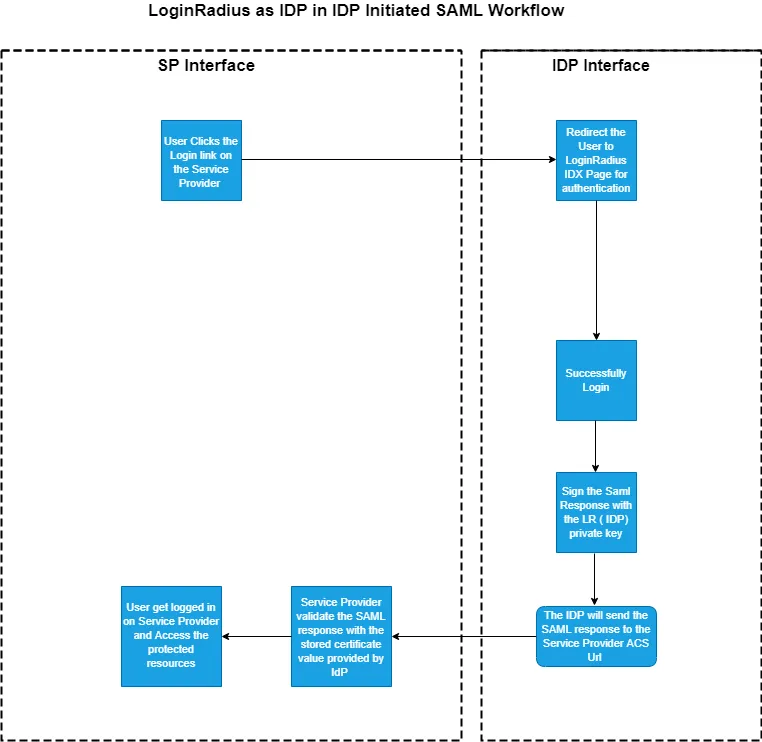
Here’s how the IDP Initiated SAML flow works with LoginRadius.
-
The user requests to access a protected resource by clicking a Login Link on the third-party service provider.
-
The user will be redirected to the LoginRadius IDX login page.
-
The user enters their LoginRadius user credentials.
-
After successful authentication, the Identity Provider (LoginRadius) signs the SAML Response with the LoginRadius (IDP) private key.
-
The IDP will then send a signed SAML response to the SP’s Assertion Consumer Service (ACS) URL. The response contains an assertion that tells the service provider who the user is.
-
The service provider validates the SAML response with the stored certificate value provided by IdP and identifies the user.
-
The user is now logged in to the service provider and can access the protected resource.
SAML App Configuration Guide (Idp Initiated)
This guide will lead you through the setup and implementation process of IDP-initiated SSO, covering all the necessary configurations needed within your LoginRadius account.
You are required to configure a SAML app in the LoginRadius Admin Console and third-party Service Provider.
Configuring SAML App
This section covers the required configurations that you need to perform in the LoginRadius Admin Console to implement the IDP-initiated flow.
NOTE: If you have enabled or added a Custom Domain for your existing application, please be aware that you should replace the URL
https://<LoginRadius Site Name>.hub.loginradius.com/withhttps://<Your Custom Domain>/in fields such as Issuer, EntityID, Login and Logout URLs, or any fields having the same format.
Step 1: Log in to your Admin Console account and navigate to Integrations -> SSO Integration.
Step 2: To configure the SAML app in the Admin Console, click the Add App button.
Step 3: Select the SAML app and Idp Initiated Login from the Login Flow options.
Step 4: In the SAML App Name field, enter an App name. If you have multiple SAML apps, each app name should be unique.
Step 5: For Attributes, map the LoginRadius fields with the Service Provider fields.
- In Name, enter the field name of the Service Provider.
- In Format, enter
urn:oasis:names:tc:SAML:2.0:attrname-format:unspecified. - In Value, enter the LoginRadius mapping field name.
- Select the Static checkbox if you want to include static data instead of fetching it from the LoginRadius user profile.
Similarly, by clicking the Add Row button, you can map multiple attributes.
Some Examples of Field Mappings:
Some Examples of Field Mappings:
| Name | Format | Value | Description |
|---|---|---|---|
| name | urn:oasis:names:tc:SAML:2.0:attrname-format:unspecified | FullName | Selecting full name from the Dropdown. Send the full name in the SAML response. |
urn:oasis:names:tc:SAML:2.0:attrname-format:unspecified | Selecting Email from the Dropdown. Send the Email in the SAML response. | ||
| Customfield | urn:oasis:names:tc:SAML:2.0:attrname-format:unspecified | Custom_field_name (From dropdown) | In a dropdown, you can select the custom field name configured as in the Data schema. Note: Custom field will be listed in the dropdown when it is only turned on for the Registration form under Data Schema. |
| User Roles | urn:oasis:names:tc:SAML:2.0:attrname-format:unspecified | Other -> Roles[0] | Roles[0] will fetch the first Role from the profile. |
Note:
- If you don't find the Custom Field in the drop-down list, select the Other from the Value dropdown of the Attributes section and use dot notation to map the custom field on the basis of name.
For e.g if the custom field name is customfield1, then we can use it like CutomFields.customfield1.
- The Roles field is of type array and will have multiple value(s) "Roles": ["Admin", "Manager" ].
You can access the Roles array value using the index. For e.g, if the role is on “0” index, then it can be access like Roles[0].
Step 6: For Name Id Format, select the format supported by the Service Provider. The default is urn:oasis:names:tc:SAML:1.1:nameid-format:unspecified.
Step 7: In the Login URL, enter https://<LoginRadiusSite Name>.hub.loginradius.com/auth.aspx.
Step 8: For After Logout URL, enter https://<LoginRadius Site Name>.hub.loginradius.com/auth.aspx?action=logout.
Step 9: In the Service Provider Logout URL, enter the service provider logout URL (you will get the SLO URL from the third-party service provider ). It will be called in the Single Logout(SLO) SAML workflow.
Step 10: In the Default Request Binding, select any of the binding values from the drop-down as per the service provider configuration. We support both types of binding values, and by default, it will be urn:oasis:names:tc:SAML:2.0:bindings:HTTP-POST.
Step 11: In Assertion Consumer Service Location, enter the location (you will get this from your service provider).
Step 12: In Assertion Consumer Service Binding, select the binding value as urn:oasis:names:tc:SAML:2.0:bindings:HTTP-POST from the drop-down.
Note: LoginRadius supports POST binding for assertion consumer service
Step 13: For the Relay State Parameter, enter RelayState.
Step 14: Configure the SAML Assertion NotOnOrAfter field in your LoginRadius settings. The options range from a minimum of 1 minute to a maximum of 70 minutes, allowing for flexible expiration times.
Note: The default value is set to 5 minutes.
Step 15: For App Audiences, enter EntityId of your Service provider.
Step 16: Select HTTPPost from the SSO Method.
Step 17: Click the ADD A SAML APP button to save the app settings.
Note: To renew the Identity Provider Certificate, click the designated "Renew Certificate" button. Once the renewal is completed, the updated expiry date and time will be promptly shown.
Configuring Service Provider Application
Once you have successfully configured the SAML app in LoginRadius Admin Console, you need to configure the third-party service provider.
Each third-party authentication system is unique and will require different configuration settings.
NOTE: If you have enabled or added a Custom Domain for your existing application, please be aware that you should replace the URL
https://<LoginRadius Site Name>.hub.loginradius.com/withhttps://<Your Custom Domain>/in fields such as Issuer, EntityID, Login and Logout URLs, or any fields having the same format.
Use the following values to configure your application for IDP-initiated login flow:
Step 1: Identity provider Login URL (SSO Endpoint): https://<LoginRadius Site Name>/service/saml/idp/login?appname=<SAMLAppName>.
Step 2: Use the LoginRadius certificate in your Service Provider application. To obtain the LoginRadius certificate, which is automatically generated from the backend, you can download the metadata file from the Admin Console after completing the configuration process.
After opening the downloaded metadata file, the certificate will be visible as below:

Step 3: In the Issuer or EntityID fields, enter your LoginRadius site URL (we can enter any other Entity ID URL, and the same value should be added for the APP AUDIENCES field in the LoginRadius Admin Console.):
https://<LoginRadius Site Name>.hub.loginradius.com/
Step 4: For SSO binding or Service Provider Initiated Request Binding, select HTTP-POST.
Step 5: Into the SAML Relay State, enter this value: redirect (Service Provider Specific).
Step 6: Enter the Logout URL: https://<LoginRadius Site Name>/service/saml/idp/logout?appname=<SAMLAppName>.
Note: If SP supports the Single Logout (SLO) feature, enter
https://<LoginRadius Site Name>/service/saml/idp/logout?appname=<SAMLAppName>for Logout URL in the SP application.