Okta Integration
LoginRadius allows your team members to log in to LoginRadius Admin Console using the Okta account. You can create a Single Sign-On (SSO) workflow between the Okta application and LoginRadius Admin Console using the federated SAML protocol.
Configuring SAML settings in the Okta application
You can use the Okta Admin Console and the Application Integration Wizard (AIW) to create your SSO integration inside the Okta organization associated with your account.
-
Sign in to your Okta Admin Console with administrative privileges.
-
In the Admin Console, go to Applications > Applications.
-
Click Create App Integration.
-
Select SAML 2.0 in the Sign-in method section.
-
Click Next.
-
On the General Settings tab, enter a name for your integration and optionally upload a logo. You can also choose to hide the integration from your end-user's Okta dashboard or mobile app. Click Next.
-
In the Single sign on URL field, enter
https://lr.hub.loginradius.com/saml/serviceprovider/AdfsACS.aspx(LoginRadius Assertion Consumer Service (ACS) URL). -
Enter
https://lr.hub.loginradius.com/in the Audience URI (SP Entity ID) field. -
Enter
https://accounts.loginradius.com/in the Default RelayState field. -
Choose the Name ID format and Application username that must be sent to your application in the SAML response (for example, EmailAddress and Email) or leave the defaults.

-
For SPinitiated SAML workflow, click on Advanced Settings in the Okta account and complete the Advanced Settings screen with the following (this step is only required for SPinitiated SAML workflow)
-
Add Single Logout URL as https://adminconsole.loginradius.com/logout
-
Add SP Issuer as
https://lr.hub.loginradius.com/ -
Upload the slo.cert file in Signature Certificate.
Note: For Signature Certificate file, goto Admin Console > tenant setting > Team SSO and copy Service Provider Certificate value into a file and save it as slo.cert.

-
-
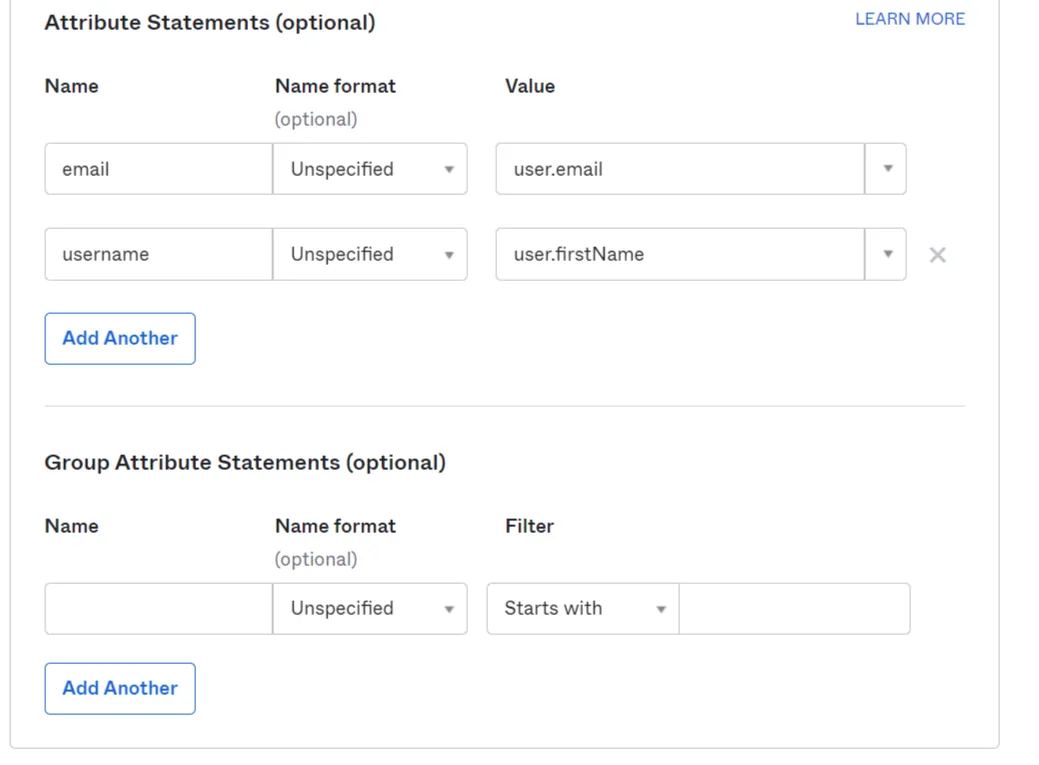
In the Attribute Statements (optional) section, enter the SAML attributes to be shared with your application.
Note: The value of key and the name field on the OKTA Should be same. If not, it will not return the value.
For example:
| Name ID | Key value |
|---|---|
| FirstName | user.firstName |
| LastName | user.lastName |
| user.email |
13. Leave Group Attribute Statements (optional) blank
Configuring LoginRadius Admin Console
-
Log in to your LoginRadius Admin Console.
-
Navigate to your team management section in LoginRadius Admin Console from here.
-
Click on SAML under the Single Sign-On tab.
-
Fill in the below form as:
-
Select any flow (Service Provider Initiated Login or Identity Provider Initiated Login) from Login Flow.
-
Enter
urn:oasis:names:tc:SAML:2.0:bindings:HTTP-POSTin the ID Provider Binding field. -
In ID Provider Location enter the Identity Provider Login URL which you will get from the Okta dashboard or metadata file.
-
In ID Provider Logout URL, enter the Identity Provider Login URL value which you will get from the Okta dashboard or metadata file, e.g.,
https://<companyname>.okta.com/ -
ID Provider Certificate: enter the Okta SAML certificate value.
-
Enter LoginRadius' Certificate and Key in SERVICE PROVIDER CERTIFICATE and SERVICE PROVIDER CERTIFICATE.
Note: Certificate and Key can be generated using online tools, with Bits and Digest Algorithm 2056, SHA256 respectively.The certificate and key should be entered with the header/footer as mentioned below:
Certificate
-----BEGIN CERTIFICATE-----
and
-----END CERTIFICATE-----
Key
-----BEGIN RSA KEY-----
and
-----END RSA KEY------
For DATA MAPPING select the LoginRadius' fields (SP fields) and enter the corresponding Okta fields, e.g.
Note: The value of the key and the name field on the OKTA Should be the same. If not it will not return the value
-
| Fields | Profile Key |
|---|---|
| FullName | username |
- Once all the required fields are completed, scroll down and hit "Update".
NOTE: You should have an account with the same email address in your SAML application as well as in LoginRadius before using your SAML application to login to the LoginRadius Admin Console.
Login using OKTA SSO
NOTE: LoginRadius leverages the values saved in the cookies at the time of SAML initiation, hence, you need to initiate login from the LR Admin Console using the steps below.
-
Open https://console.loginradius.com/login in your browser and click Fed SSO Log in.

-
Enter your LoginRadius App Name and click Log In.

-
A pop-up will be displayed asking for Okta credentials.

-
After authentication, the pop-up will be closed and you will be logged into the LoginRadius Admin Console.