Salesforce Setup Document in Admin Console
This document describes the step by step procedure to setup Salesforce as IDP and LoginRadius Admin Console as an SP in SAML workflow. Please see here for more details on SAML workflow
Configure SAML settings in Salesforce Application
Please follow the steps mentioned below:
- Login into your Salesforce account.
- Click on Setup available on the top right.
- Move to the Administer section in the left Panel.
- Click on My domain under Domain Management.
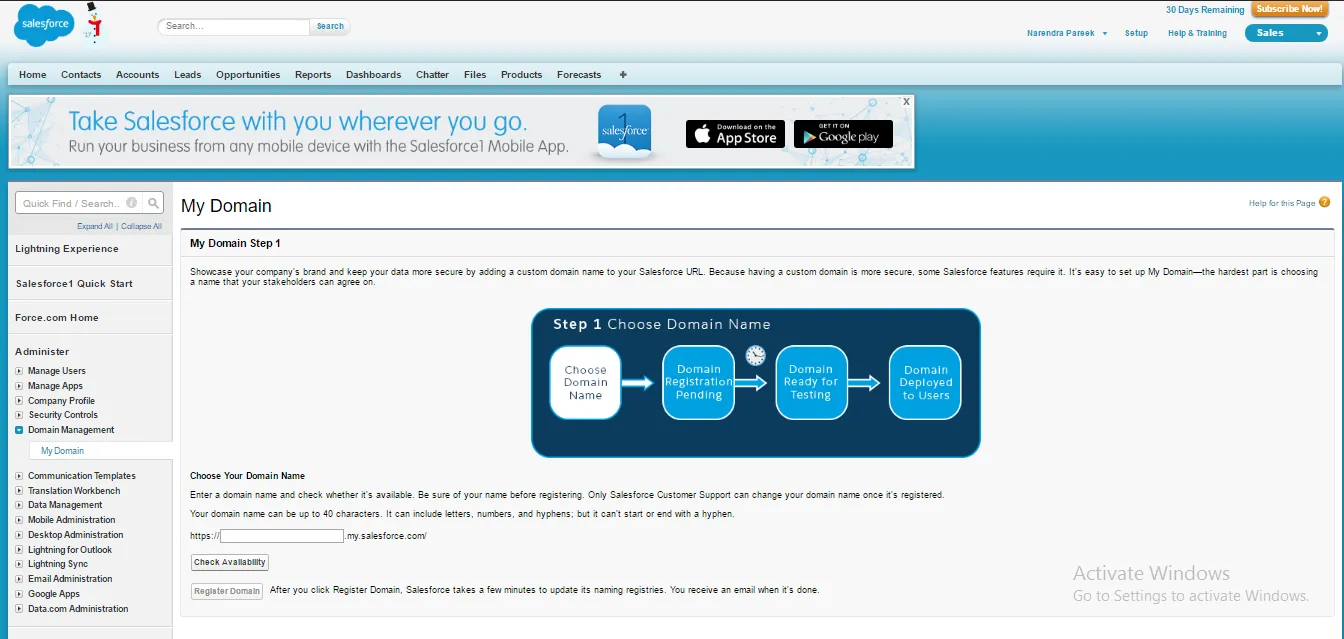
- Enter your Domain name and click on Register Domain.
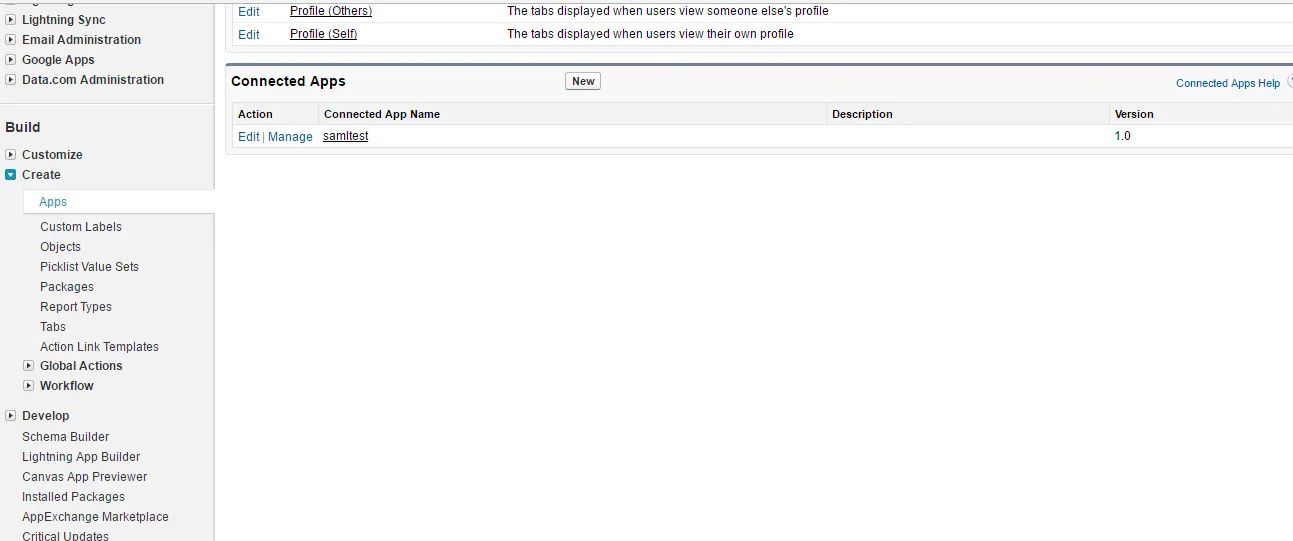
- Now Move to Buildsection in the left Panel.
- Click on **Apps **under Create.
-
Click on New button Under Connected Apps section.
-
Enter the following values for Basic Information :
-
Enter the connected app’s name. This name is displayed in the App Manager and on its App Launcher tile.
-
Enter the API name used when referring to your app from a program. It defaults to a version of the name without spaces.
-
Enter the contact email for Salesforce to use when contacting you or your support team.
-
Enter the contact phone for Salesforce to use in case we want to contact you.
-
To display your logo on the App Launcher tile, enter a logo image URL. Your logo also appears on the consent page that users see when authenticating. The URL must use HTTPS. Use a GIF, JPG, or PNG file.
-
If you have a web page with more information about your app, provide an info URL.
-
To display a description on the connected app’s App Launcher tile, enter a description.
-
-
Now fill in all the details given below:
-
Enter
https://lr.hub.loginradius.comin Start URL. -
Enable SAML.
-
Enter
https://lr.hub.loginradius.com/in Entity Id. -
Enter
https://lr.hub.loginradius.com/saml/serviceprovider/AdfsACS.aspxin ACS URL. -
To allow users to be logged out of the LoginRadius application when they log out of Salesforce as an identity provider, select Enable Single Logout.
-
If you selected Enable Single Logout, enter https://console.loginradius.com/logout.
-
Select Name Id format urn:oasis:names:tc:SAML:2.0:nameid-format:unspecified.
-
Select the IdP Certificate Default IDP certificate.
-
Select Verify Request Signatures only if you want to use Service Provider Initiated Login Flow for Login flow. Please see here for more details on SP initiated Login Flow. If you have selected Verify Request Signatures, get the LoginRadius certificate value and save it as with any filename e.g.filename.cert on your computer. Select the Choose File and browse to the filename.cert [i.e The LoginRadius Certificate] and upload the file. Please see here for obtaining the LoginRadius certificate.
-
Save the Settings.
-
Now Move to Administer section and Click Identity Provider under Security Controls.
-
Enable Identity Provider
-
Download Certificate and MetaData

-
Enable Salesforce Users to access LoginRadius application
Go to 'Manager Users -> Users' and click edit on the user you are testing. Click profile name link .e.g System Administrator. This takes to profile page. You can scroll below to 'Connected App Access' and you would see that the access is not given. Give the access to SAML app by clicking the edit profile at the top of the page.
Configuring LoginRadius
Steps:
-
Log in to your LoginRadius account.
-
Navigate to your team management section in LoginRadius Admin Console from here.
-
Click on Salesforce under the Single Sign-On tab.
-
Here, you can see two options.
-
Configure App
-
Configure from Metadata
-
Configure App
Step-1: When you choose to configure through the app section method, the you need to fill in the details in the form:
Note:
- To renew the Service Provider Certificate, click the designated "Renew Certificate" button. Once the renewal is completed, the updated expiry date and time will be promptly shown.
- If you select the Switch off Email/Password Login instead of Enable only SSO option, then login with Email/Password will not work, and only SSO Login will work to access LoginRadius Admin Console.
Step-2: Fill in the below form as:
-
Select your desired flow in the LOGIN FLOW dropdown. Select Identity Provider Initiated Login for IdP Initiated SAML workflow or select Service Provider Initiated Login for SP Initiated SAML workflow. Please see the SAML overview document for more details.
-
In ID Provider Binding, enter urn:oasis:names:tc:SAML:2.0:bindings:HTTP-POST.
-
In ID Provider Location, enter the IdP-Initiated Login URL which you will get from the Salesforce dashboard (Setup->Administrater->Manage Apps->Connected Apps).
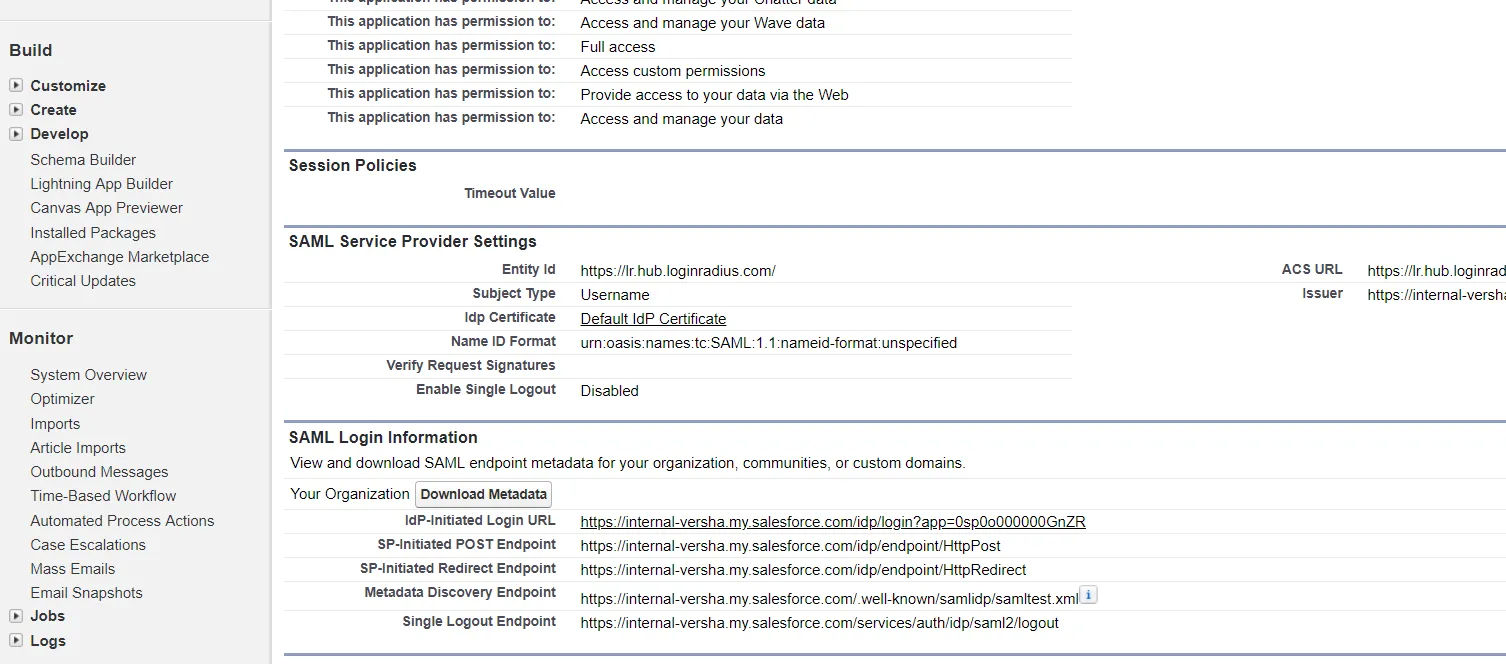
-
In ID Provider Logout Url, enter the Single Logout Endpoint from the Salesforce dashboard (Setup->Administrater->Manage Apps->Connected Apps).
-
In ID Provider Certificate, enter the Salesforce certificate from the Salesforce dashboard (Setup->Administrater->Manage Apps->Connected Apps).
-
In Service Provider Certificate and Service Provider Certificate key enter LoginRadius certificate and key. Please see here for how to generate the LoginRadius certificate and key.
-
For DATA MAPPING select the LoginRadius' fields (SP fields) and enter the corresponding Salesforce fields (IdP fields).
| Fields | Profile Key |
|---|---|
| FullName | username |
Note: The customer should have an account with the same email address in Salesforce as well as in LoginRadius before using the Salesforce account to login to the LoginRadius Admin Console.
Configure From Metadata
If you are looking to configure this by uploading a Metadata file:
After you have clicked on the Configure from Metadata file, you are required to upload the XML file, which consists of metadata for SSO setup, and after successful upload, click Add button.